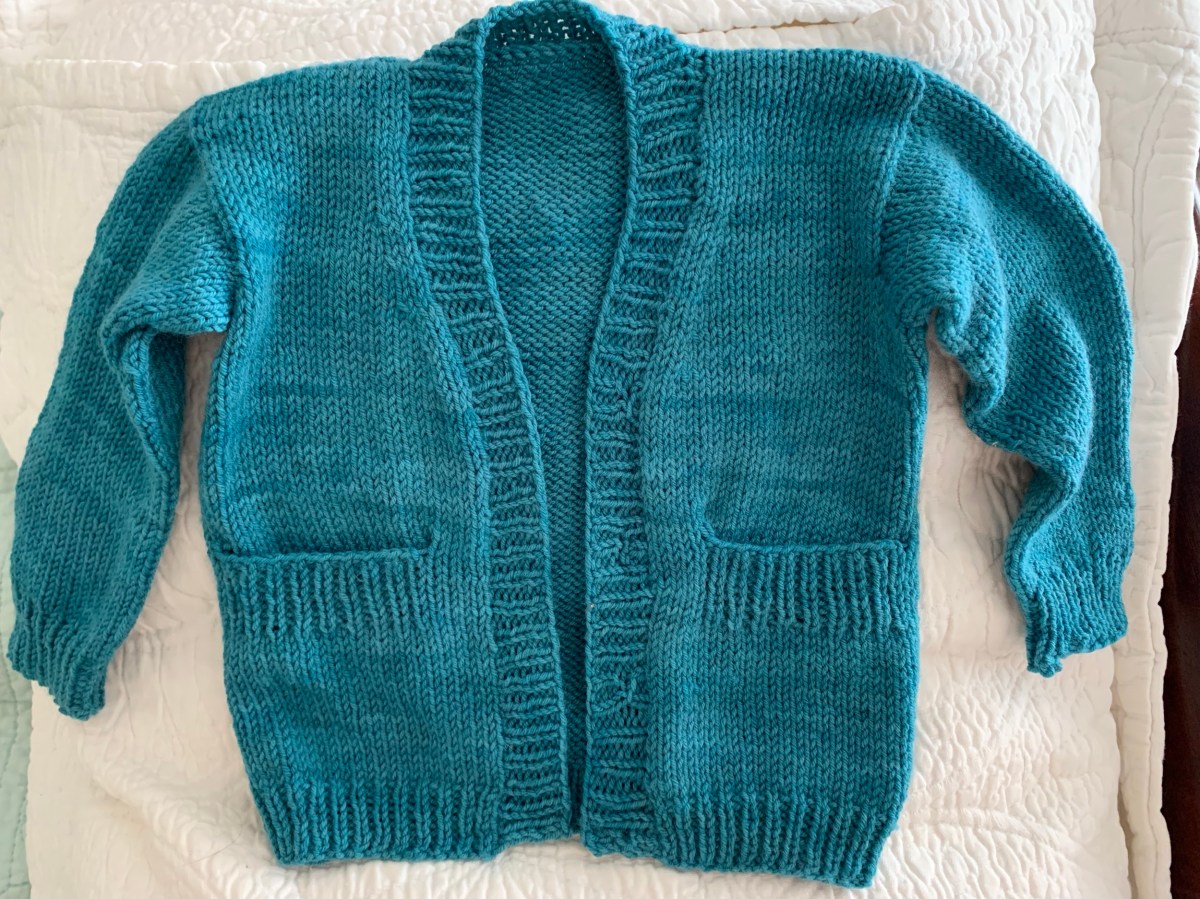
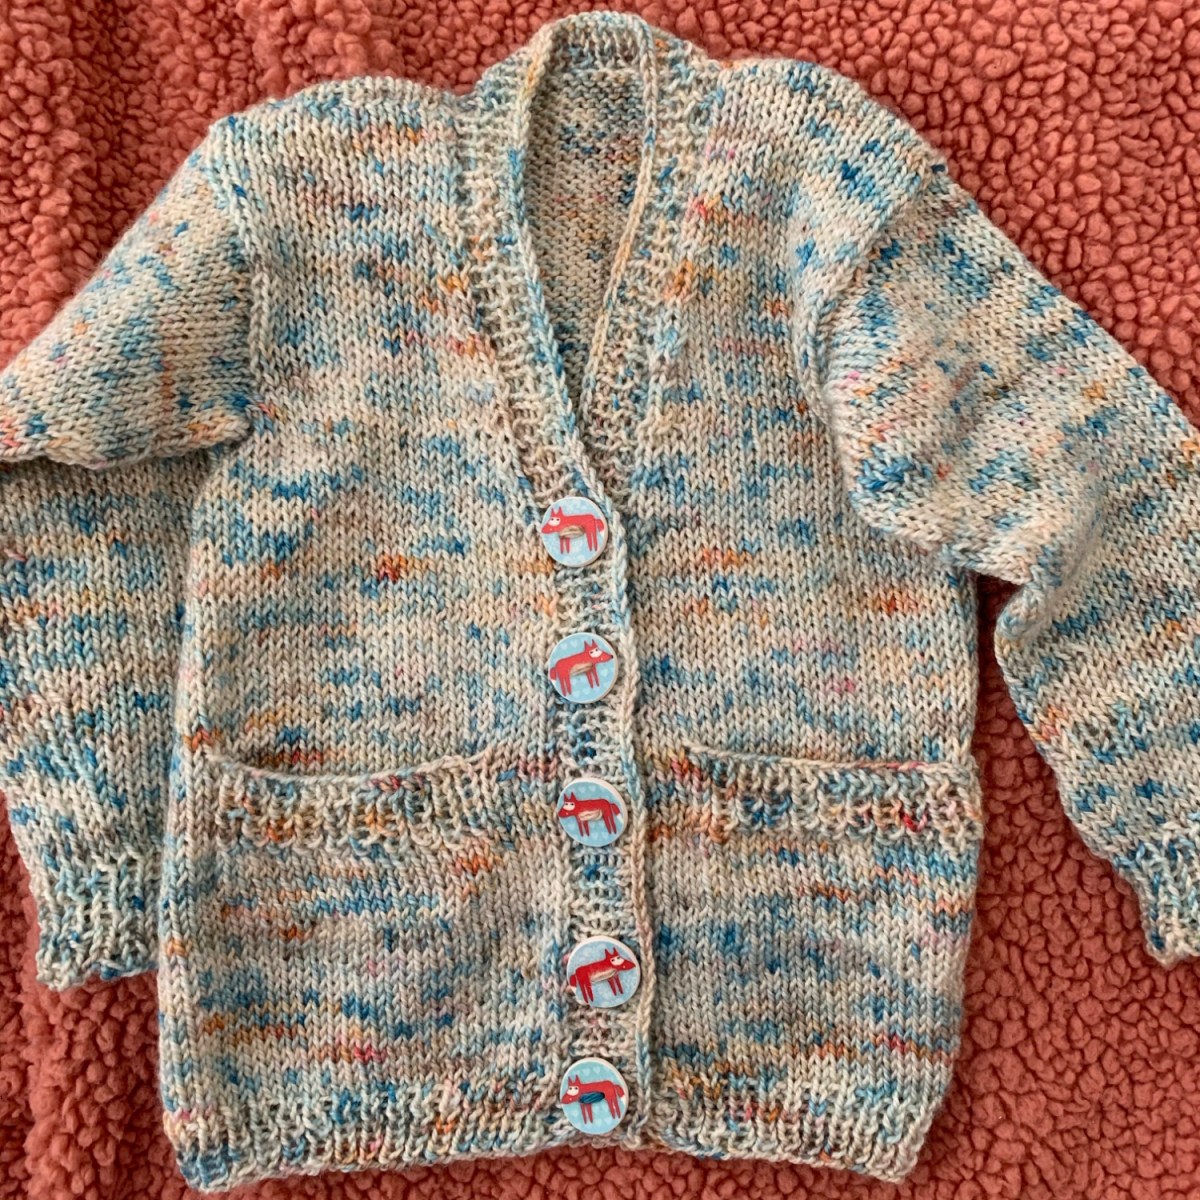
Knitting a little Playdate cardigan for a new baby boy. Blue “Putnam” yarn from Miss Babs is perfect for this little gift knit.
I’m so happy to have a reason to knit the Playdate Cardigan again! This is such an awesome pattern, with very good instructions from Tin Can Knits. The first Playdate I knit taught me about pockets and button bands. I think it was also one of the first times I did the Kitchener stitch.
Now, I am knitting this cute pattern again for a baby boy. The first Playdate (pattern linked down the page) was not for any particular child and I still have the little sweater. This time a good friend’s little boy grand-baby is arriving in December and he will be the recipeint.
The Yarn
I chose blue Putnam yarn, in color “Coos Bay”, from Miss Babs. The yarn is made up of 75% merino wool and 25% nylon, and is machine washable. Skein yardage is 400 and this size (3-6 months) sweater uses 350. (If you want to knit with some nice yarn, check out Miss Babs.)
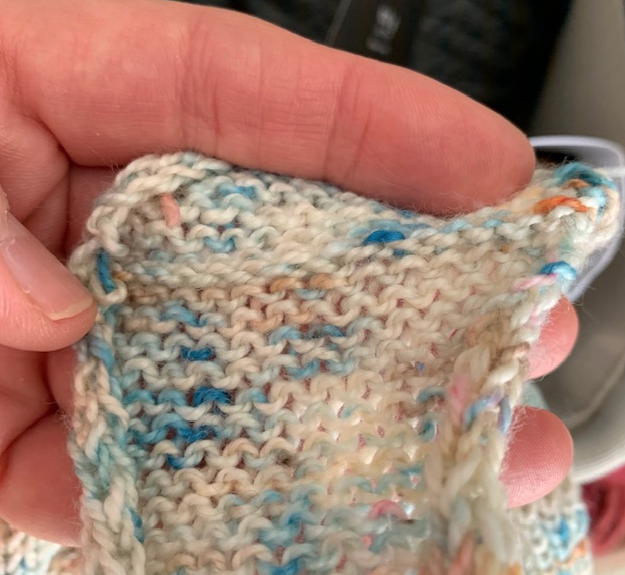
October 21st, I began the project using the Old Norwegian cast-on. First, I had to knit the two pocket liners and then I began the body.
Pockets are knit first
When I knit this sweater before, I used some merino wool with silk in it and the yarn was very slippery. This yarn is more suitable for a sweater. Playdate #1 page.
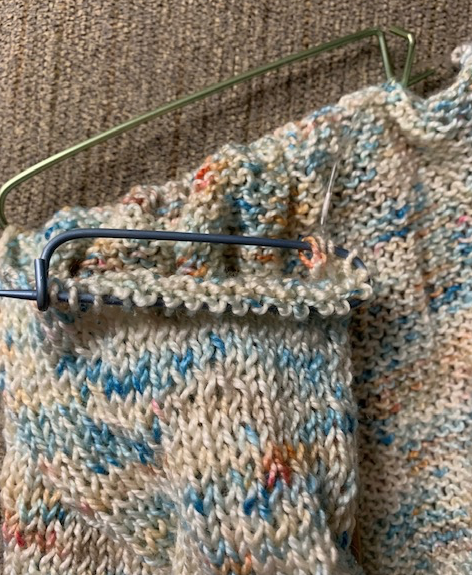
The more I knit with this yarn, the more I really like it! The shoulders of the Playdate sweater have been grafted using the Kitchener stitch. One sleeve is nearly complete.
I dislike using DPNs and began the sleeve with a 9-inch circular. Eventually I had to switch to wood DPNs but it is not a problem as there is plenty of room on each needle for the stitches.
Sleeve #1
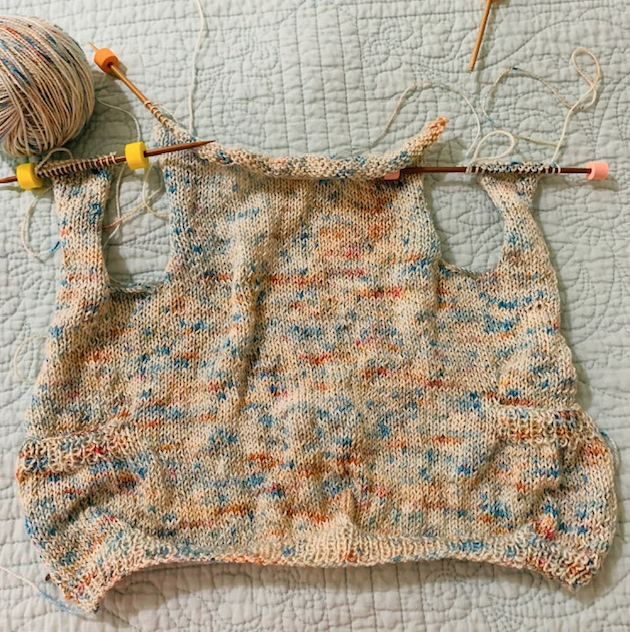
Back and shoulders being worked
Cute little pockets
The inside of pocket which will be stitched down later.
Button Selection
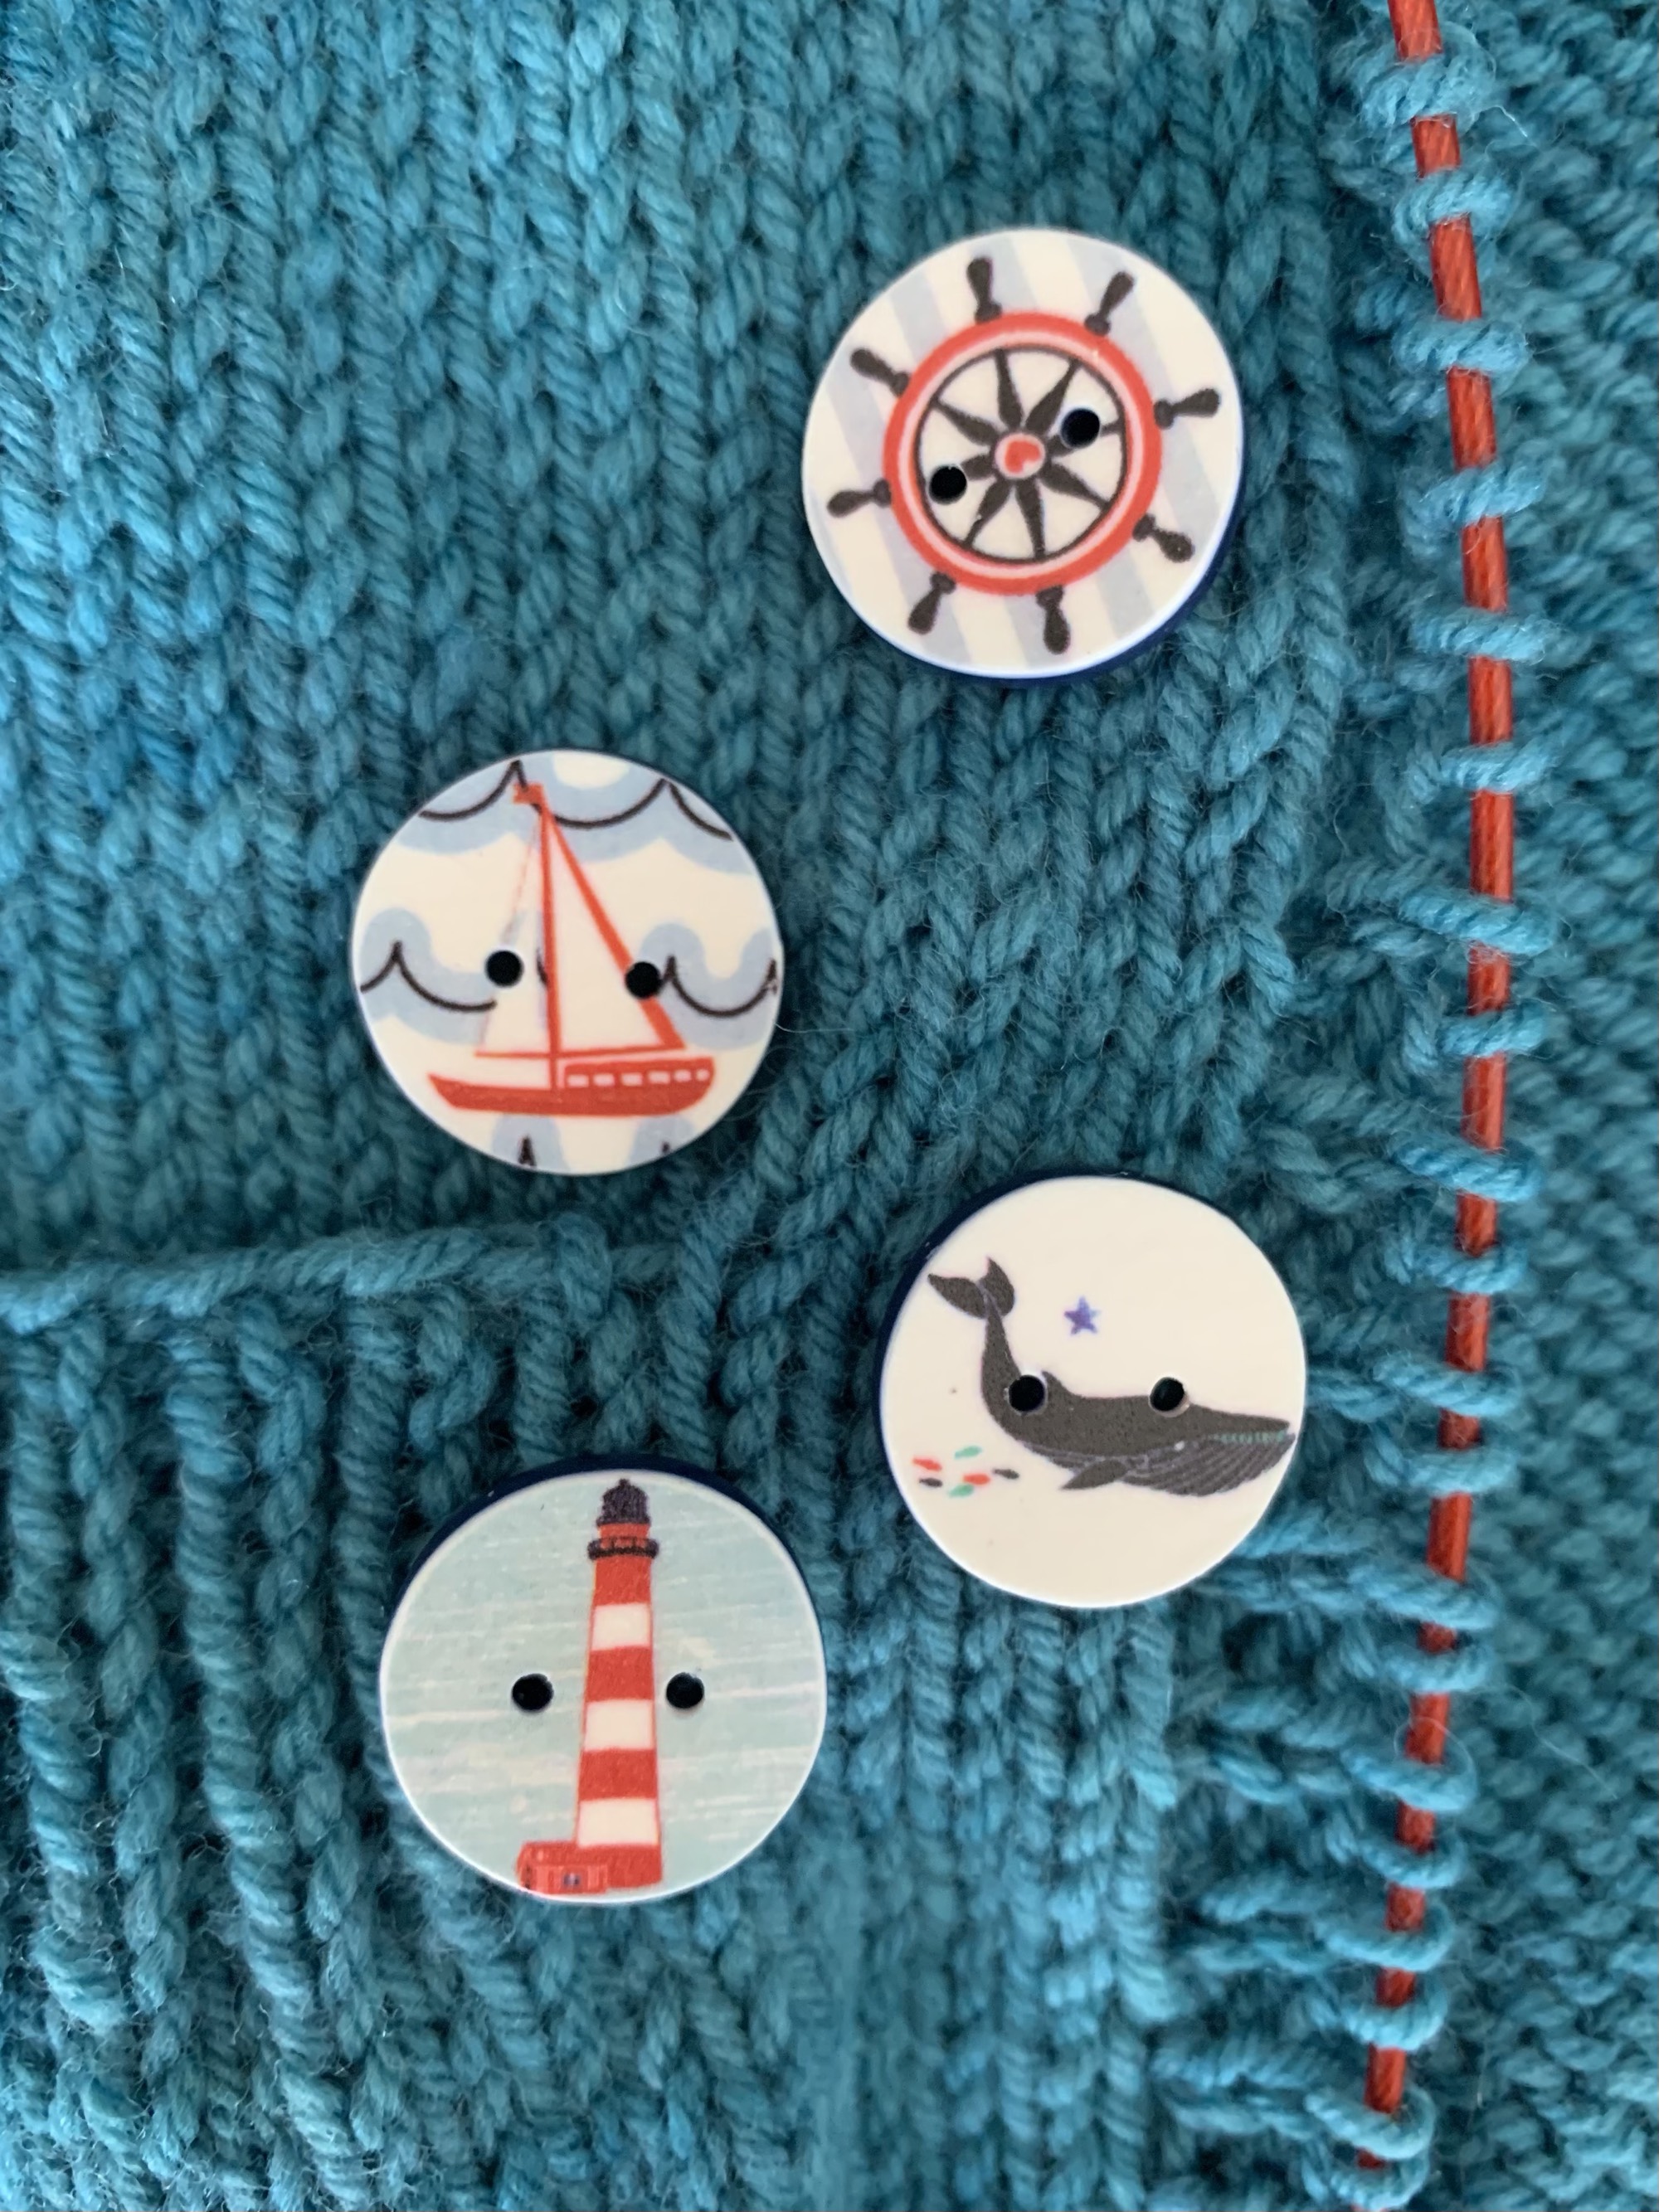
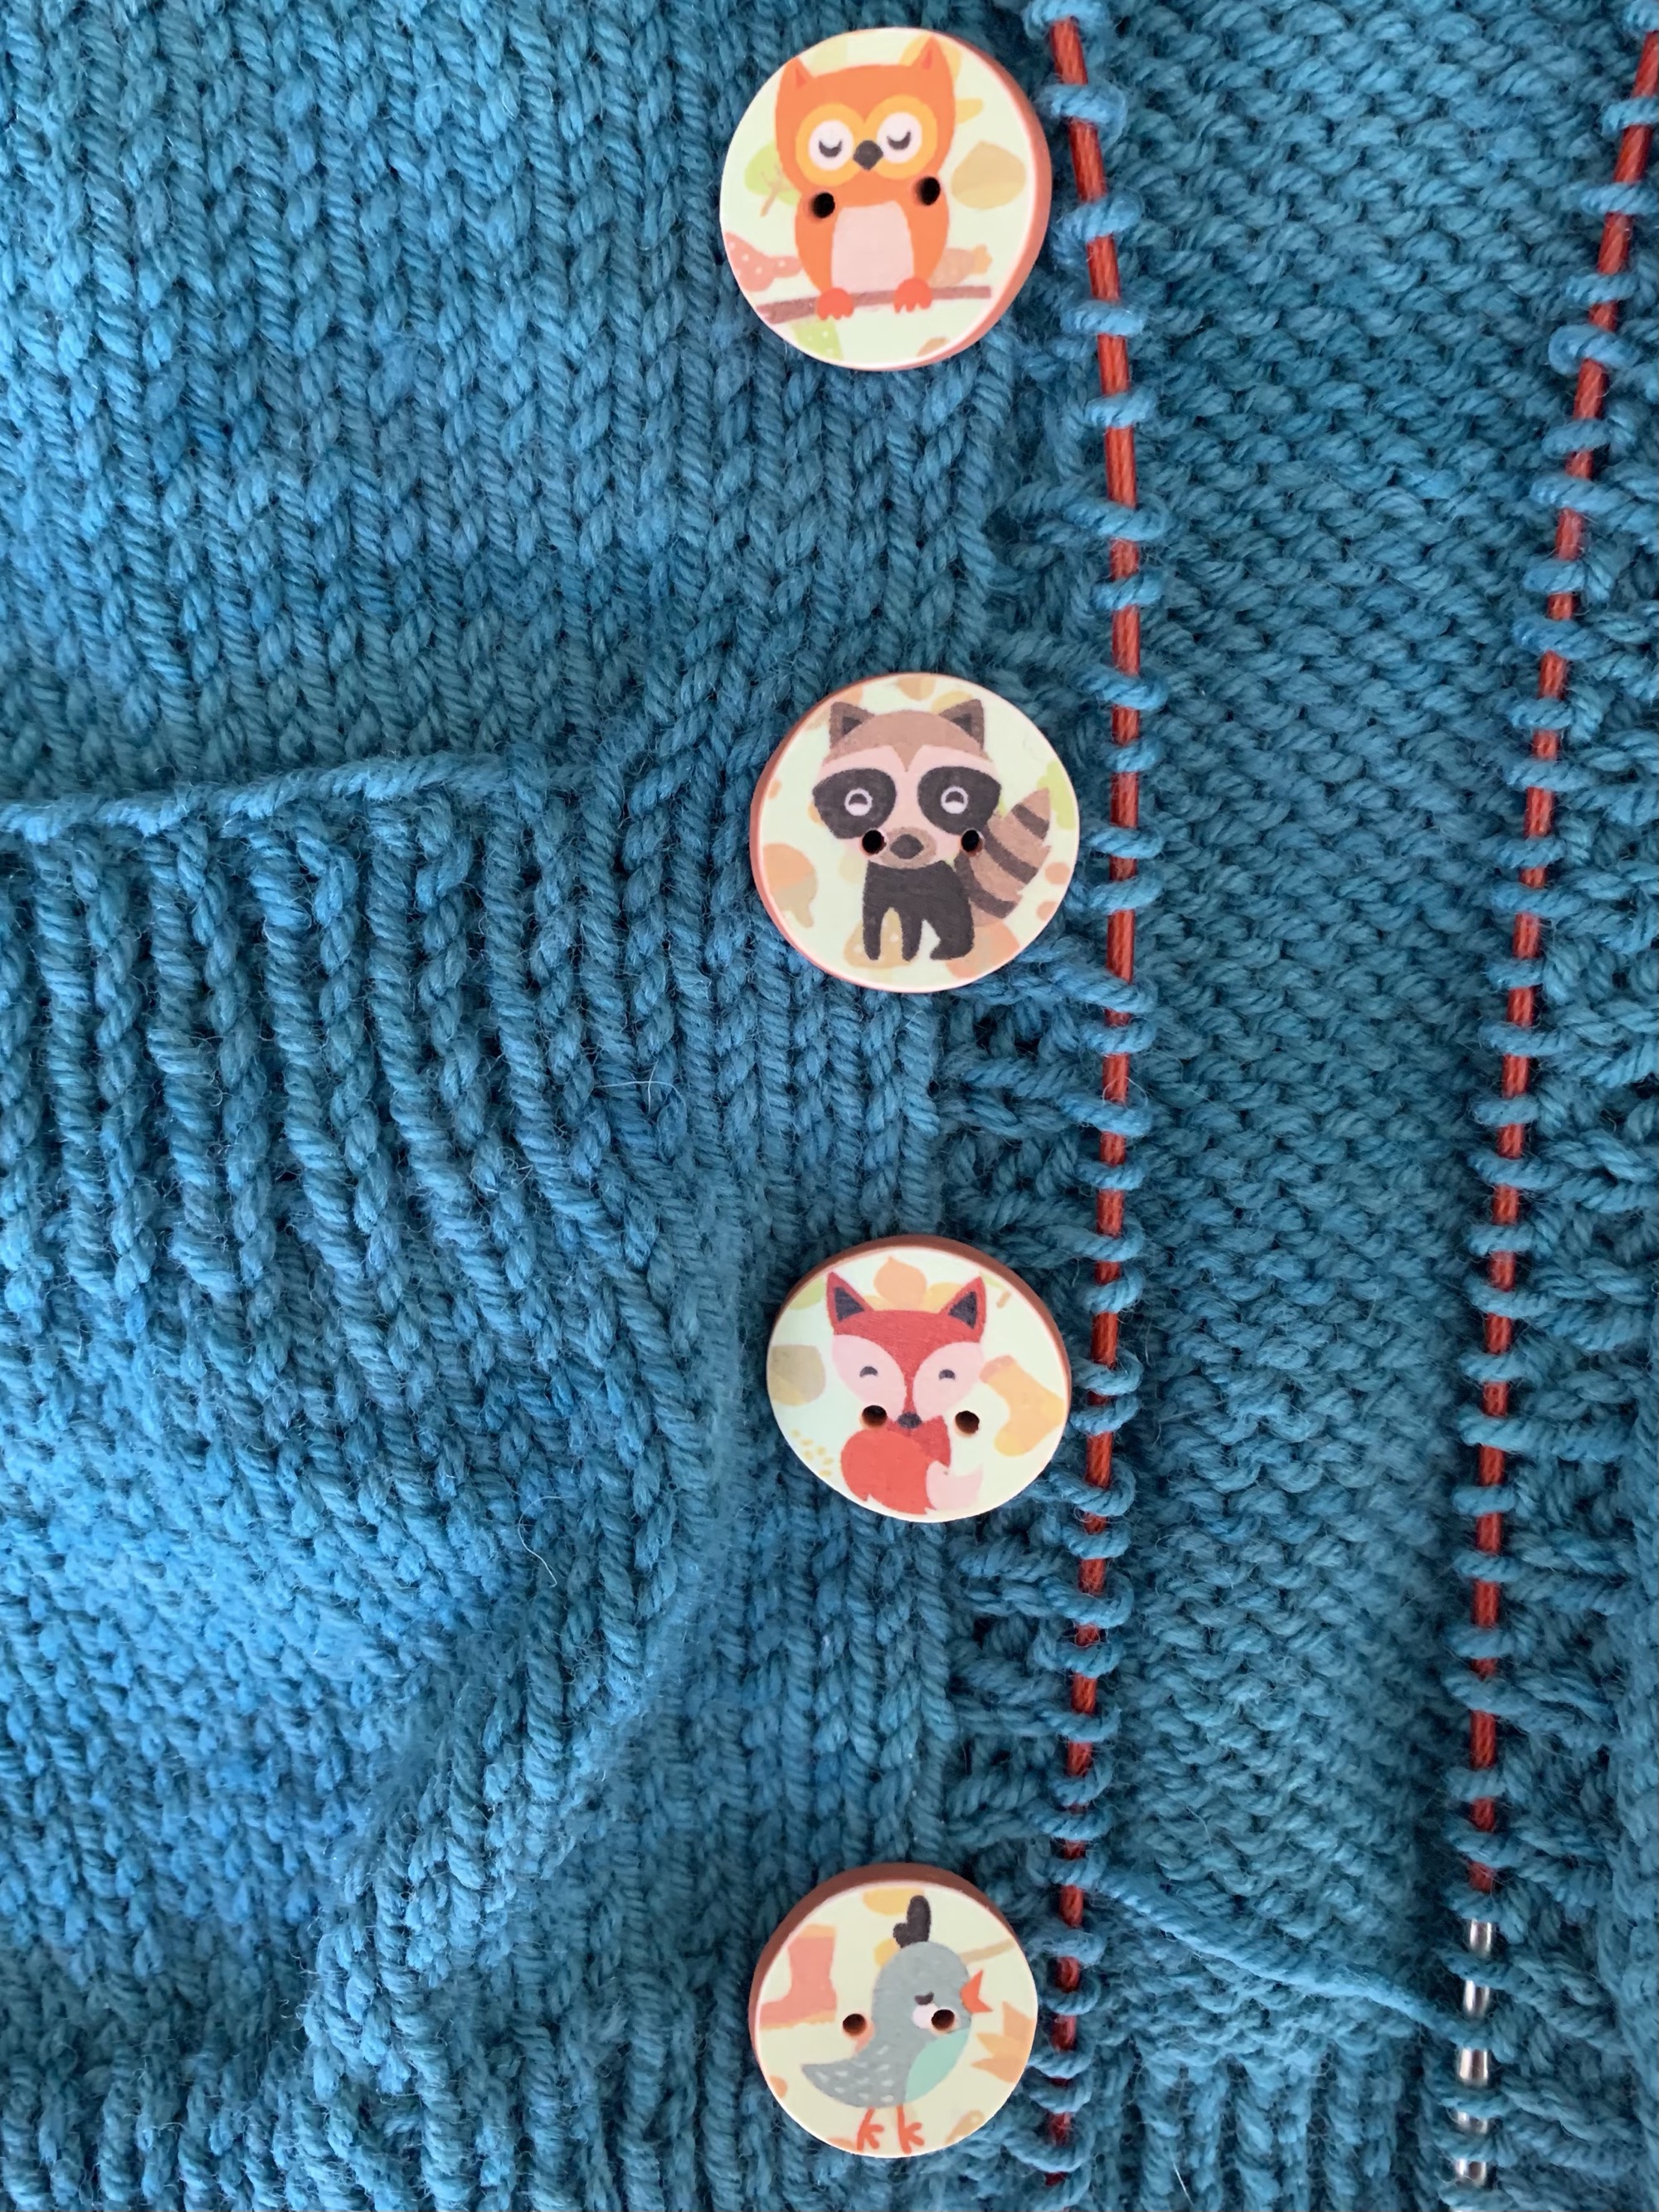
Because of the small sweater size, I plan to do only four buttons. My choices are nautical designs, little tractors, or cute animals. I’m leaning toward the animals.
Once the pockets are sewn up and the buttons are added this little sweater will be ready to go. I have already washed and blocked it. Quite a bit of yarn is left which means a little hat or baby socks could be knit to match.
Writing a blog, sharing photos, and doing research and making links takes time. Lately I don’t think the time spent doing all that is worth enough to continue. I have stopped writing…
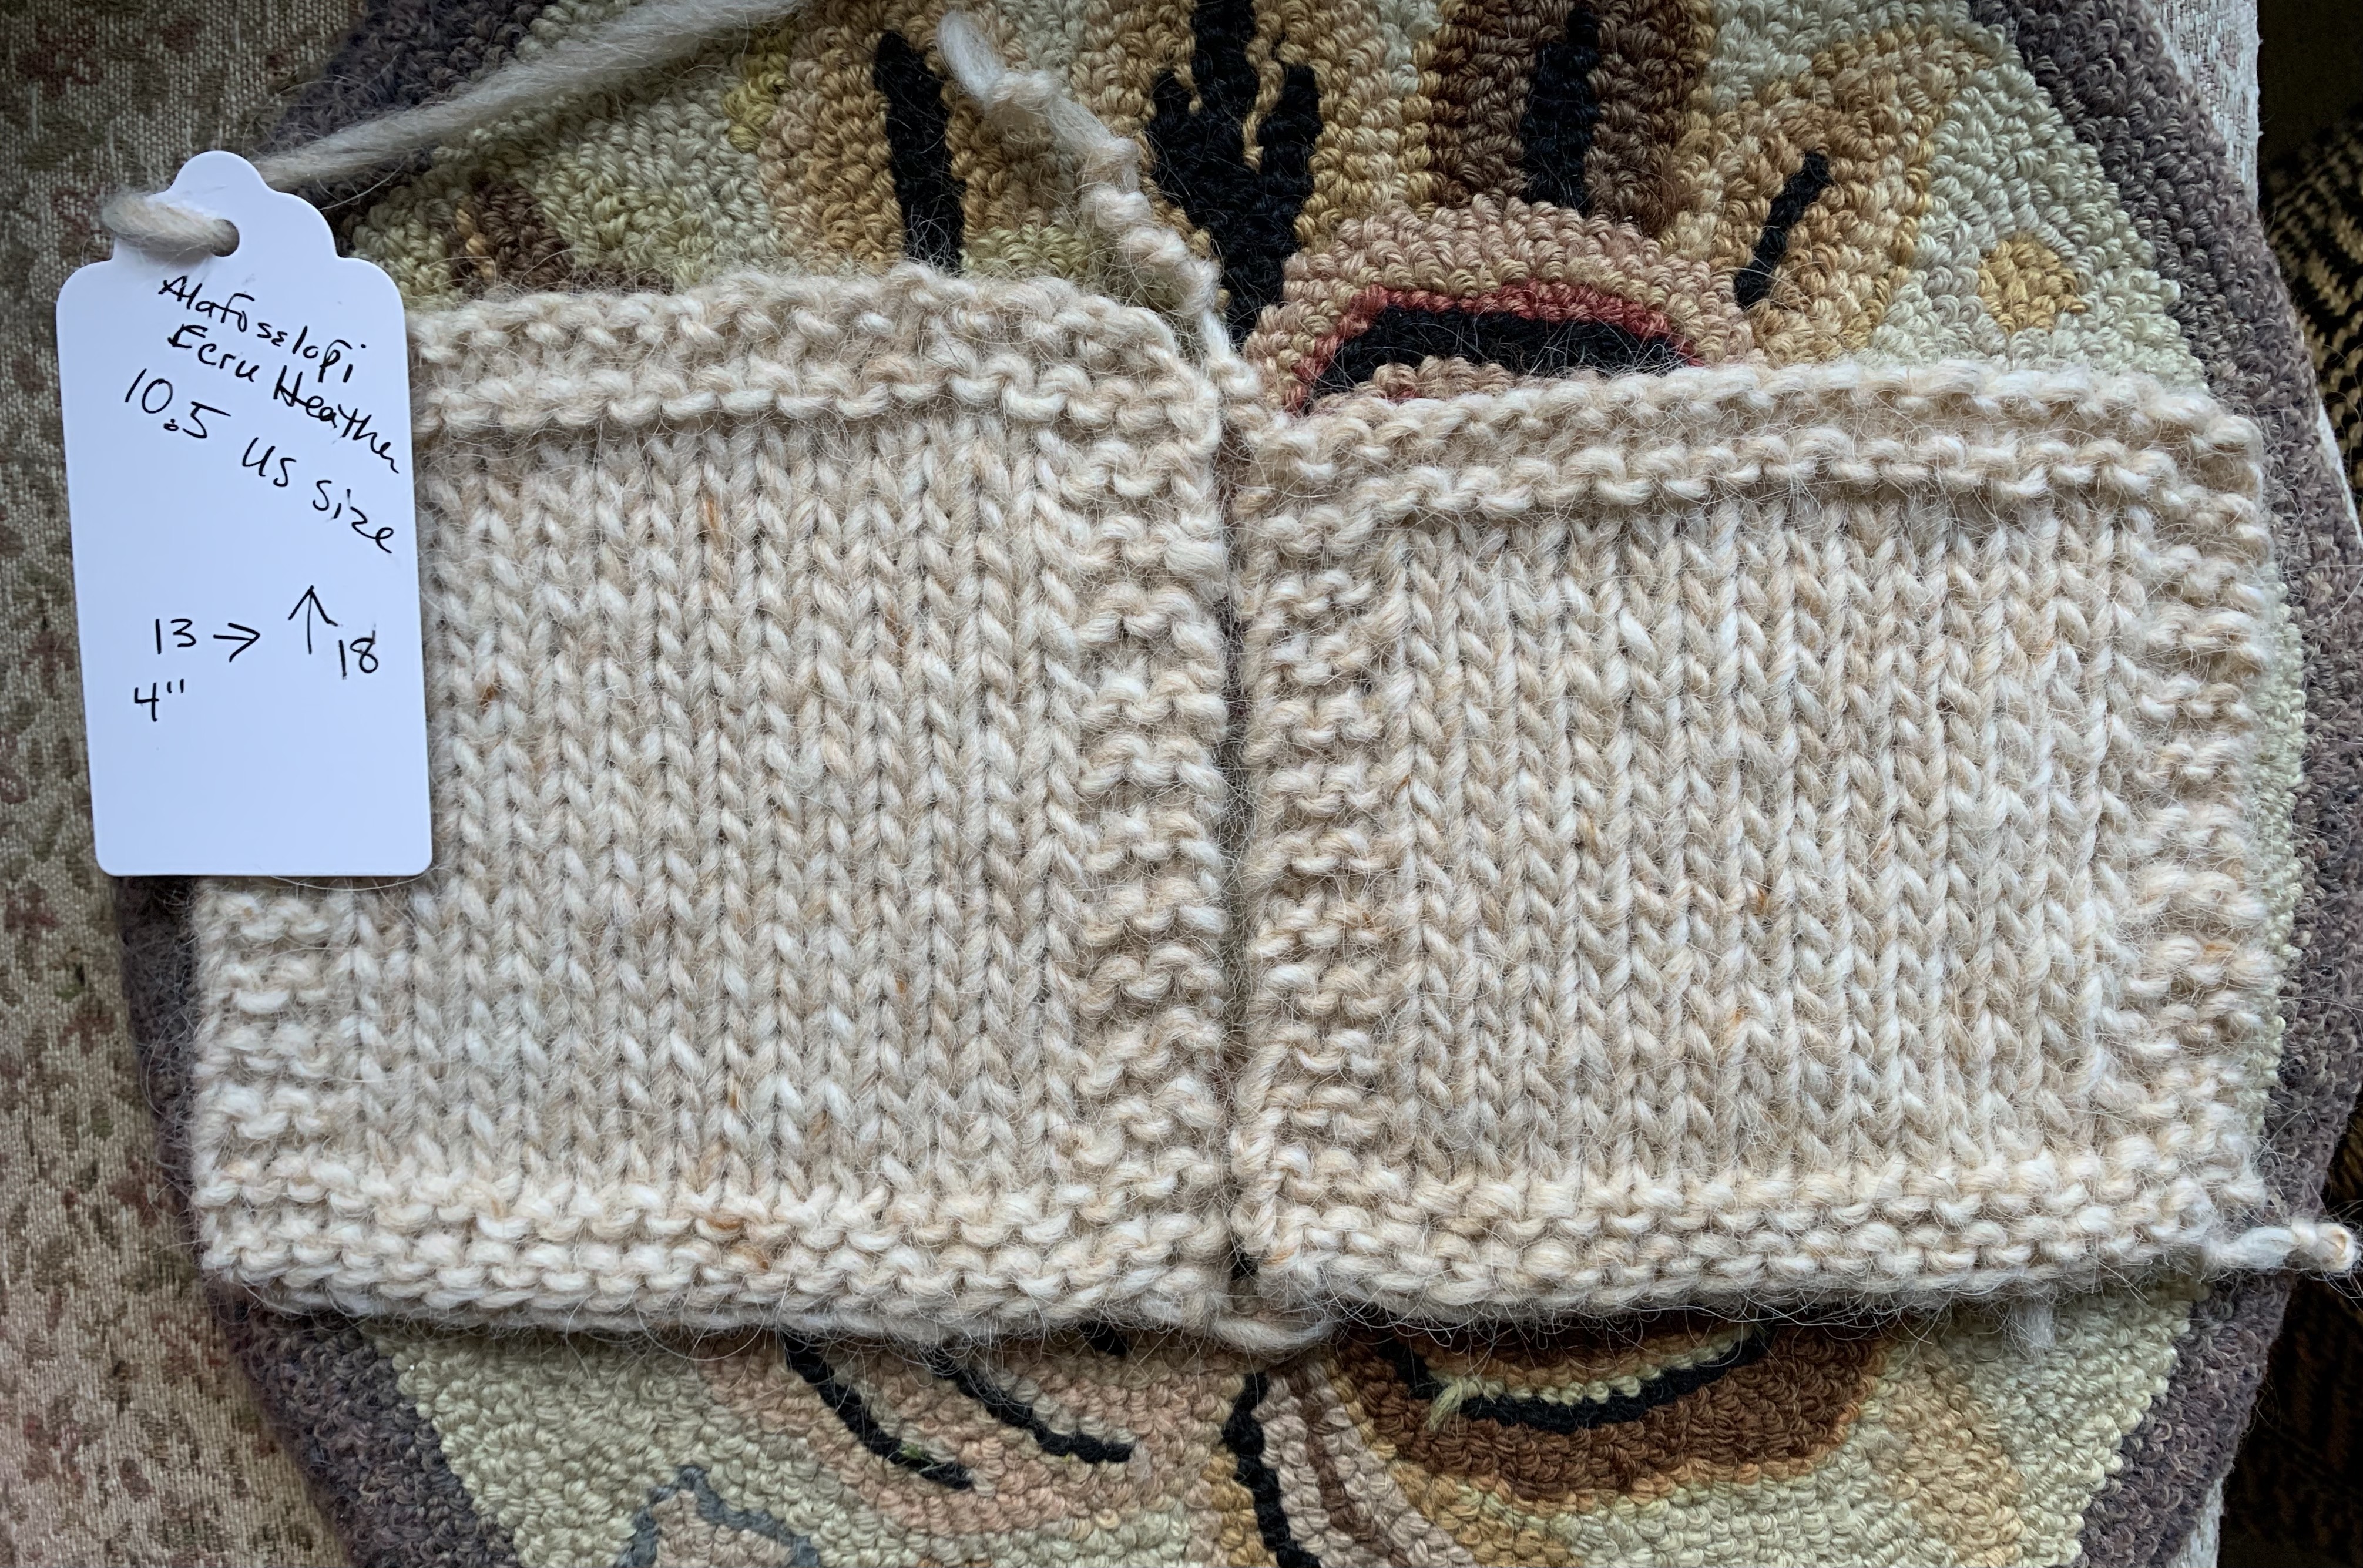
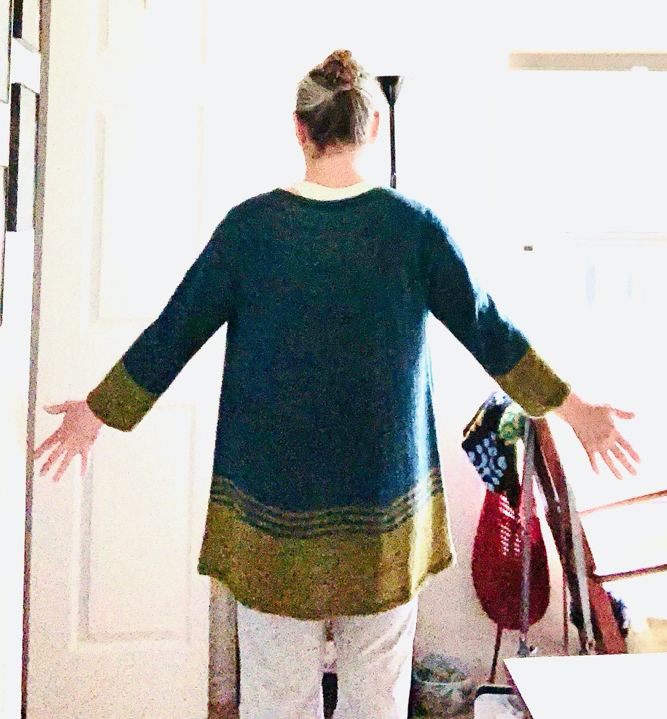
My son worked Thanksgiving Day and since it’s only me and him, I spent the day getting a new knitting project on the needles (I finished it on New Years Eve). The Carbeth Cardigan (Ravelry pattern page) is a design by KDD and Co., Kate Davies Designs. The pattern suggests holding two yarns together, but I chose woolly Alafosslopi yarn for this garment.
Lykke wood needlesKnitting the body
I did a swatch in size 10.5 with Alafosslopi yarn which was too large, so knit up another in size 10. That one turned out to match gauge exactly. I’m knitting this sweater in Icelandic wool which is bulky weight. Color is Ecru Heather. I will also need below gauge needles for the ribbing, neck and front bands.
Sweater Construction
I began with a sleeve and since I did not have a “below gauge needle” I knit the rib with size 10. The cuff is long. The body is knit, bottom up, and then everything is attached. This makes sleeve length a bit tough to figure. I knit 19.5 inches and the pattern called for 18. I’m glad I went longer. This pattern seems to have been written for a mini-sized person. I am 5’5” so pretty average.
Here (below) I have reached the point where my decreases are almost done. The back of the neck seems low, so I will try to figure out my own short rows to bring it up. Other knitters have done this and I can see why.
Adding Short Rows to the Back of the Sweater
I watched this video to figure out my short row placement, but added a life line (good video at Very Pink Knits about adding a life line) before I got to this point. I’ve never tried to figure out my own short row placement and wanted to be able to rip them out if need be.
The blue yarn is my lifeline. Above that, in the center of the back, see the raised part which happened when I added short rows. I’m very glad I did this as the sweater seems to fit better.
Short Row Placement
I marked off the stitches for my short rows one row too early. Next time: Do short rows after the last row where the two center back stitches are purled together (or knit together for some sizes) and markers are removed. This is the row just before the neck decreases begin. **Another knitter made a note that she did the short rows after the decreases. This may work better as my short rows left a bit of a pucker in one spot. I didn’t notice this until AFTER the collar was worked, and I was not ripping that far back!
Adding a life linePlacement for short row turnsLife line and short rows visible with neck ribbing begunShort rows beneath neck in back
The Front Bands and Neck Ribbing
There is a lot of putting stitches on hold in this sweater. Once the joining of the sleeves and body and yoke knitting is done, stitches are held until time to knit the collar. The collar and front ribbing is knit on the smaller gauge needles. I have one size 9, 32-inch needle which I needed for all of this. The front ribbing has to be completed before the collar is knit.
The front bands were difficult for me as far as trying to pick up the right amount of stitches to make the top three work. Also, because I knit the body two inches longer, I needed to pick up extra stitches and not what the pattern said..! I ended up doing about 80 stitches on each band – which were way too many – but I won’t realize this until it’s way too late.
The button loops are added with an i-cord edging so no buttonholes were made.
Front ribbing on hold with neck ribbing begun
Neck Ribbing
The neck stitches are knit in ribbing and will be folded over to the inside and attached. I followed the advice of other knitters and put a softer yarn inside the collar. I used gray Quarry yarn because I had it, and it matches the thickness of the Alafosslopi.
Knitting the neck was easy but then it had to be folded and attached inside. I used a size 5, long circular needle with pointed tip to pick up those stitches. You really need much smaller needle to make this easier. This video helped me see what exactly I should be doing as far as picking up stitches. I picked up two stitches for each knit and each purl section and then two stitches on each end. This matches the number of rib stitches to do the bind off – that number has to match the number knit for the ribbing! Purl Soho has a good 3-needle bind-off video if needed.
I used a much smaller size needle – size 5 US when picking up those stitches. Then I used a size 9 US DPN to knit the bind-off. I began binding off with a 5 DPN but the stitches seemed very tight. (A helpful note from the designer about all this would have been very nice!)
pick up stitchesReady to bind off3-needle bind off doneCollar turned and attachedAttaching the Ribbed Collar
Explaining Pattern Section 8
I got to section 8 in the Carbeth pattern and was stumped. After some searching, I found a good explanation in the Ravelry forum, because it seems other knitters were also stumped.
The point in section 8 is to close up that hole in the collar, which was made by folding it over, by picking up stitches along the edge. Then, the collar and front band becomes one long set of stitches.
My band is being held by scrap yarn so I needed to pick up all those band stitches also. Now the needle is full, from top of collar to bottom of sweater. Go back to the top (on one side, the bottom on the other) and begin the i-cord bind off.
Although this video, by Andrea Mowry, is not exactly how the i-cord is done in the Carbeth pattern, it gave me an idea of what I needed to do, only with a different amount of stitches. Begin the Carbeth bind-off by adding two stitches to the LEFT HAND NEEDLE, and continue as the pattern says.
Firsts For Me While Knitting This Sweater
I did my very first spit splice using this yarn! It was pretty cool and I will definitely be using it more often when knitting with wool.
The lld decrease on the wrong side. Clear directions are given in the pattern abbreviations page.
Added my own short rows – successfully – for the most part. I’m very glad I did this because the sweater would not have been “high” enough around my shoulders and neck otherwise. I’m very surprised the pattern didn’t include short rows as many knitters added them in on their own.
It was not my first 3-needle bind-off, but the first time I’d done it to tack down a double collar.
I-cord rib and buttonholes. This was pretty easy to do, but the fact that I had picked up too many stitches (way back) for the bands, made the ribbing wavy. At this point I was frustrated.
I am trying to fix this with button placement and blocking. A simple note from the designer about how to pick up those front stitches – such as “pick up 2 stitches for every 3” – or something, would have helped. She does say how many to pick up – if you follow the pattern exactly and want a cropped sweater.
Final Review of Knitting the Carbeth Cardigan
Some previous knitters of this pattern mentioned that the sweater runs small. I would agree. I made my sleeves and body longer.
In my opinion, it is necessary to add those short rows at the back too. My gauge swatch was exact, so I chose the correct size to knit, it just would have been very small had I followed the pattern.
There is a lot of picking up of stitches and putting stitches back onto needles. Also, parts of the pattern directions were difficult to understand, and I needed to search the Ravelry forum and use YouTube videos (none were referenced in the pattern) to figure things out. I have notes written all over this pattern just in case I ever want to knit it again …. which I highly doubt.
I love that this pattern uses a bulky yarn because the project is completed quickly. Overall the construction is unique, but it’s not flattering to my shape and the button bands are wonky due to reasons mentioned above.
Because many parts of the pattern needed some figuring out, I certainly would not suggest it for a beginner sweater knitter.
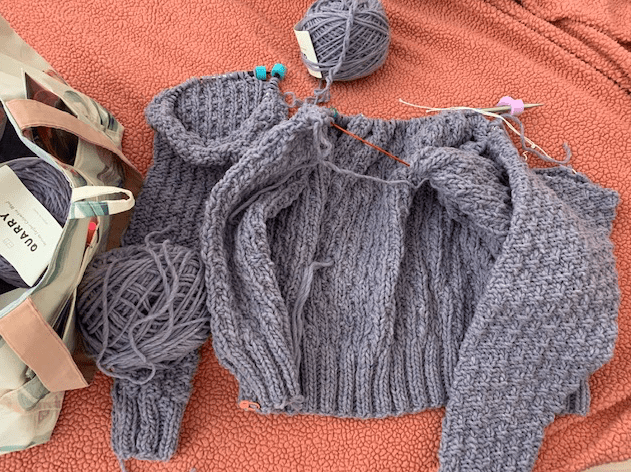
I had informally decided to give sweater knitting a break, along with shawl knitting. Then I changed my mind when I saw the Oxbow Cardigan pattern.
The pattern is by Andrea Mowry of Drea Renee Knits and I have never knit any of her patterns although she is everywhere and is very popular with knitters. She seems to have patterns that are above my skill level (this one has only reinforced my belief), but it looked simple enough, with big yarn and big needles. Heck, she made them for the whole family!
Ha! Fooled again…..I have not found this project to be easy at all AND spoiler alert – I frogged it (ripped it out to save the yarn) on April 28th. I feel very good about that too.
How It All Began – My History With This Project
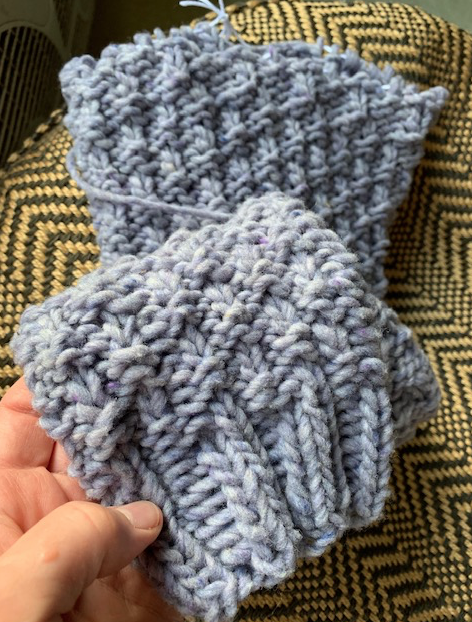
The yarn is bulky so I figured knitting the sweater would be quick. In fact I finished ONE Oxbow sleeve in two days, but man did I struggle, and it didn’t look all that great. But I learned from my efforts and the second sleeve went better.
The Yarn
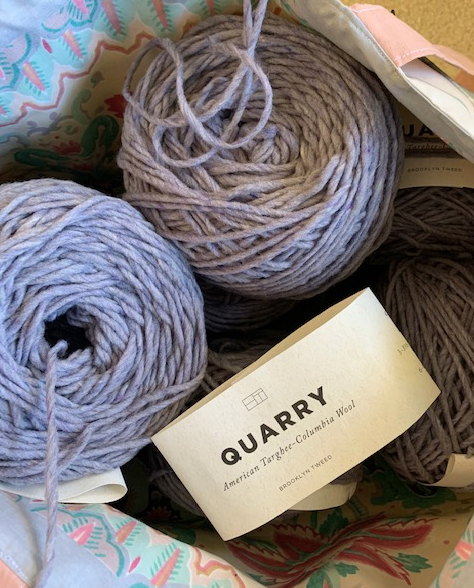
Brooklyn Tweed yarn in color “Geode”
I am using Brooklyn Tweed Quarry in “Geode”, which is a gray-lavender color. My first impression with Quarry yarn was a year or so ago when I bought dark colors to knit warm hats for my kids. As I tried to cast-on, the yarn suddenly came apart! I was very unhappy. I’ve since used this same yarn to knit a hat and have had better luck. I think I just came across a weak section of yarn and didn’t know how to deal with it. It cannot be pulled tightly, so you do have to take care and twist the strand if necessary.
Quarry yarn is bulky, yet very light weight – surprisingly so. Because of this it dries quickly when hand washed (don’t put it in the washer or dryer) and will not weigh you down as a garment. I bought mine at Wool & Company, and they wound all 7 skeins for free! (US shipping is free too, for any order!)
I was interested in this yarn because it is spun in Harrisville, New Hampshire, near where I used to live! The wool comes from Wyoming ?, is spun in NH, and then dyed in another part of the US, so it is totally American made.
Oxbow sleeve knitting in progress
Knitting the Oxbow Sleeves
This is only my third sweater knitting project, (see Fine Sand and Umpqua) if you don’t count the little Popover for a child (I didn’t like that one either). So I am nowhere near being a sweater-knitting expert.
My first mistake was at the beginning, when I used the larger needles to cast on and knit the ribbing. I was supposed to use the smaller size.
Because my gauge swatch was telling me to go up a needle size, and I couldn’t find (and didn’t really want) larger needles, I decided to knit the sweater one size larger. Is that a good idea? I don’t know.
So I began my sleeve. Once the increases happened I got confused. Other knitters had questions too. I know because I saw them on Ravelry. As I knit along trying to figure out what to do with the pattern as the increases were made, I finally figured it out, but not before I made the underside of the sleeve look icky.
Making increases on the sleeves
Figuring Out The Sleeve Increases
This information may help you, if you decide to try this pattern. The problem arises when you come to the increase rows.
I added markers to show where the increase area was. The orange marker shows the BOR. Each time I would work a round I would count backwards – in pattern – from the original beginning (where I also placed a marker) to start the pattern from the BOR. Nothing in the directions advises this! You have to wing it.
I didn’t figure this out for a while, so my underarm of the sleeve is a bit messed up. This part will be towards my body and not easily seen. (The pattern simply says to make increases and knit in pattern. Ya, the directions are not impressive.) I did do better on sleeve #2.
Mistakes are apparent on the underside of my first sleeve
Sleeves Get Long!
My sleeve also began to get really long before I was done with making my increases! So I decided to go back and follow the next smaller size directions. If I had tried to get all the increases made my sleeves would have been way too long! (I saw comments on this same problem from other knitters). As it is, the sleeve is still a little longer, which is always better than too short!
One sleeve finished
The Oxbow repeat pattern is nice and makes a fluffy texture, but it’s not all that easy to follow. It’s an easy enough pattern with 2 row repeats, it’s just not easy to keep track of the rows. What I did was use the orange clip marker to give me reference for inches (length) and then I could pay attention to the pattern better.
On To the Body and Decreases
Now I have knit the body of the Oxbow sweater to the decrease section. Wow, all I can say is really read through all the info before you begin. Basically it comes down to knitting in the pattern, but adding decreases at each end of the row (every so many rows, depending on size).
I am knitting the size “Women 42” for a good bit of ease. Once I got to the body and neck and yoke decreases, I faltered. I set the sweater aside until I could concentrate and really figure out what to do. THIS IS NOT AN EASY KNIT! Also not something to set aside for long in fear I will forget what I was doing and have to re-read it all again!
The directions are not easy to understand and I can only hope I will finish this and have it be wearable. The designer talks like this is the simplest sweater ever to make ….. and gee, why not whip one up for every family member? NOT! If I get through this one, I doubt I will ever make another. I’m just being honest here, whereas I have my doubts about some reviews I’ve read.
Knitting progress on the Oxbow
For now, this sweater is on hold. I’m partway done with the body and have two sleeves completed. I do plan to finish it, but currently I’m on a mitten-knitting kick. So I’m publishing this post and will update it when I finally finish this hellish sweater knitting project.
Oxbow Frogging Complete!
Every time I would pass by the knitting bag holding the Oxbow sweater, I would feel pressure to get working on it. But I didn’t want to. When I did get it out, I had difficulty finding where the heck I was in the pattern. I was at a decrease every 5 rows, while doing the 4 row repeat with knits and purls done at such and such and P2tog or SSK done at here and here…. Just reading it was mind boggling. Sorry, but I think it was a very lazy way to write a pattern.
I contemplated all my work – 2 sleeves done and about halfway up the body. But tearing it out made me feel calmer than pressing onward. So I frogged it. Now I have tons of Quarry yarn and must find another sweater to knit. (Eventually I knit one by Espace Tricot). But today I feel good, and will no longer see this sweater sitting around driving me crazy!
The peaceful days of camping in the wilderness go perfectly with knitting. What could be better than having coffee outside, with knitting on my lap? We camped twice in the last month and here is a look at the knitting projects I took along.
The little Playdate cardigan by Tin Can Knits is a wonderful pattern with excellent directions that will broaden a beginner knitter’s horizons!
The Playdate Cardigan pattern comes from Tin Can Knits. I bought and printed out the pattern a few days ago and have since been working my way through this cute sweater. The pattern has size adjustments from 0-3 months to 4XL…. so you can knit it for just about anyone.
I chose to knit the 6-12 months size. I’m using a 16-inch circular and 5 double-points in the same size. Another smaller needle (with same size dpn’s) is needed for the ribbing. My yarn is Emma’s Yarn, fingering weight, Super Silky in “Malibu”. I would not have chosen silky yarn if I was buying a skein to knit a sweater, but I wanted to use stash yarn for this first attempt. I would choose a favorite baby sweater yarn next time.
Creating Pockets
This is a bottom up pattern, but it begins with pocket sections. As I read through the pattern, the pockets were confusing to me. I’ve never done pockets. HINT: To knit a 2-color sweater begin the ribbing with the contrast color. But the pre-made pocket sections will be behind the work, so the main color can be used.
First thing to do was to knit two little rectangles which would become part of the pockets. I almost decided not to add pockets just in case I couldn’t figure it out, but I’m glad I used them. Because first, they are easy to add, and second, they make the sweater look cute!
Getting started on “Playdate” baby sweater
Once the bottom of the sweater is begun, the little rectangles will be added to the long needles and create the backing. The top stitches will be knit into the regular line of knitting.
Placing stitches of pocket onto long needles
The K1P1 ribbing for the top front of the pockets is created first, then bound off. See the back of the pocket above and the front below. The little rectangular backs will later need to be sewn down to actually create the pocket.
Ribbed edge of pocket with backing added to needles
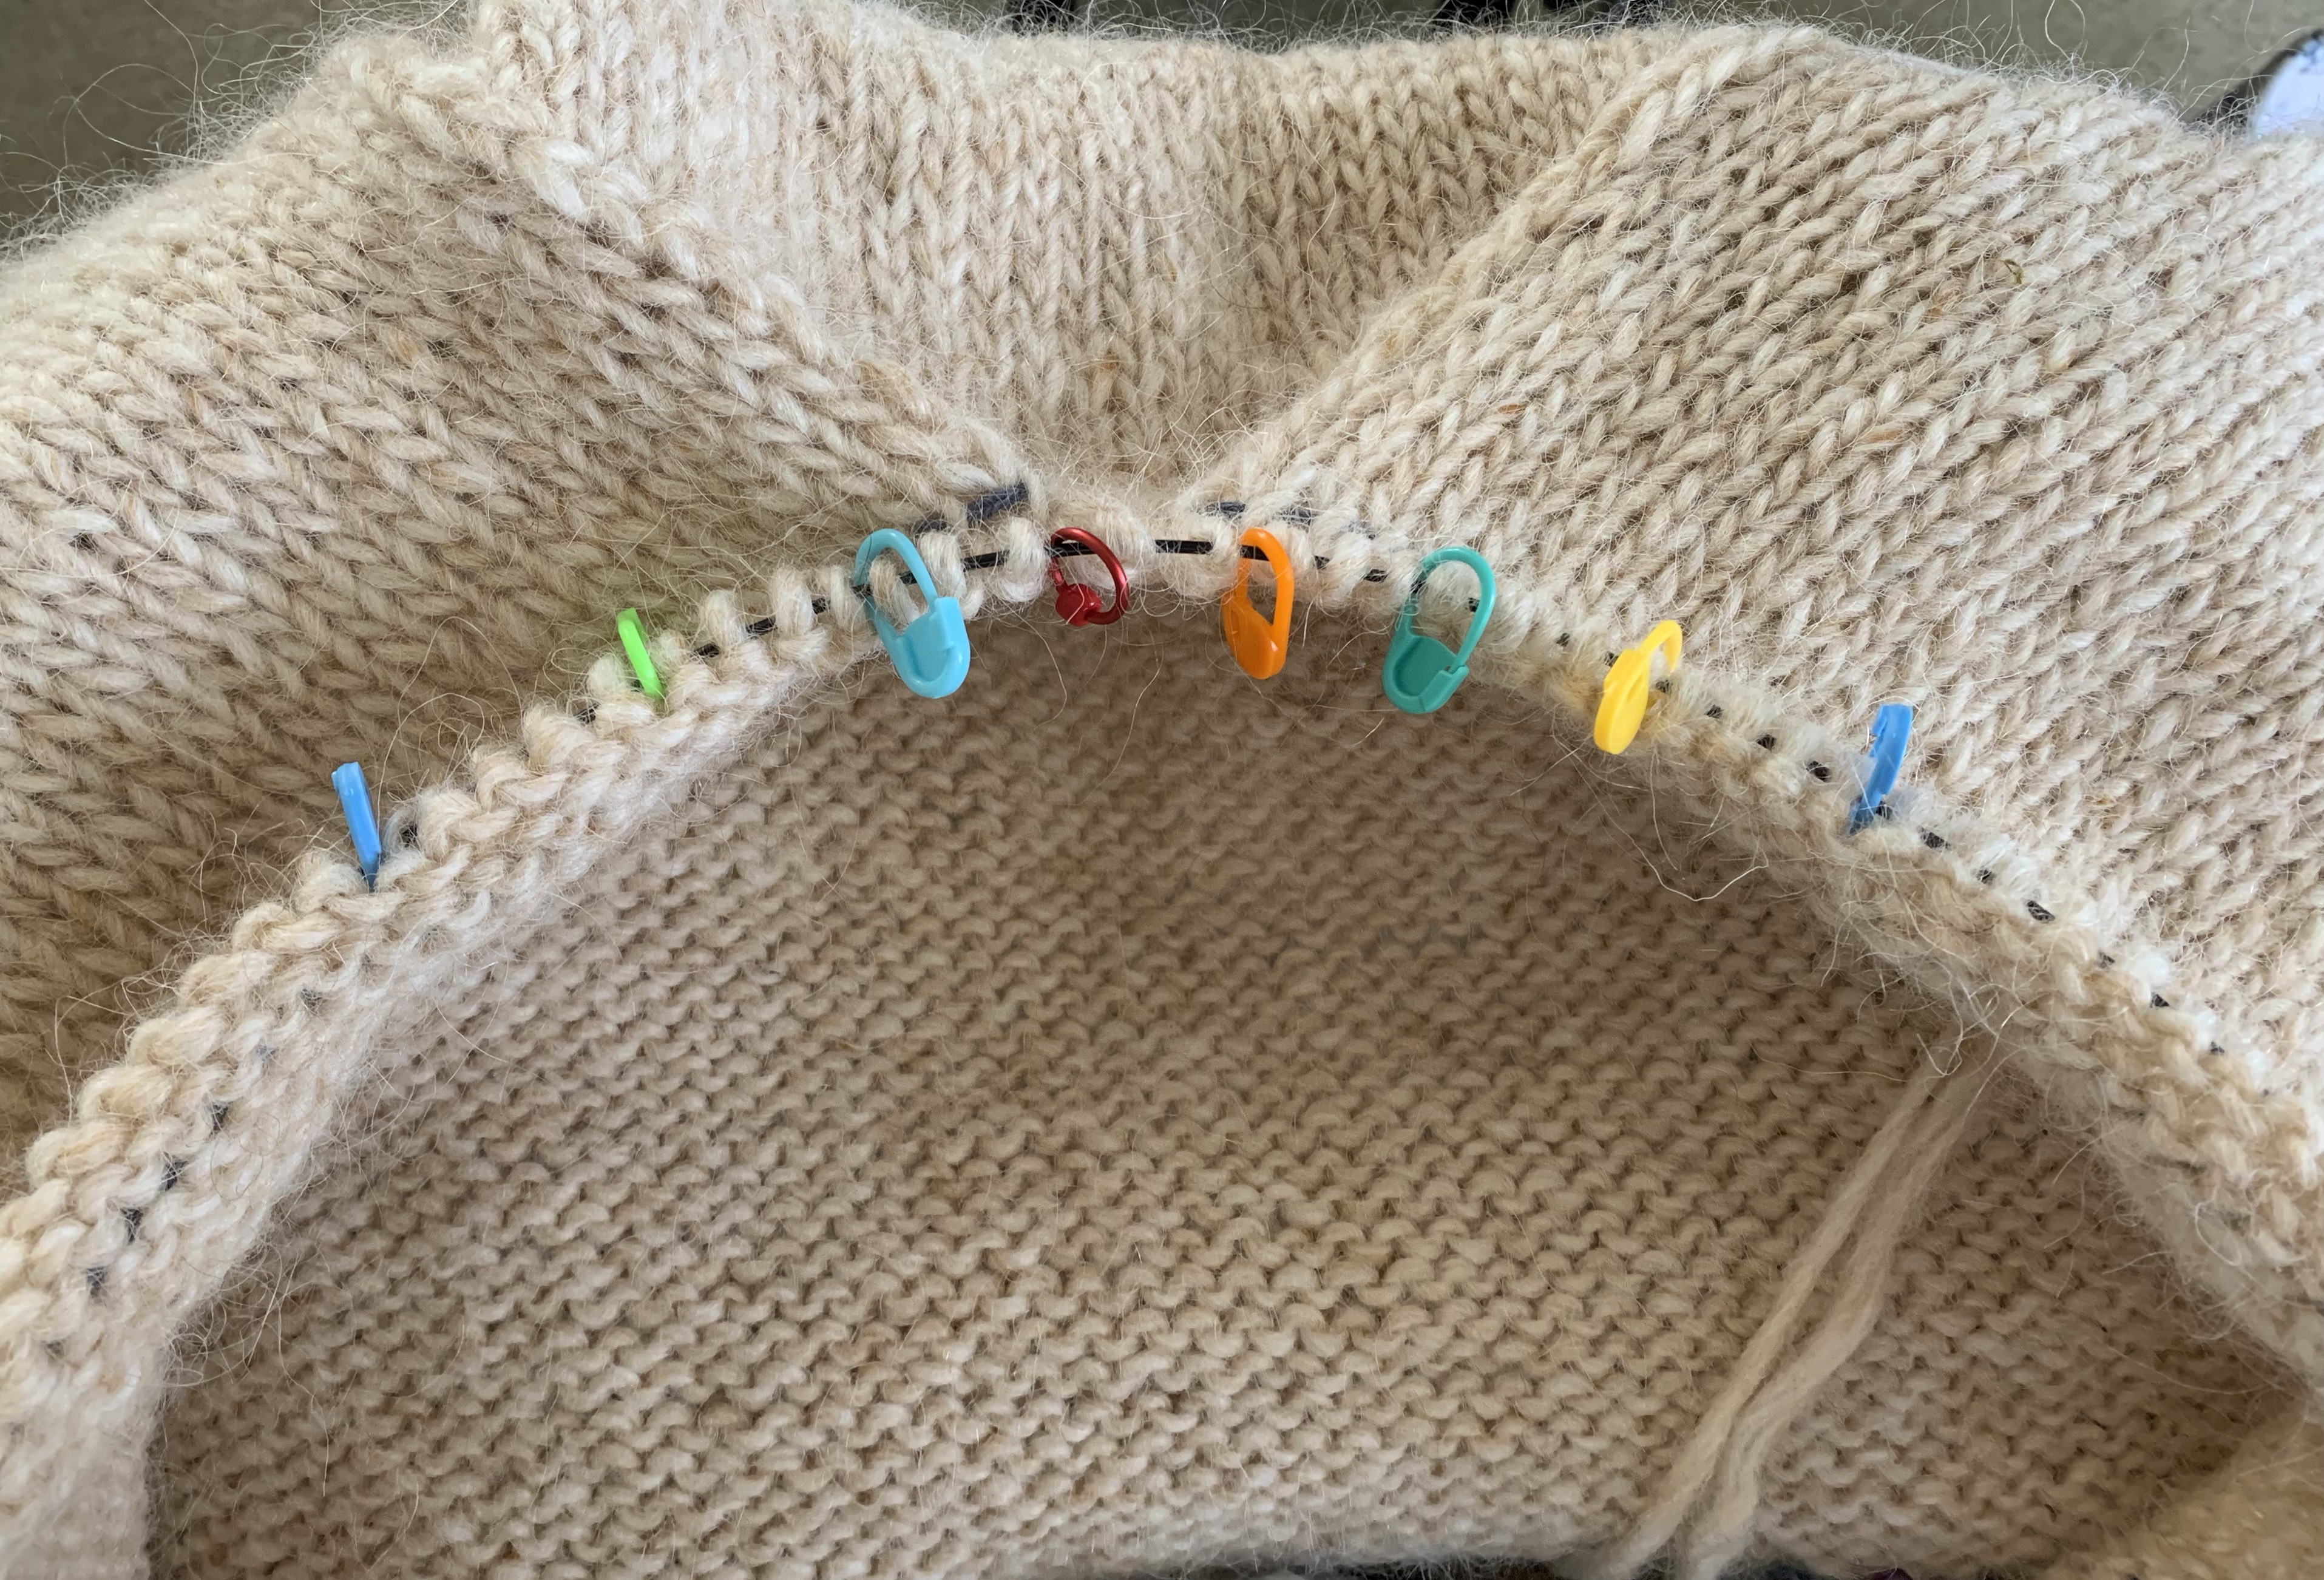
The Back and Shoulders
Once the front is knit to length, the back stitches and one shoulder will go on hold. I used some metal stitch-holders (they were my grandmothers) which work well for holding small amounts of stitches. I always have trouble picking up my stitches when I hold them using yarn. From here, each shoulder area will be knit, along with the back – separately.
Shoulder and back stitches on hold while knitting other shoulder stitches
I used DPNs to hold the shoulder stitches because my sweater is so small. The pattern directions say to work the stitches, ending with a RS row and then “break the yarn leaving a long tail”. I guess they figure you will know enough to keep those stitches on hold, but you need an extra needle for that (or yarn). So it helps to have double-points handy with good stitch stoppers(Mine are by Cocoknits and they work great). The same thing happens for the neck and I left my stitches on the main circular needle for that longer section of knitting. I used 2 double-points for straight knitting the first shoulder section.
Shoulder parts of Playdate on hold using three needles
Once the back and shoulders are the correct length, they will be stitched together. I tried 2 different methods here, and decided I liked the Kitchener stitch – as shown in slow motion by Very Pink Knits – which came out pretty smooth. I sat in front of the computer while I did it so I could watch her video.
Ready to connect at shoulder seams
Kitchener stitch joining back and front at shoulder
Shoulder seem, wrong side of kitchener
All the edges are curling up badly, which is par for the course when knitting stockinette. I had the same problem on the Fine Sand sweater, but after washing and blocking it looked great.
My front and back knitted sections are now attached at the shoulders
On To The Sleeves
As I went around the armholes picking up stitches, I picked up a few more than was suggested just so there would be no holes. On the next couple of rows I decreased back to the correct number. I was able to knit one sleeve within a few hours time. I think I like making this little sweater. It’s finishing up fast and looking pretty cute!
Getting there!
A long, circular #3 needle was used to pick up the required stitches around the sweater front opening. A #3 was suggested for the bottom ribbing and sleeve cuffs, but I used a #4. The rest was knit on a #5. I didn’t check gauge because the end size did not matter to me.
Knitting a Button Band and Doing Buttons
This is my first attempt at doing a button band around a cardigan. It means placing the buttonholes evenly and making each hole the correct size for a button. Thanks so much to Tin Can Knits and their excellent page all about knitting a button band. I will definitely be referencing it during this phase of knitting. My buttons are on order from an Etsy shop (Ginger Mint Collection) because I have no place local (that I know of) to buy buttons.
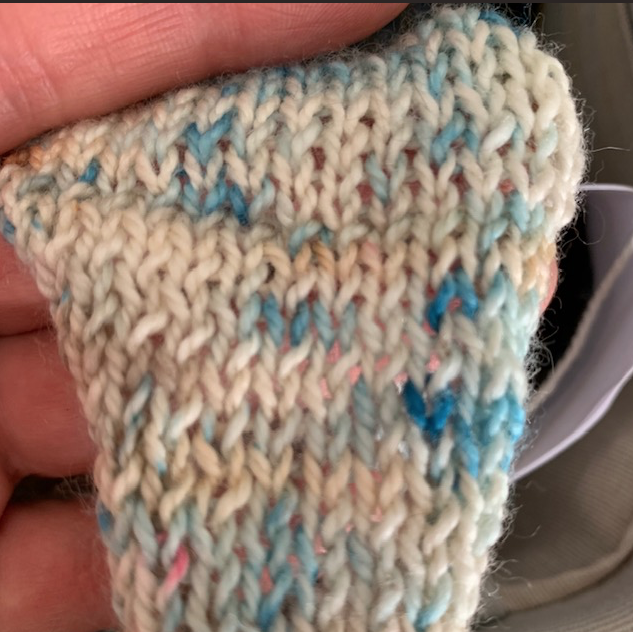
In the meantime, I decided to knit a little swatch and try out a couple of buttonhole sizes. Once my buttons come from Australia I can see which of the sizes to knit on this cardigan. I’m not sure which set of buttons I will use, but hopefully one of the button designs will match well.
I’ll keep this swatch for reference and have added a tag with info as a reminder. I did the 2-stitch buttonholes because a good size button will fit through.
Measuring buttons
Until my buttons come, and I’m sure they will fit the size holes I make, this sweater will be on hold…. changed my mind. I decided to add 5 buttonholes and continue to finish the band. Today I washed the sweater and when the buttons arrive I will pick the ones I like and add them. *Update: chose the fox buttons!
My experience knitting the Playdate cardiganFox buttons on the Playdate cardigan
Finished! My Thoughts on Knitting the Playdate
This was a fun sweater to knit and I got it done quickly. Here is a link to the pattern once again: Playdate by Tin Can Knits. I learned to make buttonholes and pockets, so that was nice. It’s good to learn new things. I would love to knit this one again – and in October / November 2022 I am, using blue yarn this time.
Tin Can Knits has a book out called Strange Brew with loads of options for knitting pullovers and maybe other things. I just found it for sale at Jimmy Beans Wool and ordered a copy.
This sweater knitting project was a fun one. Although there were a few things to figure out, I recommend the pattern to any fairly experienced knitters…
I’m knitting a beautiful cardigan pattern by Camilla Vad. The Magnolia Chunky Cardigan is knit top-down with lace and bobbles on the body and sleeves. On…