

This is a big deal for me! I am knitting a sweater…!
For my first hand-knit sweater project I chose the Umpqua Sweater pattern by Caitlin Hunter of Boyland Knitworks. I know so little about knitting sweaters that I have no idea if top-down, or bottom up, are easiest, but here I go. I’m jumping in! This pattern is knit from the bottom up. The fun “arrow” design around the yoke caught my attention and I wanted to knit it.
Gauge is still a bit of a mystery to me. As far as I could tell, while figuring the gauge for this sweater, I needed to go up a needle size. I’m using a size 6 for the cuffs and bottom of body, and a size 8 for all the rest. I’d rather have the sweater fit loosely than tight. The pattern suggests going up a size for the color work (yoke area) if you generally do color work tighter. I have no idea if I should do that, but I don’t have a size 9 circular long needle, so I probably won’t. I’ll worry about that when I get to the color work part of the sweater.
Body and One Sleeve – I’m On My Way!
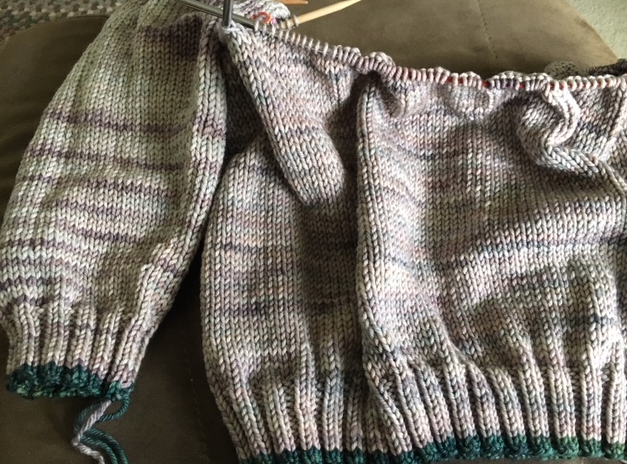
Here’s a photo of my one sleeve and body. I still have a few inches to knit on both parts, and no, they are not connected. I set them side by side for the photo. I’m happy with the main color (Whole Grain) and I love the Rios yarn. Check out the Malabrigo website and I dare you not to buy their gorgeous yarn. Rios is washable too! I also chose Aguas (dark green) for the trim, and English Rose (dark pink) for the Yoke colors.
Knitters who are savvy sweater people make all sweater knitting sound EASY. I’m scared to death while I knit this. I’m following the pattern exactly and if I am unhappy with some part (like sleeve length), I may knit another one of these sweaters one day and make changes. This one is really a test for me!
Attaching Sleeves and Body of Sweater
Now both sleeves are done and I put the stitches of the sleeves onto “holders” like the pattern said. One little section of stitches is for the armpits – which will be stitched up at the very end – and the rest of the stitches will be knit with the body.
Purl Soho has an excellent tutorial which explains how to do this, so I added it here. It helped me visualize the parts of sweater knitting. Also, after watching the video, I realized that when I finished up my second sleeve, I should have kept the stitches on my 3 DPN’s and not placed them onto yarn. I had to put the stitches back onto the needles to knit – a waste of time.

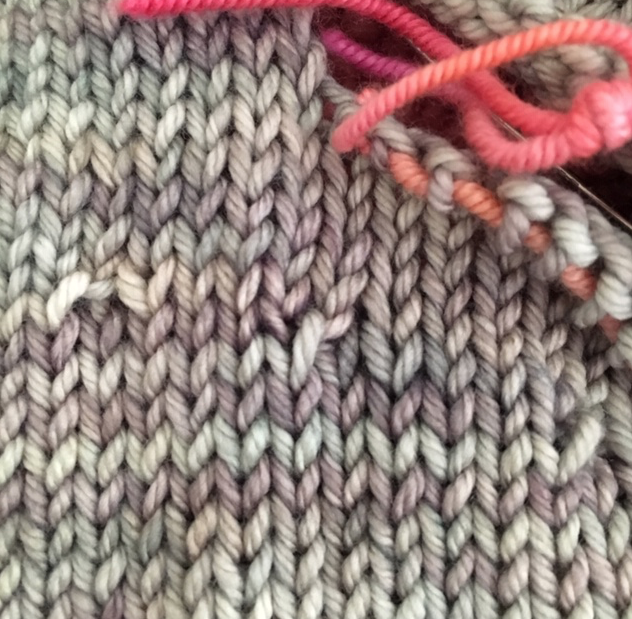
Doing German Short Rows at Yoke
Because I was not happy with the look of the short rows I did earlier in the pattern (see photo below where you can see 3 “off” stitches where I did a wrap and turn to shape the back), I decided to try German Short Rows when it came to shaping the yoke.
I had read from some of the Umpqua knitters that they used this type of short row work. The YouTube video below is by Very Pink Knits and it is how I learned to do German Short Rows, which seem simple enough.
However, the sweater pattern itself was confusing when it came to doing short rows. Once I began doing wraps and turns (creating short rows) I had no idea where they were on my needles. Suddenly “Short Row 3” said to “knit to 5 stitches before last wrapped stitch, wrap and turn“. Does that mean the last stitch I wrapped, or the last wrapped stitch I would come to while knitting? I had no answer, so I turned at the first wrapped stitch I came to because the pattern said later on to “work wraps together”. I figured I should not hit a previously wrapped stitch until then. I have no idea if I did this part correctly.
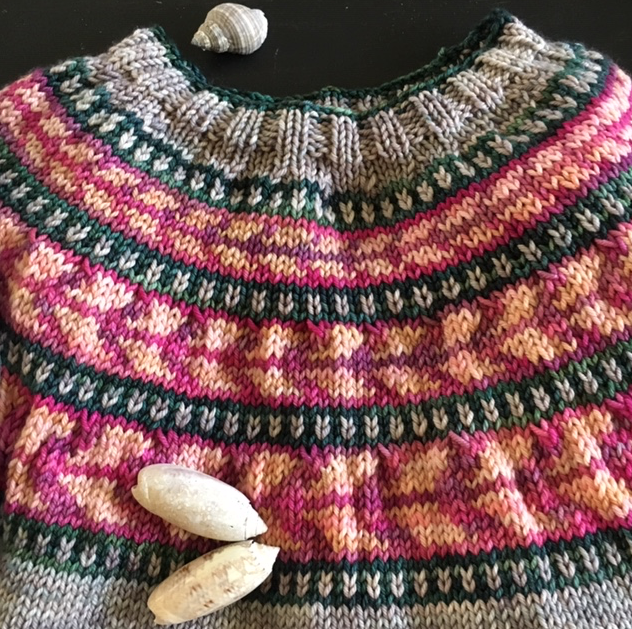
Now I am nearing the color work area of the yoke, and that is shown in chart form only. Luckily I know how to read a chart for working in the round. I may order more Rios yarn in other colors because I still think I will be cutting it close with my main color (MC). If I substitute a new color in place of the main color for the rows of yoke color, I will conserve the MC yarn for finishing.
Adding Color to The Yoke Area
Below you can see my first rows of the color chart. I did decide to use another color of Rios yarn, which I just happened to have in my stash. I can’t find the tag for it, but it’s a peach color (Peachy?). I’m sticking with “whole grain” which is the MC for between the green rows as the pattern says. The same main color should also be where the yellow / peach color is, but I’m afraid I will run out by the time I need it to finish the neck area.


Three-Needle Bind Off For Armpits
The yarn that has been held on stitch holders or extra yarn now needs to be put onto DPN’s once again – Do this on the WRONG SIDE. Holding them side by side a three-needle bind off is done. Watch the video below as it is easier to understand, but it’s very simple to do. Holes will probably remain at each end, but they can be closed up when weaving in the tails.

I’ve found this tutorial by Purl Soho which shows exactly how to accomplish the three-needle bind off. Don’t sweat it – it’s easy!
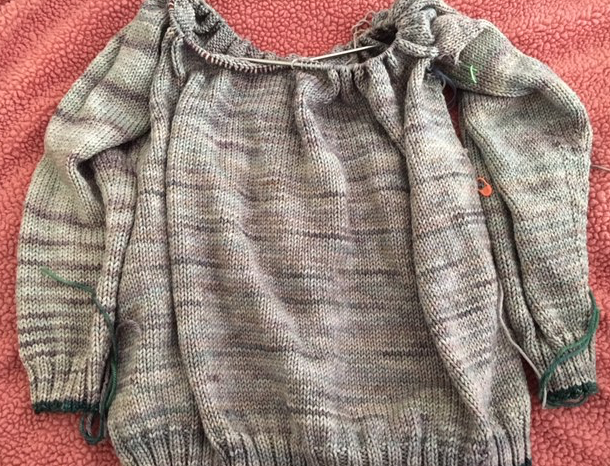
Finished..!
On April 7th I finished knitting my Umpqua sweater and I am pleased! It fits.. yay! There is lots of room to move and it would keep me very warm in cold weather, I’m sure. The day I finished, by weaving in the tails and closing up the underarms, it was in the 80’s here in Florida. Not exactly sweater-wearing weather. Because it was hot and muggy, I didn’t wash and block it yet. There is no hurry because I won’t ever be able to wear this garment unless I take a trip North to New England in cooler months! But I did get some photos.
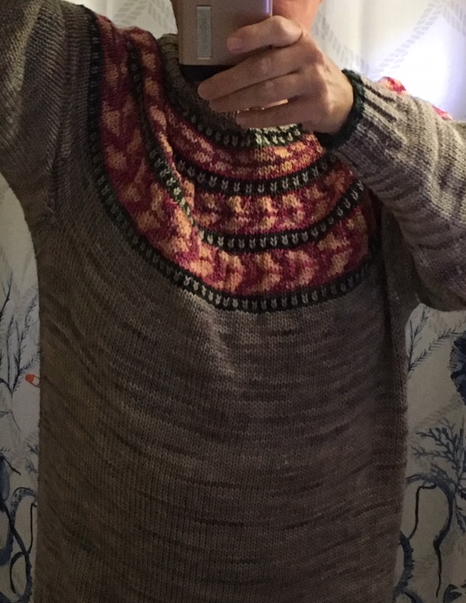
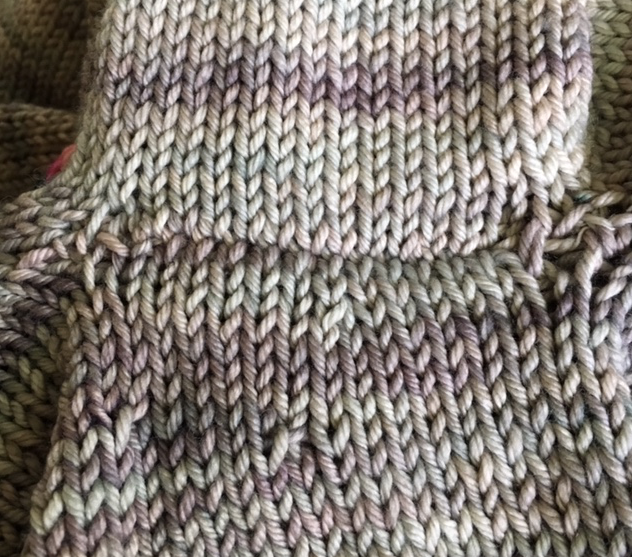
You can see the “whole grain” main color and the peachy colored arrows. Those were supposed to be the main color, but I was afraid I would run short so I used some Rios stash yarn. I do like the addition of color. I knitted size “D” but I probably could have gotten away with one size smaller. Or, I should have kept the suggested needle size and not gone up one.

I think I did my SSK’s incorrectly, but it’s not super noticeable. Live and learn is my motto.
Collecting and photographing seashells is another hobby of mine. I have a blog about it at Seashells by Millhill.


it’s beautiful! well done!
LikeLike
Thanks so much!
LikeLike