Considering a Cable Knitting Project

Knitting a cable vest swatch for size reference and cable chart practice. The Rockhound Vest is a beautiful cabled knitting project.

Cable knitting is not something I have much experience with. I tend to buy cable patterns and then file them away thinking “maybe one day”.

The biggest cable projects I have done were hats (Skiff and Habitat). Now I am looking at knitting a vest with cables on the front and back.

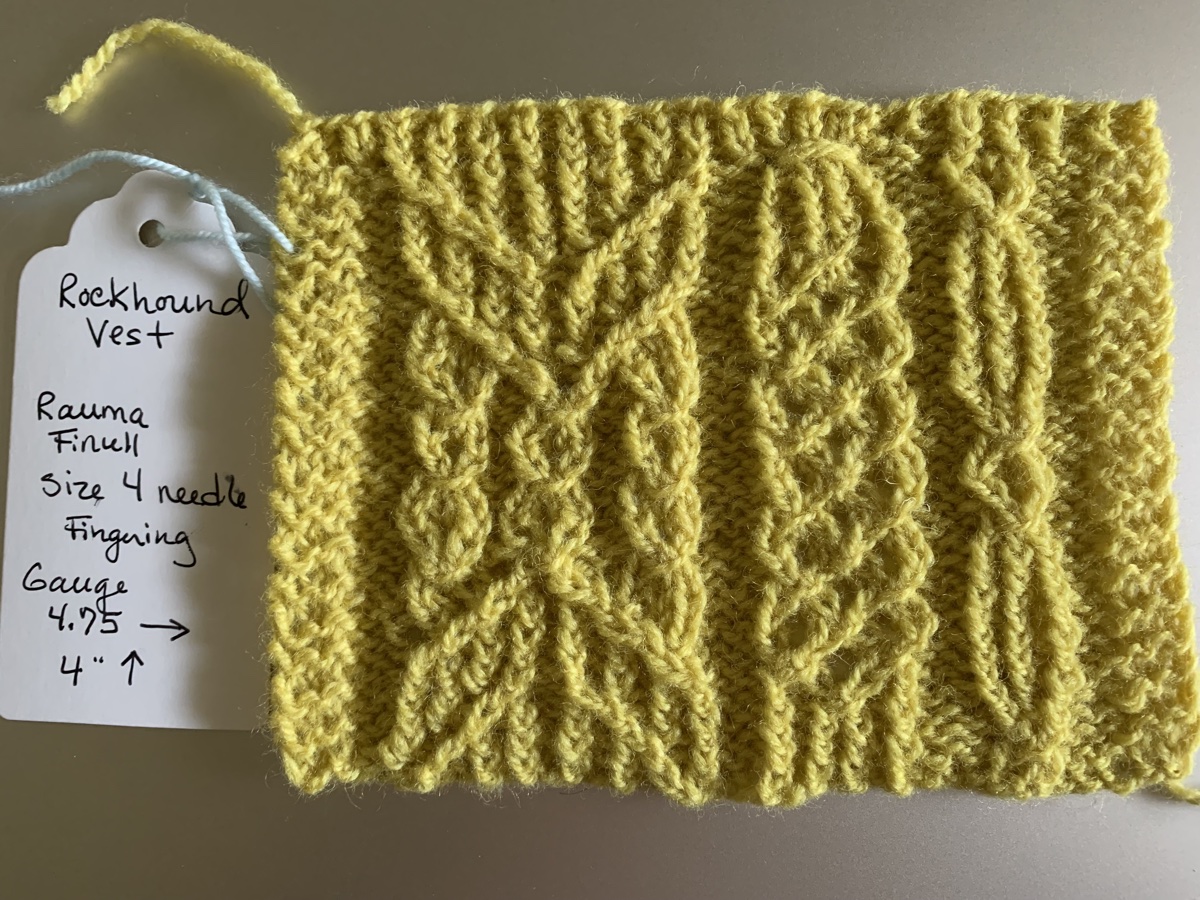
The Rockhound Vest is a pattern by Wool and Pine designs. The company was offering a discount on their patterns and I thought I would see what they had to offer.

You would think that a vest would be a simple and quick knit. This one has a section of cables that comes down from the shoulders and goes down the front. Cabling takes time, but it can be so pretty.

The V-neck and armholes have to be picked up and knit after, and I’m not looking forward to that. Also, the charts look a bit intimidating.

Knitting a Cable Swatch

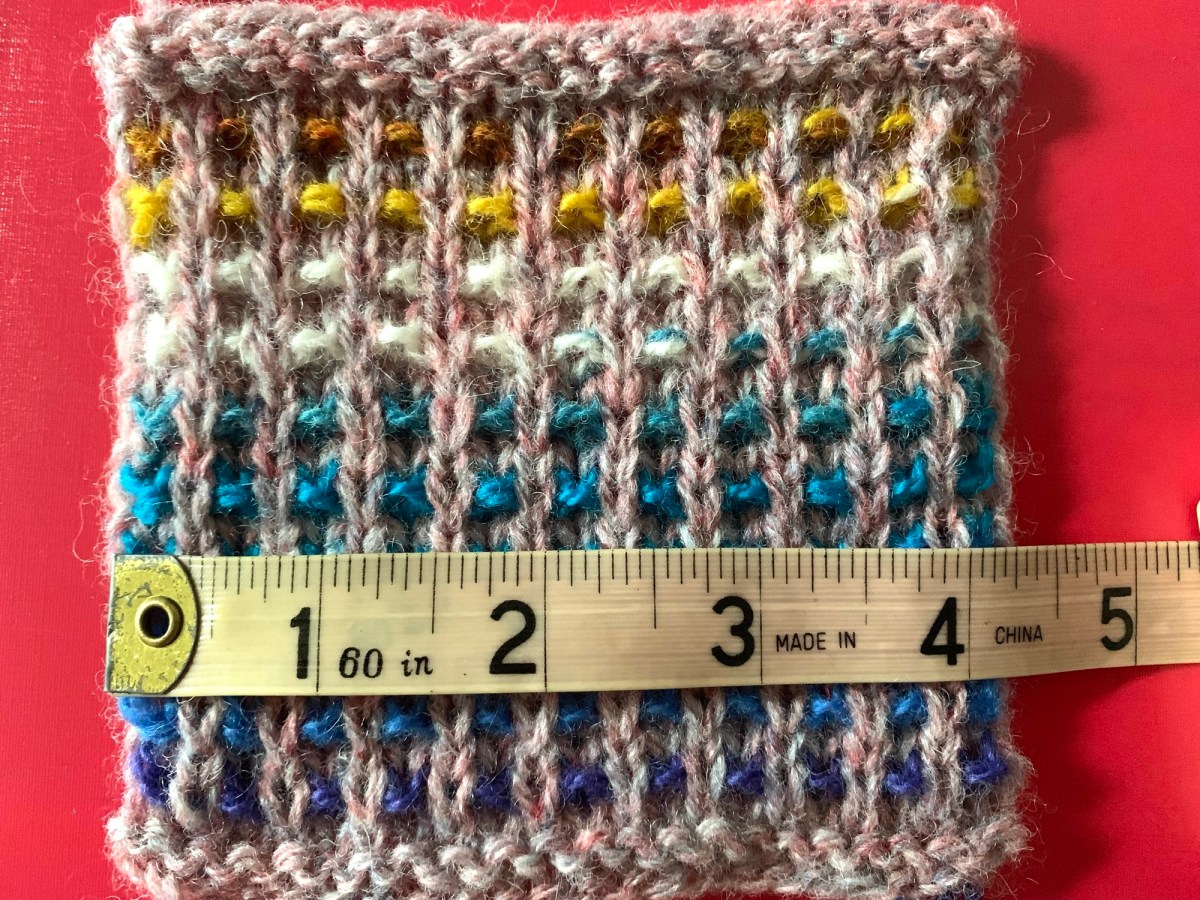
The Rockhound Vest pattern (link at the bottom of this page) comes with a Swatch Chart, which is a section of cable that needs to be knit, washed, blocked and measured as a swatch – both flat and in the round.

I decided to knit the swatch using Rauma Finull yarn because I had a skein, and I already know I love this fingering wool.

Helpful

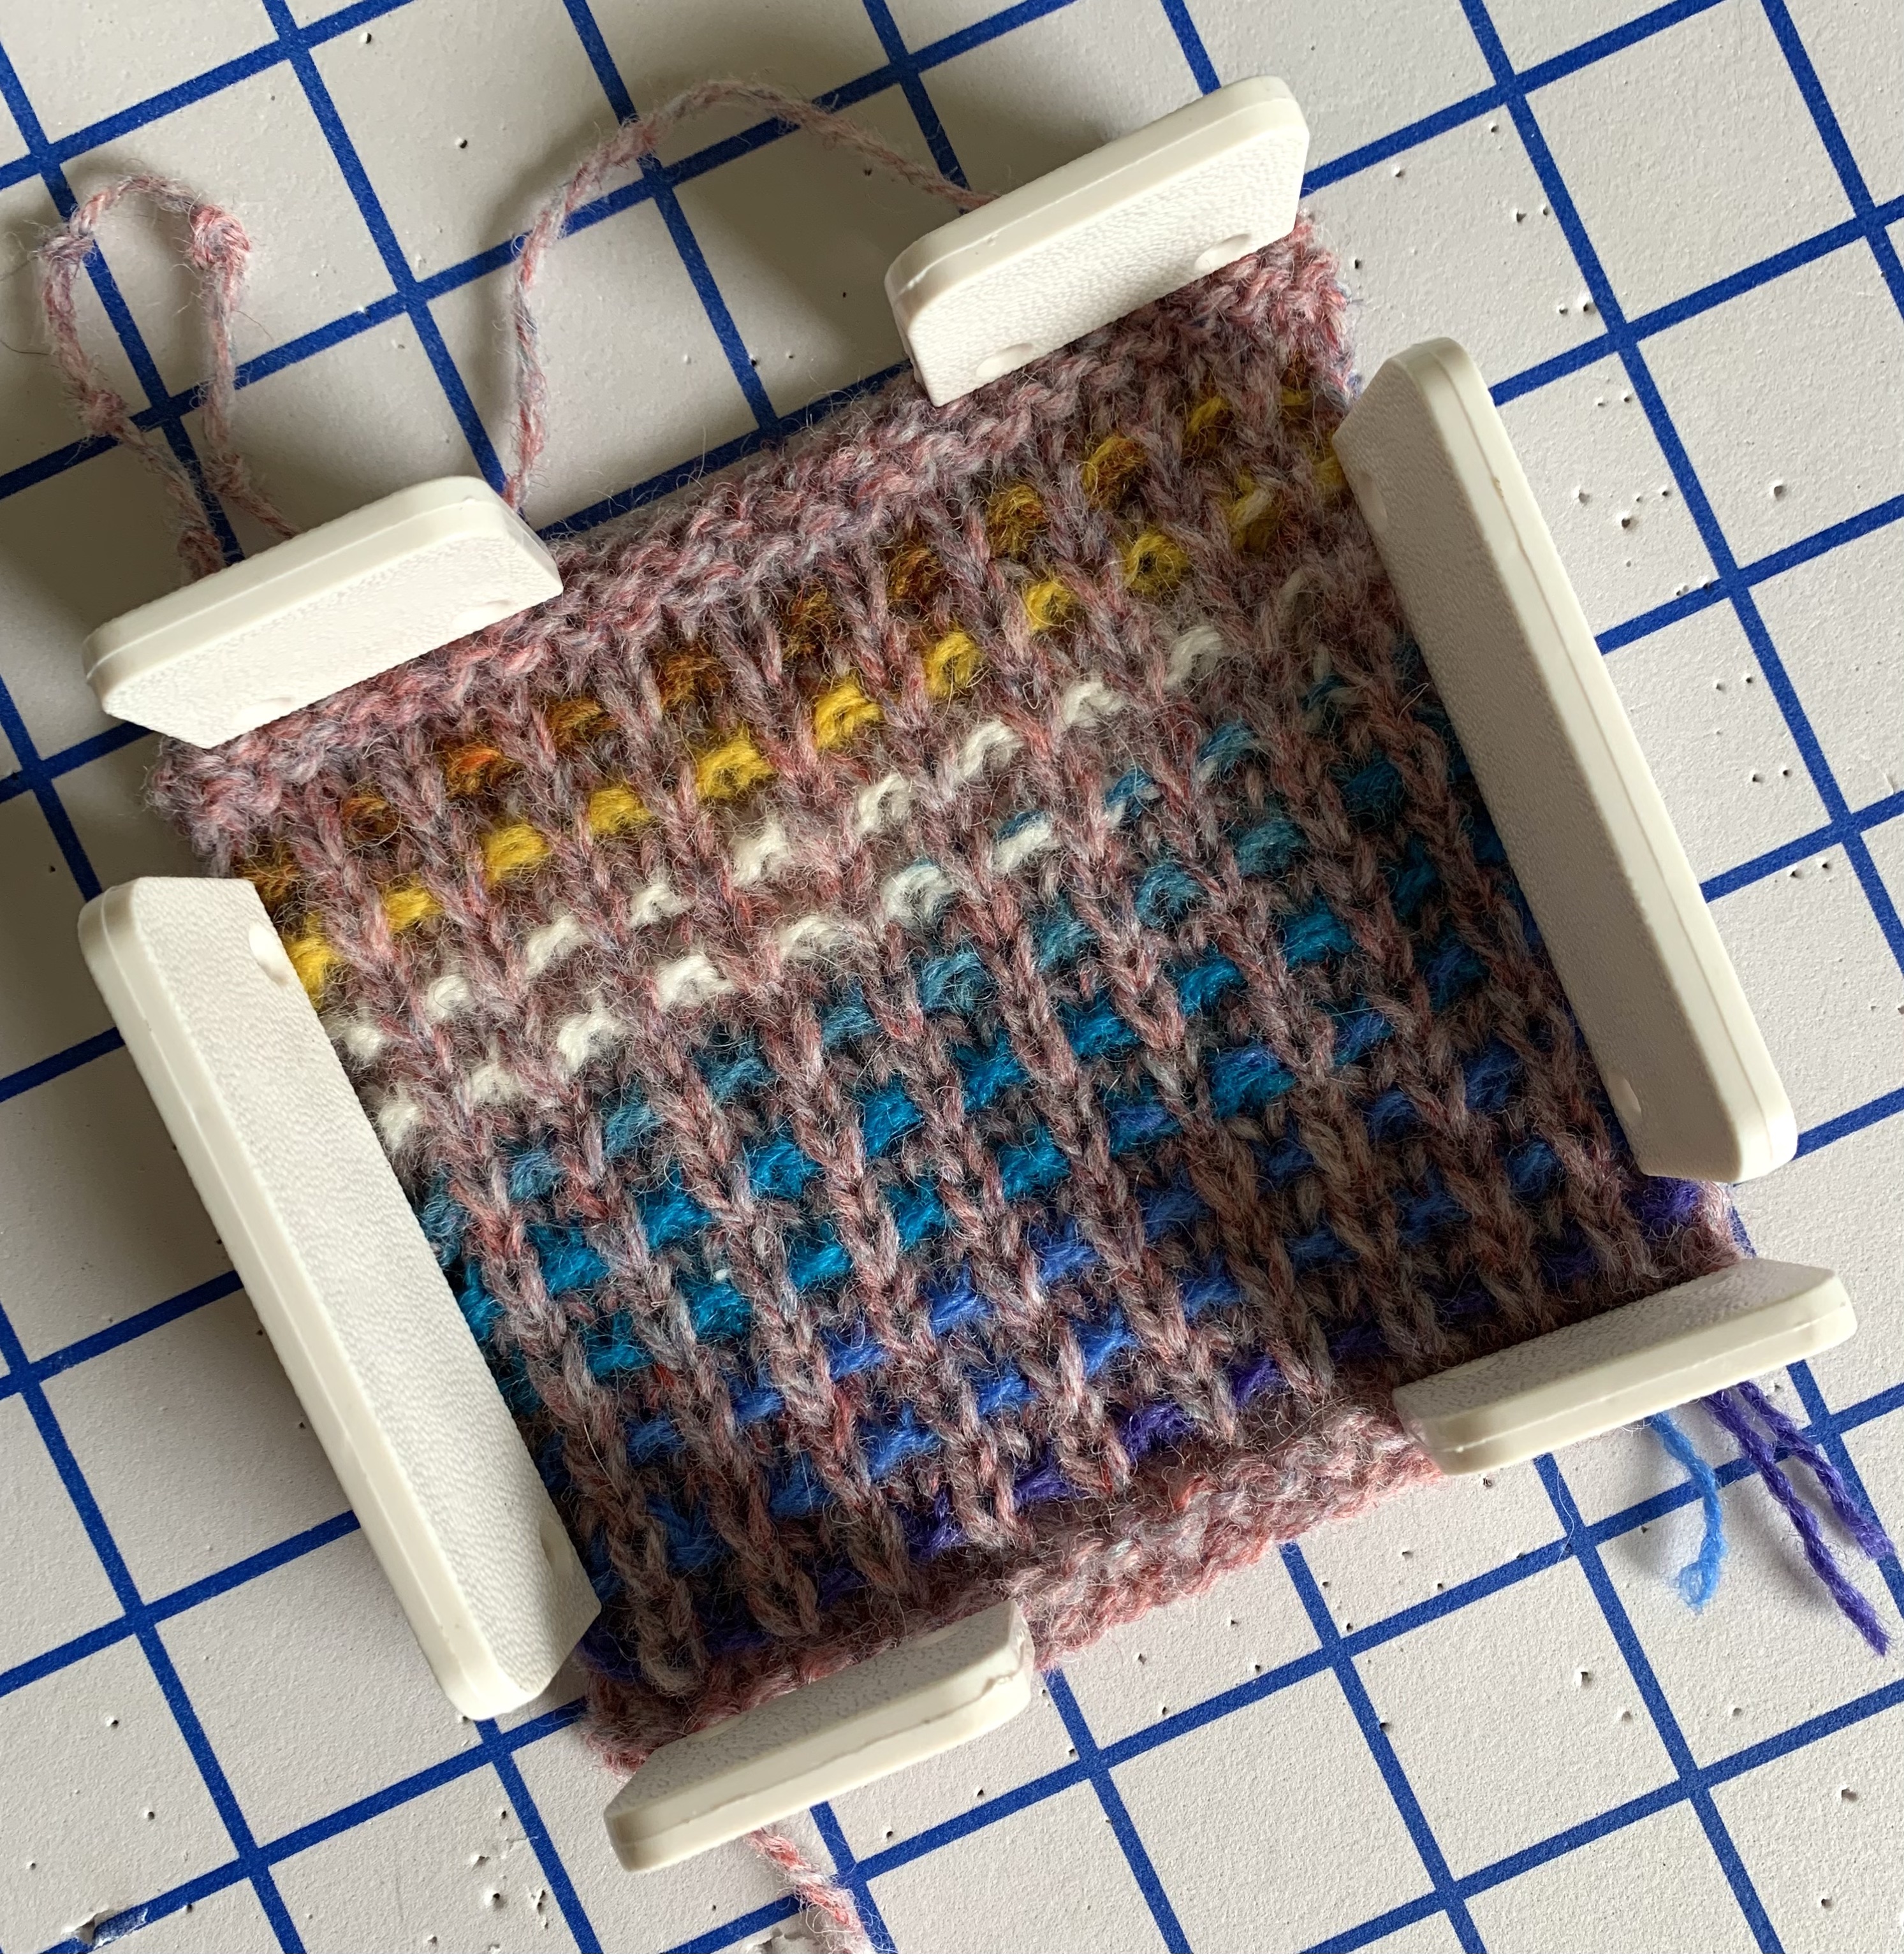
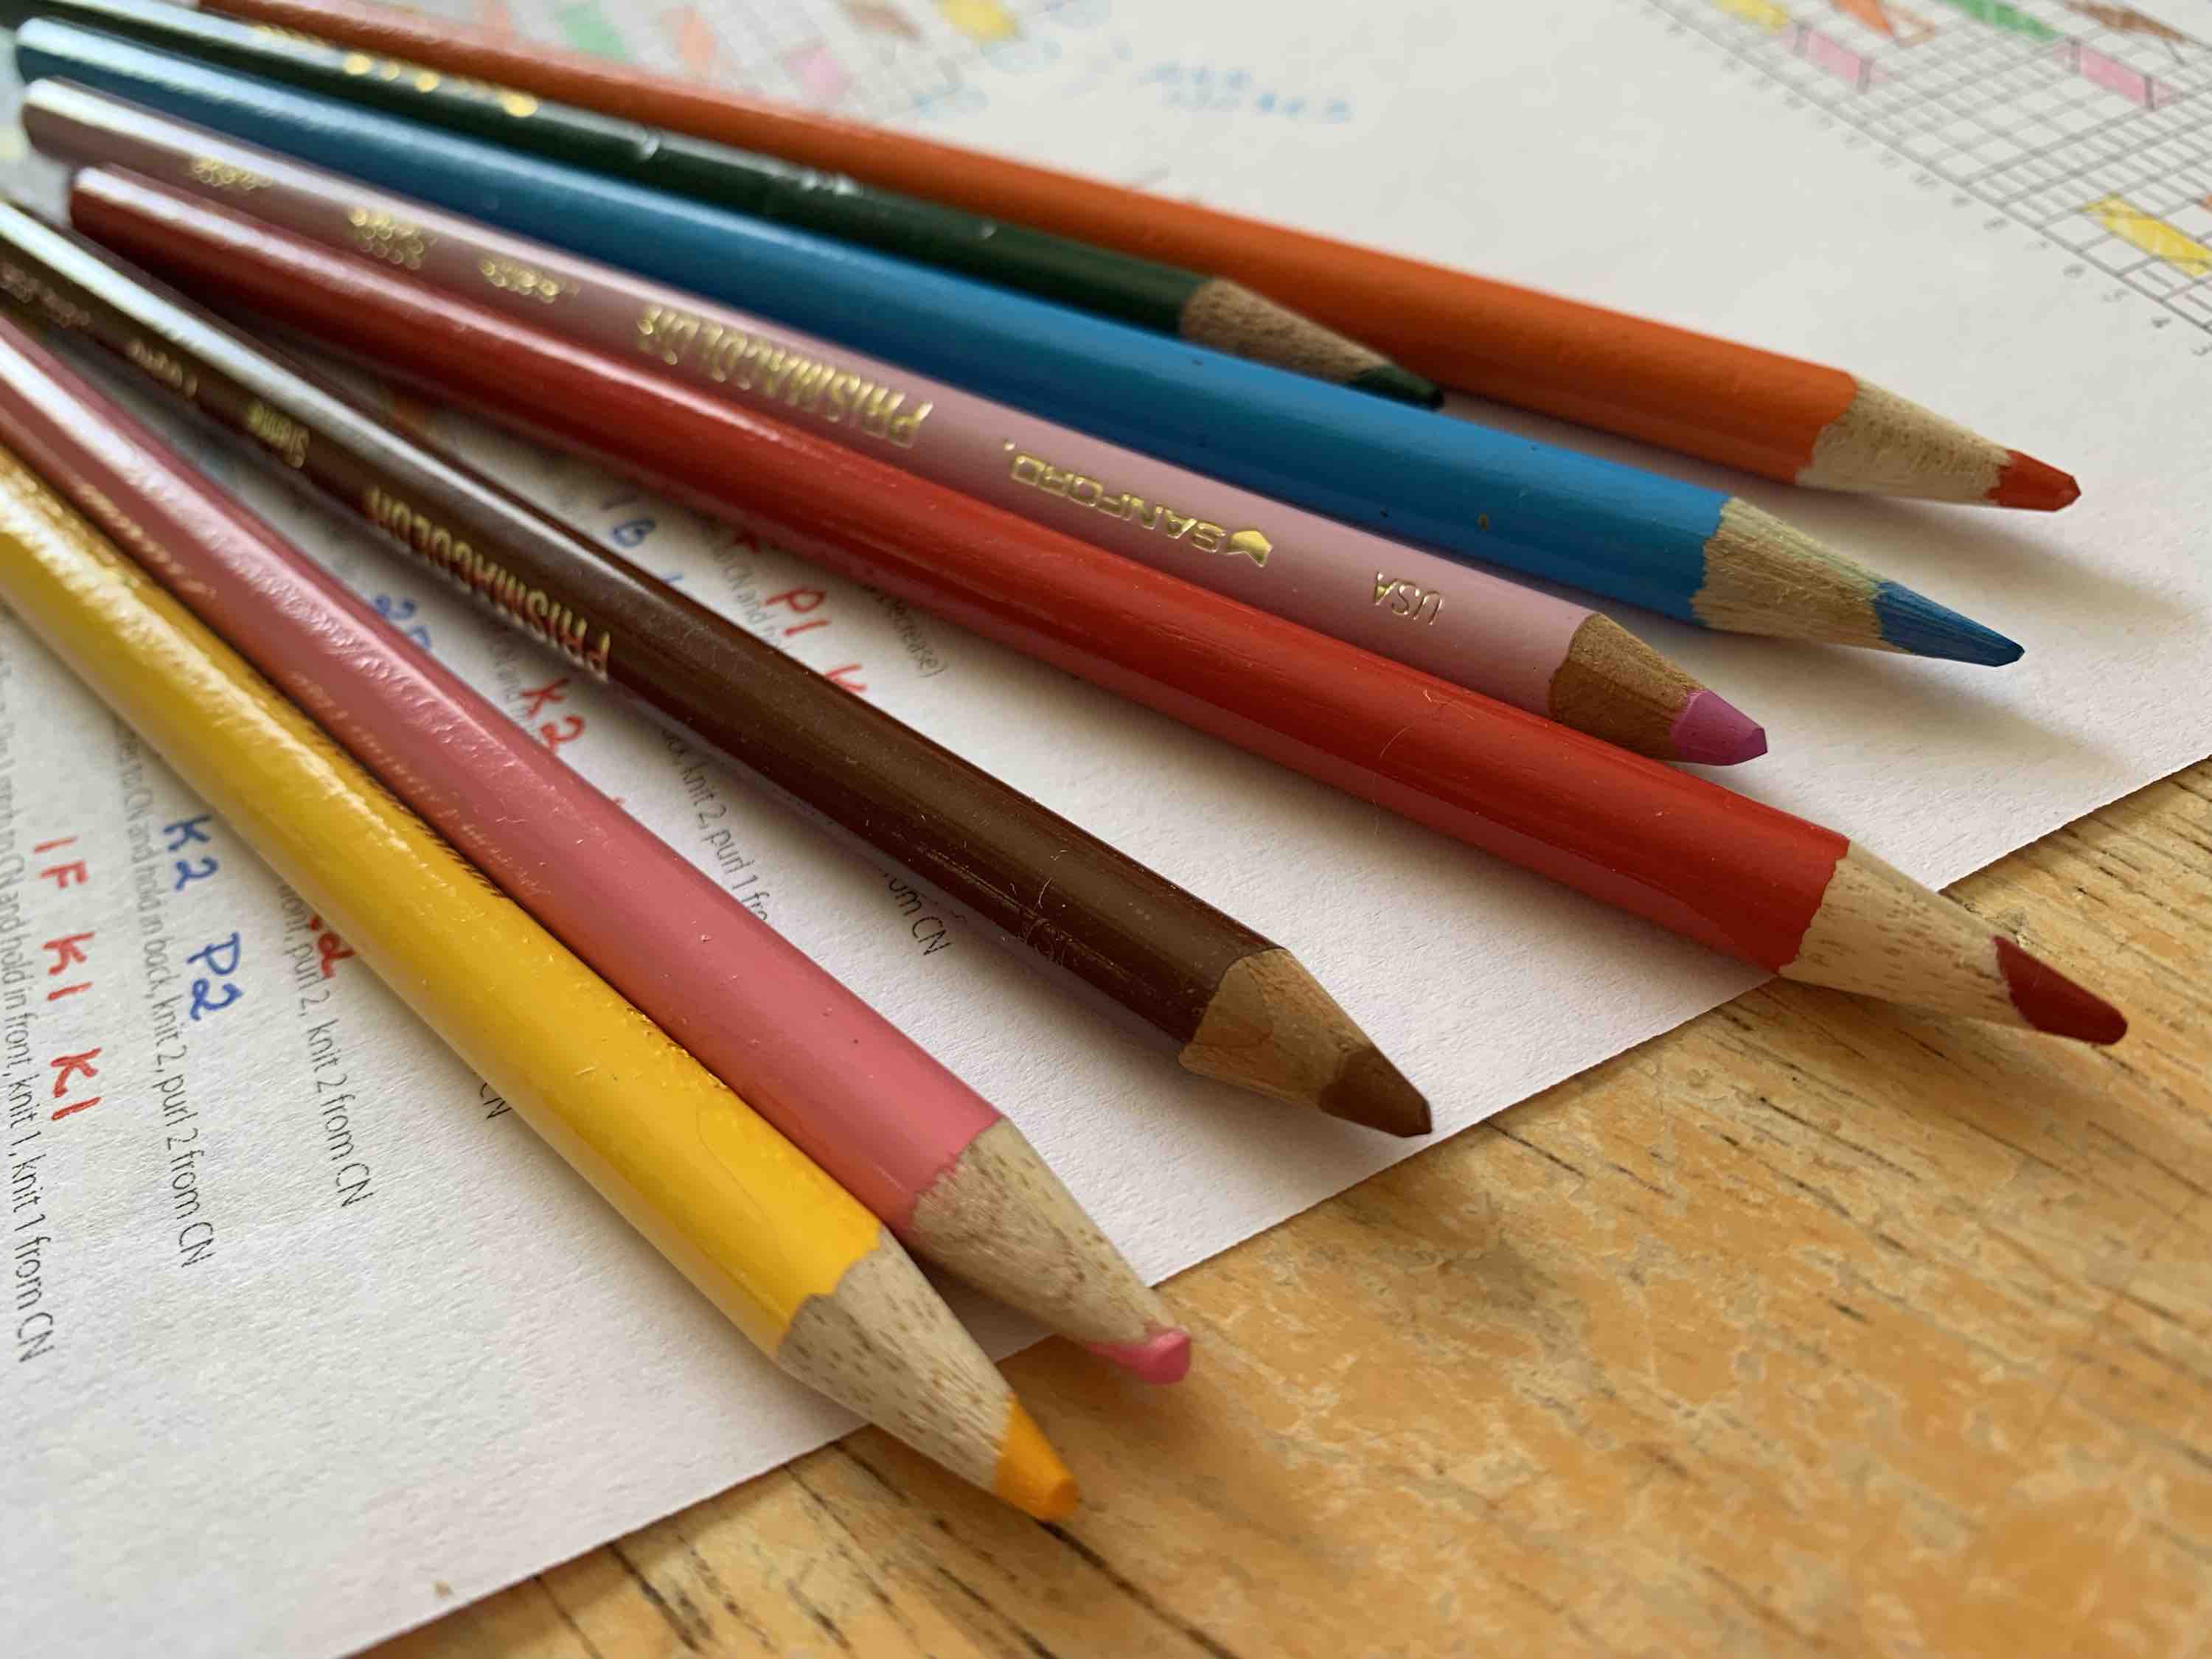
First thing I do when knitting cables is color code them! I also write a short description of each cable next to each cable diagram. I have no idea how to read a cable stitch, so the color helps me find the description quicker.

colored pencils

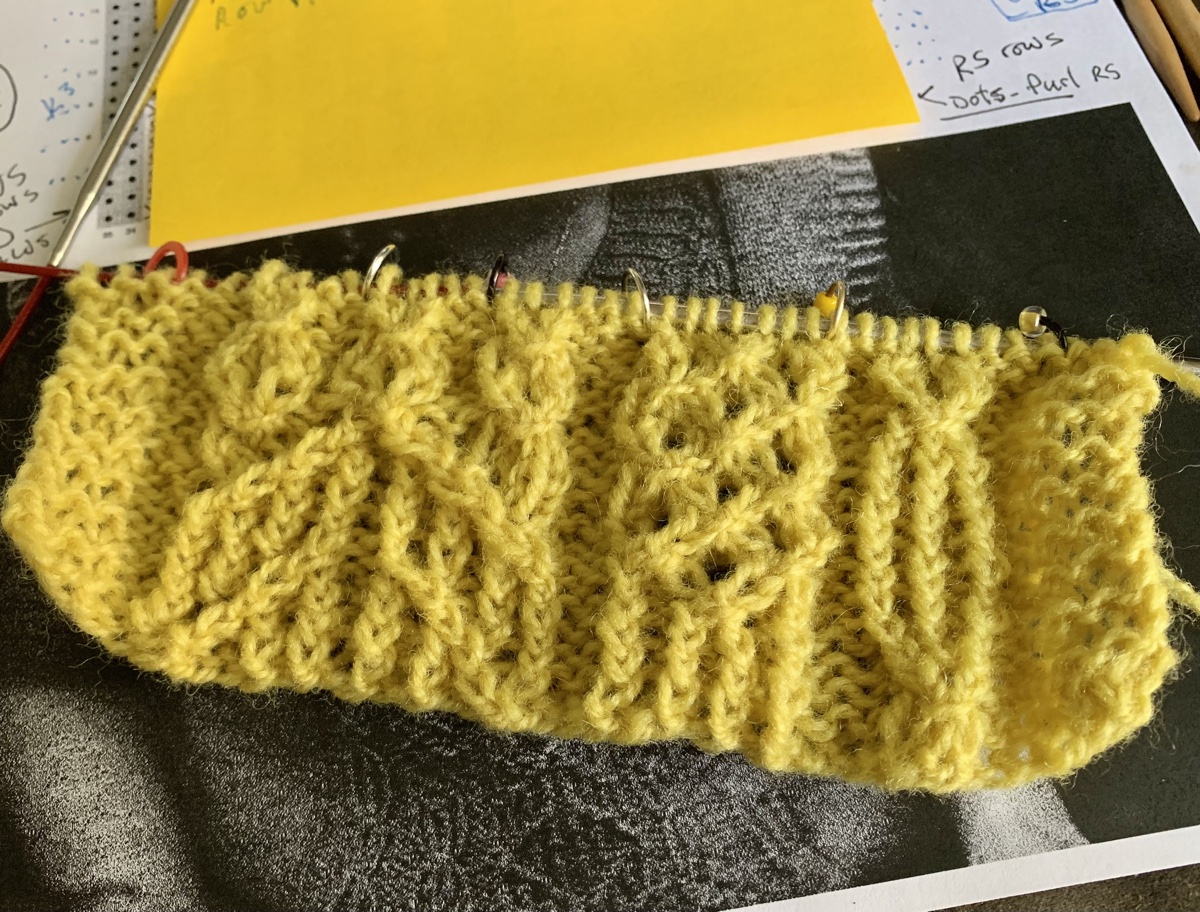
Use stitch markers!!! This helped me a great deal, even though I had to keep moving some of them because the cable section would move. I made small sections on the row to prevent a lot of ripping back.

cable knitting with stitch markers
Use stitch markers to knit a flat cable swatch

Get a better cable needle!!! I was trying to knit using my old, metal cable needle and had my usual problems. The thing would slip out and leave my stitches hanging, or I had to clumsily hold it to be sure that didn’t happen.

Then, I searched for new types of cable needles. I just couldn’t understand why cable needles couldn’t work better! Low and behold… I discovered the Brittany short wooden cable needles (Amazon paid link). Amazing!

short wood cable needle
New Brittany wood cable needle – LOVE!

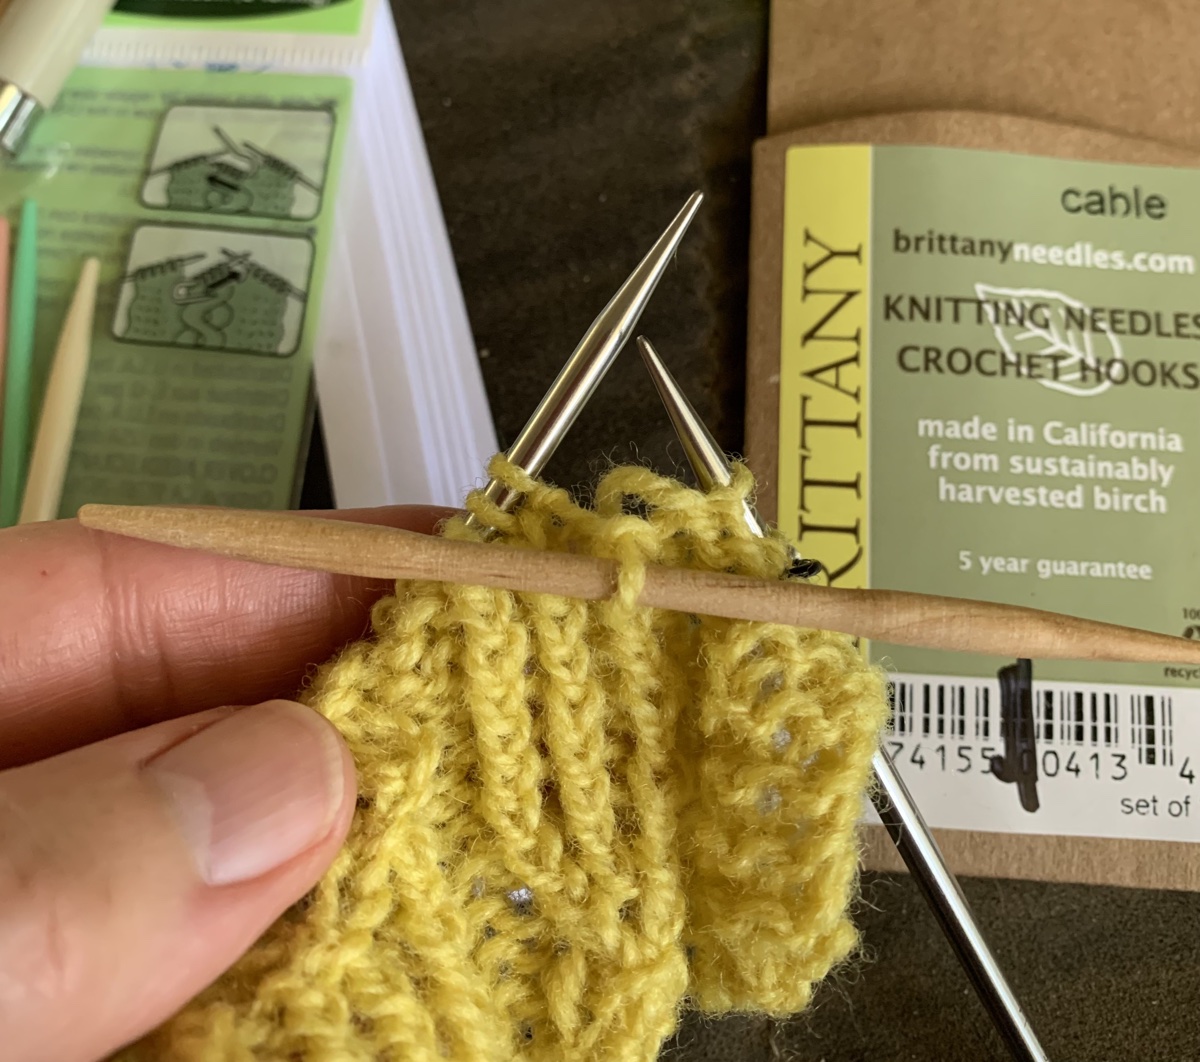
This set of cable needles comes in three sizes, and I used the middle size for this project, which is fingering yarn (picture above). The short, wooden needle is thinner in the center so the stitches stay put. The shortness also helps when knitting off the cable needle. This has made cabling a lot easier for me. I highly recommend them.

Swatch and Sizing

After looking over reviews, at Ravelry, written by previous knitters of this vest pattern, I see that many finished projects have turned out to be too tight. Even when a seemingly larger size was chosen, the vest seems to end up with a smaller circumference than planned. Maybe knitters did not do a swatch in the round???

I have added six extra stitches (3 on each side) to my swatch. Those stitches are not part of my gauge.

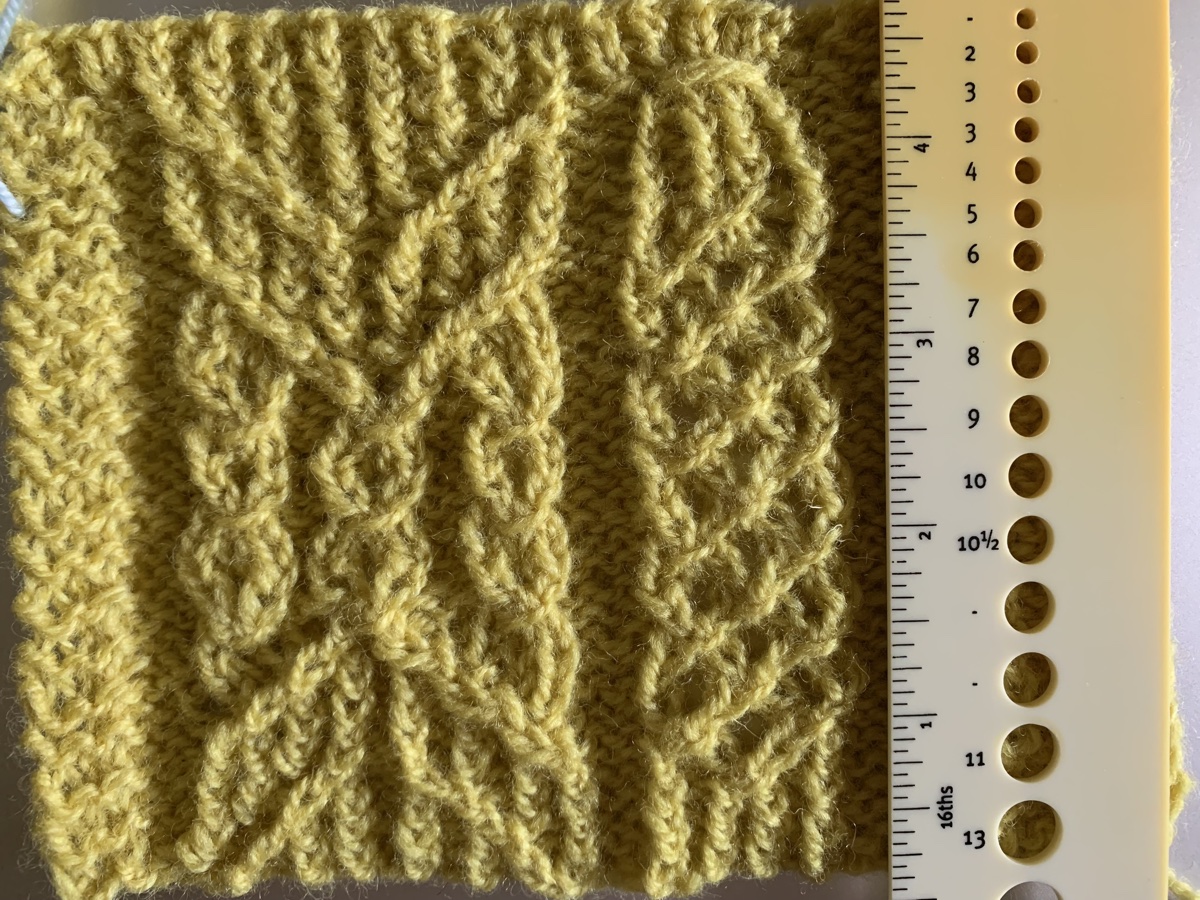
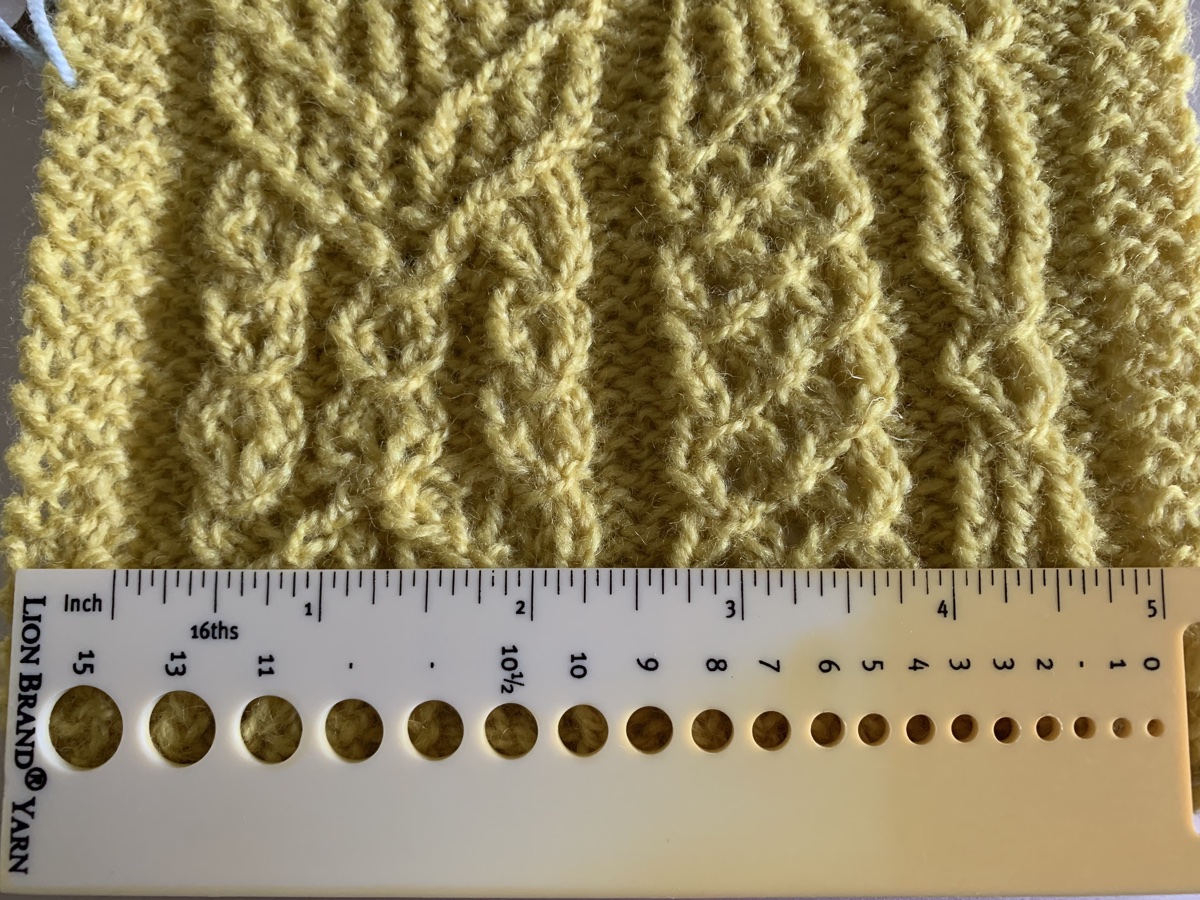
Knitting a swatch is very important and swatches should be knit flat and in the round, because that is how they are knit in the pattern. I’ve only done the flat swatch. The finished swatch size will be larger than normal 4×4 inches- according to the pattern. My swatch was nearly exact, but a tiny bit larger. Going down a needle size would most likely make this too small, and having things a little larger might be good with this pattern.

If I decide to knit this pattern, I need to buy the same kind of yarn, in a different color. I may knit a swatch in the round with my new yarn and see how that turns out. It is possible that the gauge is tighter in the round. That would explain why knitters were getting tighter vests. Maybe they never checked gauge in the round.

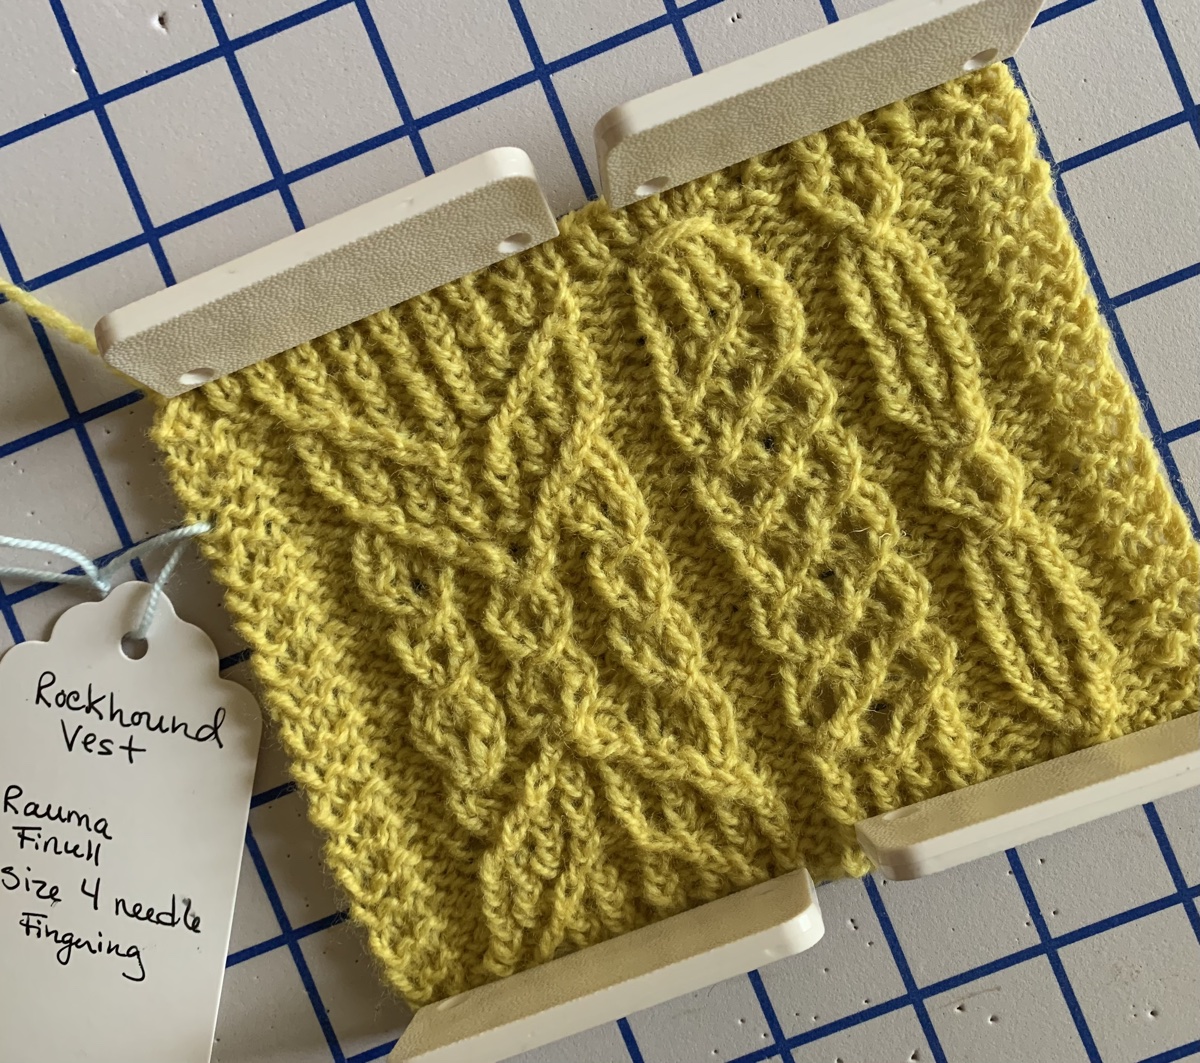
I definitely made some mistakes in this cable swatch, but it wasn’t that bad to knit. This swatch shows only part of the cable pattern which goes down the middle of the front and back. If nothing else, it was good practice at knitting from a cable chart.

More Knitting From Me

Knitting a Swatch For Trove

Knitting a gauge swatch for the Trove slip stitch sweater pattern.

I’m always on the lookout for interesting sweater pattern to knit. I’m not an expert so I’m always looking at difficulty too.

The Trove pullover pattern is made up of slip stitch rows with alternating colors. The pattern interests me because I can use up some of my J&S wool.

I bought the pattern and knitted up a swatch. The pattern says to use Sport weight yarn, but I want to use fingering and DK. I went up a needle size to do the swatch, hoping this will work out.

measuring a swatch

After knitting a few rows, I wanted to see if the knitting was close to 4 inches across, and it is. The real measurement will be done after washing and blocking, but if this was really off, I would not continue with this needle size.

The colors I grabbed may not be the ones I use to knit the sweater. This is a trial piece, and a good time to try out colors.

How I Knit My Swatch

It took me a bit to figure out how to knit the swatch, so I will share how I did it here.

I cast on 23 stitches. The gauge swatch should be 22 stitches across, but the swatch needed to be an odd number to work out knitting flat (or so it seemed to me).

Knitting swatch for Trove
Swatch for Trove, after washing

Each section is four rows of knitting, and rows can be easily counted when you remember that. 40 rows long should be 4 inches, so do 10 repeats of the 4 row count to equal 40 rows. In my swatch you may be able to see the 10 colored rows (those colors are actually 2 rows of knitting).

After casting on, I knit back and forth, then did a purl row so the “Dotted Stripes Stitch” begins on the right side (RS) – as it will when knitting the sweater. Usually I have 3 extra stitches on each side of my swatch, but I did not do that this time.

Measuring My Gauge

This is my Trove sweater swatch after washing and blocking to dry. Gauge in the pattern is 22 stitches by 40 rows in four inches of knitting. My stitches are pretty much exact. I have one extra (23 total) stitches in my swatch.

The row gauge is short, so I will have to watch the length of things when I knit. It is better to have stitches correct, as the length can be dealt with more easily.

The Advantage of Knitting With Wool

When, and if, I do get around to knitting the sweater, I will alternate skeins of wool – Jamieson & Smith, and Rauma – by spit splicing (no ends to weave in!) to alternate the colors. I will be using more than the 5 colors suggested.

The main color will be Jamieson’s lavender – pink color. I bought a bunch of skeins to knit something else, then decided I didn’t really like the yarn for that project. I think it will work well for Trove.

Notes and Suggestions From Knitters

I’m always grateful for knitters who bother to leave truthful comments about their experience with knitting a pattern. Some things I noticed while reading comments about Trove were that the sleeves are too wide. Also the neck tends to be too loose and wide. These are a couple of things I can be aware of when knitting my own sweater.

Can a Beginner Knit this Pattern?

If this is your first sweater, or you have not been knitting long, this one might be a challenge. I mainly say this because if you need to make changes to the pattern, a beginner might not know what to do. I have not knit it yet, but maybe a solid color pattern would work better for a beginner knitter. I’ve had a lot of luck knitting the free sweater patterns by Espace Tricot.

Link to Trove pattern page at Ravelry. Have you knit Trove? In the midst of knitting it? I’d love to hear what you think.


Why Knitters Need to Swatch and Get Gauge

Learning the importance of knitting a swatch and keeping that info for later. It’s not a waste of time, but a necessary part of knitting patterns.

I’ve been seriously knitting (as much as possible) for a couple of years now. I still consider myself a newbie to the knitting world. The more I knit, the more I realize I still have a lot to learn. (Photo at top: Miss Babs sends along this little bits of yarn to try out whenever I place an order, which I think is so cool!)

I want to say that I am a beginner in many ways. Swatching and getting gauge is still something I need to work on. I am searching for information on these subjects myself. This page is full of good links to help me as much as any reader.

Swatching is Not a Waste of Time

When I first began to read about swatching I thought it was going to be a tremendous waste of time. And then I would just have to unravel the swatch before I began knitting the item. What was this gauge thing and how off could I be? Plus, I really didn’t understand how to make a swatch.

This Very Pink Knits video was very helpful in making me understand more about making swatches.

Tie Knots For Needle Size Used When Swatching

In the Very Pink Knits video above, around 7:15, she will show you this handy trick to remember needle size used when swatching. Leave a long tail and tie one knot for each size. In my swatch samples below you can see I have 5 and 7 knots tied which means the dark green swatch was knit in a size 5 (US) and the lighter was knit with a size 7.

knots for needle size used in a swatch
Knots in the tail represent needle size used

I was thinking about swatching incorrectly. Each swatch can be kept as a reference to go back to and use when knitting something in the future. A swatch, made correctly, can be stored with other swatches to build an inventory over time. Of course labeling each one is important to remember the yarn used, needle size, etc.

using tags to save swatches
Tags can be used to save swatch info, but must be attached to each swatch

Gauge is found by counting stitches across and also rows (up and down). Rows aren’t as important for scarves or items that can be a bit longer or shorter without a problem.

Changing needle size will help with gauge. Most times I need to go up a needle size to get gauge. This means I knit tightly and get more stitches in my 4 inch swatch count than there should be. When I go up to a bigger needle my stitches are bigger so there are fewer within the measurement. The type of yarn can also be a factor.

As you can imagine, not all knitwear designers knit the same, and they probably don’t knit the same way you do. And if you change yarn type – that matters too! This is why gauge is important to figure out before knitting something like a sweater. Pattern designers will give you the recommended gauge and you keep trying to knit swatches until you get that gauge – or very close to it.

Convert suggested needle sizes using this excellent chart (link below) which lists US, metric, and UK / Canadian sizes.

Knitting Needle Conversion Chart


Keep Reading: Recent Blog Posts

Learning How To Do Mosaic Knitting

Do you ever wonder how color-work knitting can be done flat? I’ve wondered if that is possible because I’ve only ever done color-work in the round.

Well, mosaic knitting is not really the same thing, but it can have the same effect with a pattern knit into a flat item, like a scarf, shawl, or cardigan.

I’ve been keeping my eyes peeled for my next sweater project. My top choices are either a stranded colorwork pullover, or a cardigan. Unless I do steeking, which I’ve never done, a cardigan can’t have patterning on the body because it’s flat knitting. Color-work is done during circular knitting. Unless… you do mosaic knitting.

The Boho Style Mosaic Cardigan pattern caught my eye. I love Bohemian styles. And this loose, flowing, cardigan has beautiful color-work on the body and sleeves. It is done with mosaic knitting as the name suggests.

Printable Mosaic Knitting Chart For a Swatch

If I am going to commit to knitting a big sweater using mosaic knitting, I’d like to know how it’s done. Before I began wading through bad YouTube videos, I thought I’d look for an article online explaining mosaic knitting. The Interweave site has a good article with a little chart to print out.

Basically if you can knit, purl and slip stitches, you can do mosaic knitting. It is a fast and easy way to create an interesting pattern.

I chose Chart 2 from the Interweave article. This chart does not show the purl side rows, but you don’t need them.

If chart knitting is not your thing, believe me, you will catch on quickly anyway. This little chart is great for a beginner. Once you follow the first couple of rows it will make sense, and you won’t believe how easy it is.

Go to the Interweave page and print out Chart #2.

mosaic knitting swatch
Quick swatch to practice mosaic knitting

How to Follow This Mosaic Knitting Chart

Read the chart beginning at the bottom, reading right to left. This may seem weird, but that is how our knitting goes – we knit our stitches right to left.

I simply knit back and forth for the first few rows before beginning the chart.

Row 1 is all dark triangles and it’s all knit stitches in the darker color (green for me). At the end of the row, turn to the wrong side and purl all stitches to get back to row 3.

Now add the white yarn beginning at row #3. Knit 2 white, slip the next green stitch. (To Slip: put the needle in purl wise in the next stitch and slip it onto the right-hand needle… simple!) Continue across the row and turn to work the wrong side.

For the back of the work – the purl side – all stitches are purled with the color yarn you are holding. The other color stitches you come to will be slipped. There is no need to follow a chart because you can see the stitches you just knit as you come to them. If you just finished knitting with green, you will now purl those stitches with green. White stitches are slipped.

Also, wherever the yarn is – front or back – it will stay there while you knit or purl. On the Right Side / front of work, you will be knitting so the yarn will stay in back while you slip stitches. On the Wrong Side / back of work, you will be purling so the yarn will remain in front while you slip.

slipped stitches knitting mosaic swatch
Slipped stitches on back of swatch

All Purl Sides, back of work: Whatever color yarn you are holding – purl the same color stitches and slip the others!

For the next row, grab the correct color yarn – in this chart the dark triangle means the dark yarn – and begin knitting – and slipping the V blocks in the row. The yarns will travel up the side of the swatch as you change colors. This is not the best edging, and I would do something different if I were truly knitting a garment, but it’s fine for the swatch.

mosaic knitting

This is a very easy way to add an interesting pattern to a garment and I think the style itself looks a bit Boho! I don’t know yet if I will knit the Boho Style Cardigan, but at least I know what mosaic knitting consists of.

Mosaic vs. Fair Isle

For the mosaic type of knitting you are only knitting with one yarn at a time compared to Fair Isle where two yarn colors are held to knit a pattern across a row. That makes mosaic knitting quite easy to do. It can be worked on circular projects as well.

Fair Isle has a smoother finish as you can see in the images below, which are projects of mine. It’s a lot of fun to do, but must be used for circular knitting projects only. Cardigans can be knit in Fair Isle, but steeking is needed… yikes. I haven’t worked up to that yet.

This makes mosaic the perfect choice for adding designs to anything worked flat – including a cardigan.

Pictured projects L-R: Turkish Patterned Cap, Fair Isle Mitts (free pattern), and Wild Angelica Socks.

YouTube Videos on Mosaic Knitting

If reading how to do this type of knitting is confusing, a decent YouTube video can help. Unfortunately I can’t find any really good videos on this, but this one shows mosaic knitting in a shawl. It’s not exactly the same as I’ve described here because she is not purling the back of her work and the slipped stitches need the yarn in front for the slipping. But it shows a pretty way to add color to a shawl.

This video shows how to follow a chart, but as usual, there is a lot of talking. I didn’t watch the whole thing.

Free Mosaic Knitting Patterns