Twice I’ve bought sweater patterns and lots of yarn to knit them, and both times I’ve not been able to accomplish the patterns. Since I have all this yarn to use up, I’ve kept an eye out for a simple sweater to knit.
The Turtle Dove sweater pattern has raglan sleeves and also droopy underarms. What is that called? Bat wing? Anyway the armpit area is long. It’s not my favorite type of sweater, but the finished projects, knit by others, look quite nice. You can see them at Ravelry. It also looks comfortable. And, oh ya, it is a FREE pattern..!! Yes, that drew me in.
I’m not an experienced sweater knitter, and after my last two tries at knitting were flops – the Oxbow disaster really turned me off – I swore I wouldn’t knit a sweater this year. But all that yarn, stacked up in my spare bedroom, kept stressing me out. I needed to use it for something.
Beginning Sweater – #1

I used Arranmore yarn for my first attempt. This was frogged because I did the short row shaping in the wrong place. I didn’t understand the marker placement.
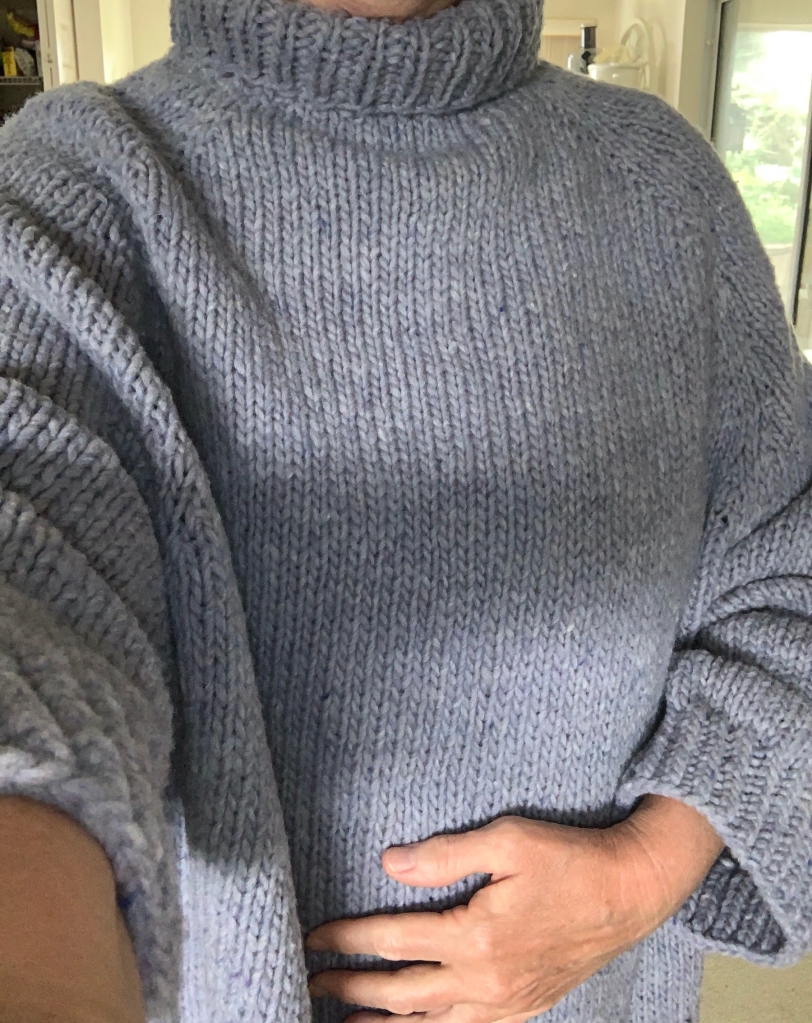
I ripped out the yellow knitting and began again with Brooklyn Tweed’s Quarry. (My photos on this page are of the same yarn, but the color “Geode” photographs very differently.)
First, I researched “how to knit a raglan sleeve sweater”. I discovered that raglan sweaters are supposedly the easiest type to knit. You mark out your sleeves and make increases. The pattern began to make sense when I realized this.
I’m writing this page because I couldn’t find answers to my questions about this pattern. And, I’m not the only one who had questions.
Sketching Out the Pattern Increases
The marker set up row is separating out the sleeves, and marking the front of the sweater and the back. The markers DO NOT show the center of these areas, which was my mistake. The pattern does say that the markers denote the “divisions” between the areas. For some reason this did not click with me. Duh.
I had to draw out the directions. When I sketched out the marker placements and where the increases would be, I first thought that the right and left sleeves were mixed up. Then, it occurred to me that I am knitting the sweater upside-down, so the R and L labels were correct, of course.

On the “marker setup row” first you knit the smaller amount of stitches, and place the marker – those stitches are the sleeve stitches, also called raglan stitches in this pattern.
Knitting around and placing four markers gives you both sleeve placements – the sleeves are within that smaller number of stitches. Knowing this, gives you a feel for the back and front areas of the sweater, which you need to know for placement of the German short rows at the back of the neck.
German Short Rows and Video Help
To begin the short row shaping, the pattern directions say to “knit across the right sleeve, front, and left sleeve, and then begin short rows. The short rows will go between that last sleeve marker and the BOR / back stitch marker. This area is the back of the sweater.

I’ve never knit German Short Rows before, but after watching the Purl Soho video I did them just fine. The pattern suggests watching Very Pink Knits video, and it may be the one I list here, but I preferred the Purl Soho video.
These links go to YouTube: Very Pink Knits and Purl Soho. Very Pink Knits also has a slow motion video.
Raglan Increases
Now that I can “see” the pattern, when I get to the section where I will “Begin raglan increases” the rounds make sense. On Round 1 increases will be made before and after every marker. In the pattern they are called “raglan markers”. On Round 3 the increases are made at the front and back sections only – next to the markers.

Needles and Sizes I Used
This is my info, and you will use the needle sizes to get gauge for your project – it will depend on the yarn and how you knit. Gauge is listed in the pattern.
The pattern suggests using a smaller needle size for the ribbing to begin, but I used a size 11, which I am also using for the sweater. I tend to be a tight knitter and I did not want a tight rib around my neck. I knit the rib for 5 inches, to have a good roll down. I decided that I didn’t want the neck to stick up. I’ve tried it on and the neck is fine.
I cast-onto a 16 inch needle, following the directions for a size Medium, using the Old Norwegian cast-on – or something like it. (By the way, if you do change needle sizes after the neck, continue to use a 16 inch length needle – once the stitches get crowded, switch to a 32 inch length.)
When my stitches became crowded again, I bought a longer (40 inch) circular needle. I am knitting with yarn that is quite bulky.

See photos of my finished Turtle Dove Sweater.
Discovery!
This is a pattern by Espace Tricot, which offers all their patterns for free! What? That is what their Ravelry page says. Based in Canada, they have a YouTube Podcast, website (for their yarn store), Ravelry page and forum, and a blog. Yay, a new designer to follow! I will be looking into all this further because I see that they offer some really nice FREE patterns!
More Free Sweater Patterns by Espace Tricot
- Gingerbread Sweater – new raglan pattern that uses two yarns held together, or use a heavier single yarn for knitting.
- Bright Side – also a classic raglan pattern knit with fingering weight yarn.
- Calliope – Raglan with expanding rib at neck and long rib on sleeves. I have knit this sweater and you can see the Calliope page here.


How did you increase at each marker for round 1? Did you kfb, k1 before each marker and k1, kfb after each marker? Round 1 is where I’m having trouble understand. Your visual for round 3 is great!
LikeLike
Hi Emily. If your question is about the raglan increases Round 1, do exactly as the directions say. Kfb then knit to 2 stitches before the next marker – kfb, k1. AT the end of the round you will knit 1 which will be next to that first Kfb. On that round you are making increases at every marker (4) so 8 increases. Basically you are expanding the sleeves and body on round 1. On round 3 you are only expanding the body area. I hope this is helpful.
LikeLike
you are amazing i kept forgetting i wa knitting upside down a they say and forgetting which wa back front or right a nd left nice to know i was not the only one
have you tried some of their other patterns yet?
found them to be classical knits simple straight forward and never out of fashion
i have so enjoyed your turtle dove journey
LikeLiked by 1 person
Thank you Marie, glad you enjoyed this page. I have to be able to visualize what I am doing – like most people. I do love Espace Tricot for their generous offerings of beautiful free patterns. I just finished up Calliope (I also wrote about that one) and they just added a free, classic raglan pattern – similar I image to Turtle Dove, but without the big sleeves. It’s called Gingerbread -https://www.ravelry.com/patterns/library/gingerbread-sweater …… Happy knitting! ~ Pam
LikeLike
So Row 3 is basically increase twice, once right before the front and the marker before the back (21 stitches )
LikeLike
If you mean Round 3 on the raglan increases, you will increase 4 times around. Twice at the front and twice at the back – after and before the sleeve stitch sections.
LikeLike
Thank you so much for explaining the increases
LikeLike
I’m happy it helped!
LikeLike