I had never done an I-cord bind off, but I’ve used the i-cord to make rope handles and long points or tassel holders on the end of hats.
I must say, this type of bind-off is quite nice. I used it recently when the Bay’s Edge Shawl called for binding off in this manner. As I neared the end of knitting on the Scrappy Bias Shawl, I wanted to do the same thing.
Directions for I-cord Bind Off
To begin binding off, first add three stitches to the needle, with right side of project facing, also called a “cast on” of 3 extra stitches. Wrap the yarn around your thumb and place it onto the needle (at the end of the work – or Left-hand needle). Do this three times to add 3 extra stitches at the end of the work.
*Begin the bind-off: Insert the Right Hand needle and knit 2 stitches. Now, slip the next stitch knit-wise (as if you were knitting) from the left needle to the right. There should be three stitches on the right hand needle (see below).
Next…Knit one, and pass that slipped stitch back over the knit stitch. This is the bind-off stitch so it drops. (See the video below for more help). This leaves 3 stitches on the Right needle. Slide those 3 stitches back onto the left needle.
And begin again from *: K2, Slip 1, PSSO and slide 3 stitches back to L needle.
Once you get to the end, there will be 3 stitches left. Either bind them off in the regular way, or pull the yarn tail through all three.


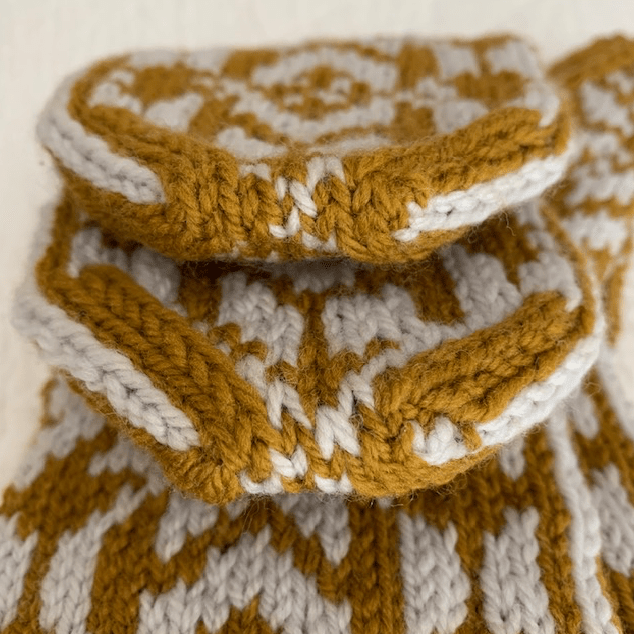
Binding-off this way takes longer, but the finished edge is more rounded and substantial than a regular knit bind-off. See it below in my photo.

Very Pink Knits shows all these steps on the video here. She does go a bit fast, but once you learn the steps, the bind-off will progress quickly.
If you are interested in creating an i-cord edging while you knit, I have a page that explains that as well. It leaves a nice edge up the side of an item, such as a scarf, dishcloth or other flat knit project.
Keep Reading About Knitting

Lots of Changes This Year
Writing a blog, sharing photos, and doing research and making links takes time. Lately I don’t think…
Keep reading
Knitters and Our Many Projects
How many projects do you have on your needles? It is not uncommon to find that fellow…
Keep reading
Happy New Year 2026 and Time to Cast On
A new year means a brand new knitting project to begin. What will you be making?
Keep reading