How To Sew Buttons on Knitting

Finally I have figured out a good way to sew buttons onto knitting.

One reason I haven’t knit many cardigans is because I have to make a button band and then sew on buttons. I love the knitting process, but the finishing up is not as fun for me.

sewing buttons on a sweater
Eva Cardigan buttons being added on the wide band.

Recently I knit the Eva Cardigan pattern which calls for four buttonholes with, of course, four buttons. I decided it was time to figure out how to correctly add buttons to my hand knits.

This page is being written as a reminder of how I added the buttons, and is as much for me as anyone!

There are a lot of videos, but I only watched one. It was very basic, but someone commented, below the video, that beginning from the FRONT of the sweater would hide the knot left by tying the yarn ends. I like that idea. I went a step further and pulled the little ends under to weave in. Here is how I did it.

buttons to sew onto a cardigan knitting project
Ceramic buttons for the hand-knit Eva Cardigan sweater

How to Begin

If possible, use the same yarn you used to knit the project. The Eva Cardigan was knit with a DK weight wool yarn. I pulled the yarn strand apart – in half – in order for the yarn to fit through my needle eye.

You will need a needle small enough to fit through the button’s holes. Then, you need to get the yarn through that needle eye. Figure that out first.

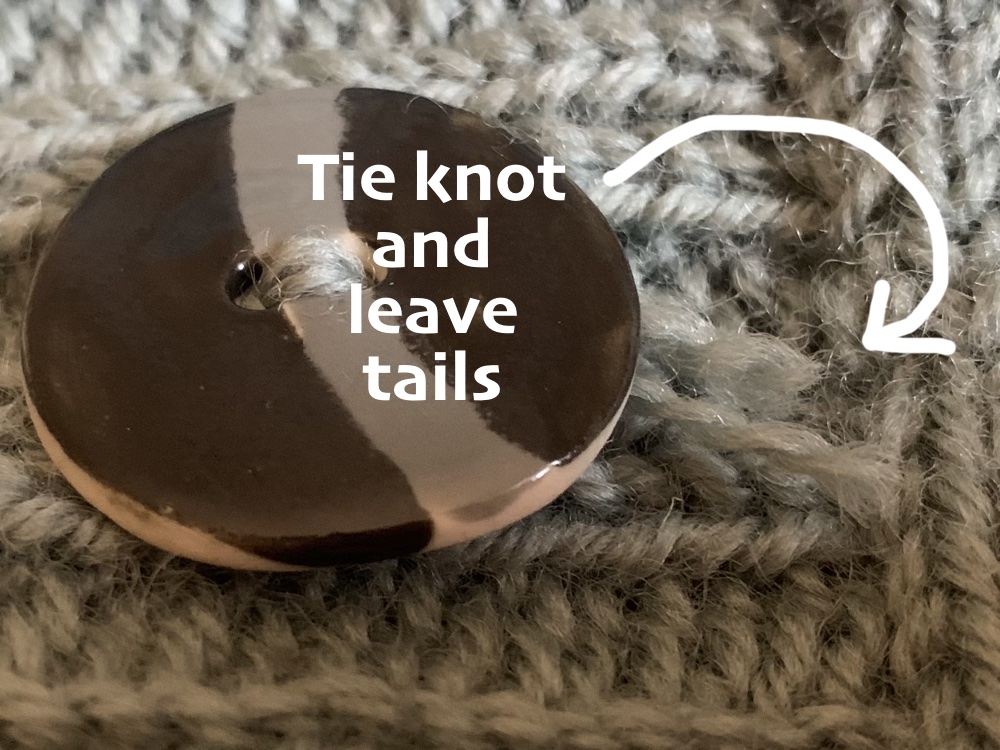
Decide where the button will go on the band – to match up with the buttonhole on the opposite side. With the threaded needle, go into the button-band from the front (no button added yet), and leave a tail – image below. Then, come up and go through the button hole and down through the other hole. My buttons only had two holes. Even if you have four holes, just knit the button on and ignore that tail until the button is secure.

sewing on a button
Begin sewing the button on

I went up and down through the holes until they were full – only a few times. Then, I wrapped the yarn around the base of the button for a bit more security. Then, using the two tails, tied a few knots tightly. They are underneath the button, and can’t be seen. Lastly, cut the ends of the yarn a bit short.

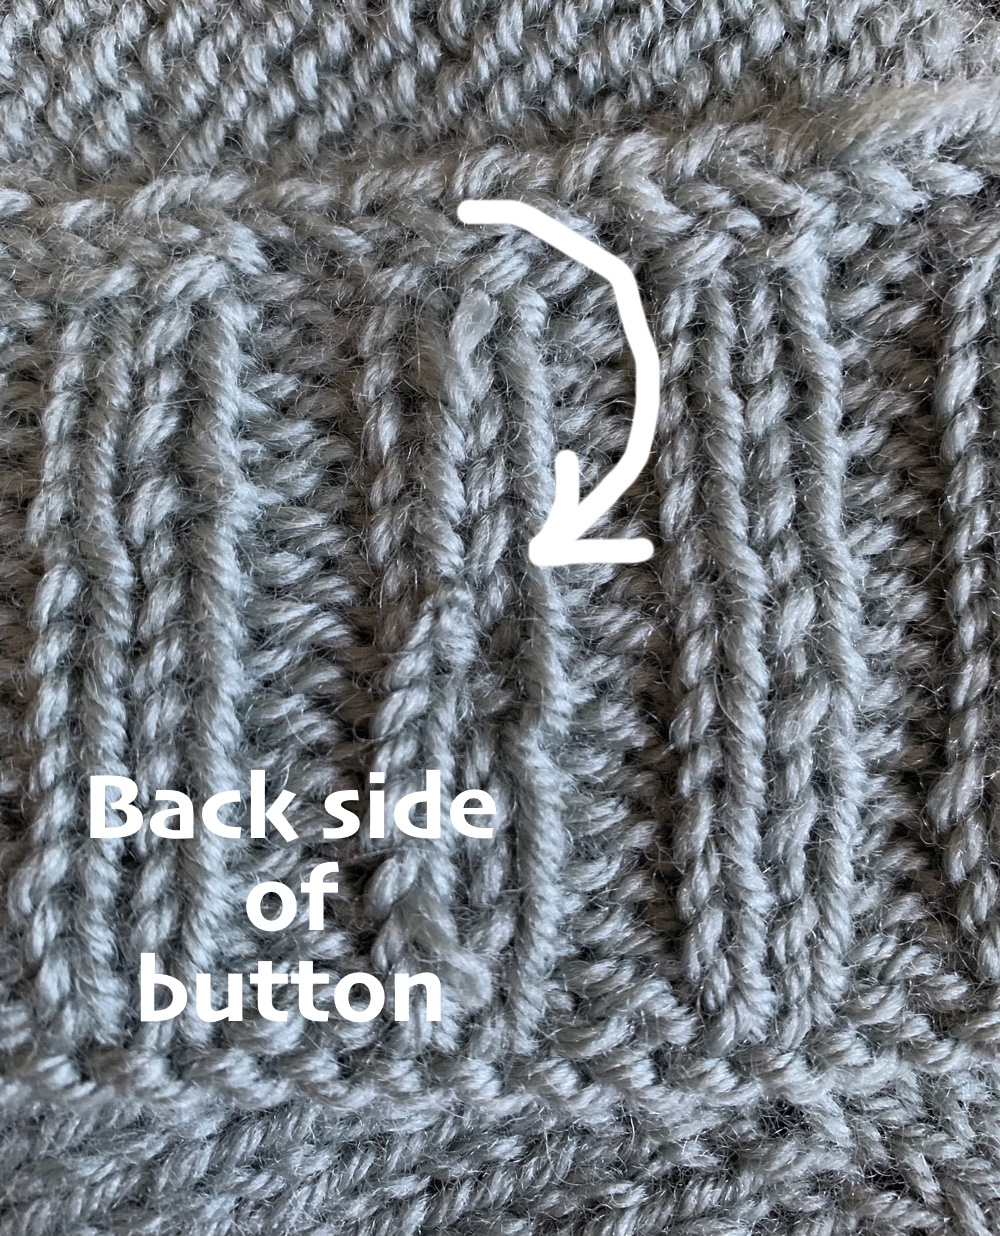
The commenter suggested that this would be enough, but on my first button I could still see the ends. And my buttons are fairly big! So I pulled the ends through to the back, using a small crochet hook, and then wove them in. For the remaining three buttons, I left my ends a little longer and wove them in on the back.

sewing on a button
Leave tails to pull through to the back.

Here is how the back of the button looks. It’s pretty neat looking and the buttons feel secure.

sewing on a button
Finished back side of button

I’m quite happy with this way of sewing a button onto a sweater knitting project. I would love to hear from experienced knitters who have suggestions for sewing buttons onto sweaters. Please feel free to help fellow knitters out by leaving a comment! Thank you.

More stories about yarn projects

Review of Knitting the Eva Cardigan

Cardigan knitting requires a little extra effort, but worth the effort for the Eva Cardigan by Petite Knit.

The Eva Cardigan is knit in a DK yarn and is a low v-neck with four buttons. It is a design by PetiteKnit (link to pattern below). I began to knit this – cast on – around the middle of September and finished the end of October. I found it to be a good pattern and love the sweater. Also, I learned some new things along the way.

I used a new yarn too. Sandnes Garn Peer Gynt, which is a DK, but really seems more like a worsted to me.

Although I have knit a few cardigans, none have had a shoulder construction like this one. I also had to watch a video to complete the buttonholes.

The Pattern and Yarn

The yarn is nice and I was very happy knitting with it. I bought mine at Wool & Company. It is made of Norwegian wool and the Peer Gynt is DK weight, but seems heavier. Wool and Company offers many colors, including heathers and tweed.

I bought 12 skeins of Sandnes Garn Peer Gynt yarn in color “Eucalyptus” green – per my daughter’s color request. I ended up with nearly two skeins leftover. But, better too much than not enough!

Peer Gynt yarn skeins leftover
Eva Cardigan leftover yarn

I knit a swatch with size 6US needles and it was a bit large. I don’t have many needles in size 5 (and then go down 2 sizes for the ribbing), so I chose to use the sixes (with size 4 for rib) and knit the extra-small size sweater. (Lots of various length needles are needed for this sweater in both the 4 and 6 sizes.)

However, this cardigan is being knit for my daughter, who is tall and thin, and likes longish sleeves. I’ll be adding length to the body (end measurement is 23 inches) and especially the sleeves (18.5 inches).

Wool and Company notified me that only 10 skeins were matching dye lot numbers, so two would be off, but very similar. I took them anyway, and have used one of the odd dye lots to knit the body ribbed hem. I was saving the other for the button band – but never had to use it.

Hurdles During Knitting

After the initial neck knitting, stitches have to be picked up at each of the shoulders. I really didn’t know how to do this, so I used another needle to pick them up and then added those stitches to the main needle.

I think this may be called a “saddle shoulder”, but I’m not sure. The design idea is to keep the sweater from sliding off the shoulders – I think.

  • Eva cardigan sweater knitting
  • shoulder construction Eva Cardigan knitting pattern
  • knitting a sweater

Picking Up Stitches for Button Band

Picking up stitches for the button band is not at all my favorite thing to do when knitting! This always takes me hours. I love cardigans, but it’s one of the things I dislike about knitting them.

For this wide button band, which goes up one side, around the neck, and down the other, the total number of stitches picked up needed to be divisible by four in order to make the 2×2 ribbing. Also, while you’re at it, make sure both front sides have the same number of stitches.

At least the designer said to pick up 3 for every 4 stitches. I guess most knitters know this, but I appreciate the instructions. (This is something another designer didn’t bother to mention and my Carbeth cardigan is totally messed up because of it.)

I watched a helpful video by Cocoknits which advised to only do the picking up of stitches, and not “pick up and knit”. YES! Do this! Then, when your counts are off (be prepared to count and count and count), it is easy to remove the picked up stitches and fix the count, which I did… over and over. FINALLY.. I got everything worked out correctly.

How to Make the Buttonholes

The buttonhole directions in the pattern are a little confusing when it comes to doing the “double backward loop”. Many thanks to another knitter, who referenced the video below which shows how it’s done. I am not sure my purl 2 together through the back loop was done right, as it looked a little too loopy.

This YouTube video by Kimmie Mulkholm shows the buttonhole construction for the Eva Cardigan. It is not in English, but can be understood easily using CC or not.

In the End

I have a pretty nice sweater now, which is a gift for my daughter. Since she lives in New England, it will get used a lot. It is currently being dried, on mats in a room with the dehumidifier running (necessary here in Florida), and then the buttons will be added.

This sweater seems quite big. Then again, my gauge was off. The shoulders and sleeves fit me just fine and I knit the XS size. I would like a wider body for myself so I’m not sure which size I’d choose to knit for myself.

  • hand knit cardigan
  • Eva Cardigan hand-knit sweater
  • Back of Eva Cardigan

As is usually true of hand knits, especially wool knits, the fabric smooths out and ends up looking incredibly good. I’m so pleased with the end product. I would knit it again – next time it will be for me!

Here is a little post about how I sewed on the buttons.

More Knitting Fun

Knitting The Brodgar Poncho Pattern

An easy poncho pattern that needs a lot of yarn, but would be good for beginner knitters.

I’ve always loved the freedom of movement when wearing a poncho. Like being wrapped in a soft blanket, ponchos are warm and unique outerwear. They come in so many styles and sizes that there is surely a poncho pattern to make everyone happy.

As I was browsing Ravelry one day, I came across Brodgar, which is a poncho pattern by Laura Aylor. It looked easy enough that I could handle it… So I ordered yarn from Miss Babs and knit and knit and knit on this project…..THEN

I ran out of yarn. It is my fault for not considering the size and yarn needs. Two skeins of Yowza will knit a Small size, but it’s not enough for the larger sizes.

Brodgar poncho knitting

Yowza Yarn

I chose Yowza yarn by Miss Babs in color way Cordovan, which is a maroon red color. This is a Superwash wool, which means it can be washed in a machine. All hand knits should be hand-washed, but for those people who simply don’t have time, or won’t do it, a beautiful Superwash yarn is a good choice. I would still recommend using a laundry bag (Amazon paid link) and laying the item flat to dry.

Knitting the Brodgar Poncho
Brodgar Poncho

Knitting to the Sad End

The pattern was quite easy to follow, but the knitting was quite boring. Everything is either a knit stitch or a purl. The pattern is created by those two stitches, and then once the pattern area is done, the rest of the poncho is still only knits and purls – to create stockinette – and the same stitches for making that edge ribbing.

For beginners: This is a good pattern choice. A chart is included, but every row is also written out. For those who can’t follow a chart, or want to check what they are doing, the written part is very helpful.

Once the entire length of the poncho is knit, a section will be grafted together to leave a neck opening. You MUST complete the textured part for the ends to look okay!

Yarn Amounts – Do Pay Attention

This poncho project has been something I knit for a bit and then leave to do another project. Each big skein of Yowza contains 560 yards. The size Medium poncho takes more yarn than that and I ran out of yarn. I was not going to buy another $52 skein of yarn, but I really should have because the ends (where the design is) don’t match up. This makes it look stupid.

If you want the Yowza skeins, one suggestion might be to do both textured sections – beginning and end of pattern – in a different color. Those two big skeins of Yowza should be enough for the long, middle section.

I will probably frog this project and use the yarn for something else.

cats and yarn

Want to read more yarn stories?

Surprisingly Sweet Blueberry Vodka Lemonade Sweater Pattern

My experience and notes about knitting the Blueberry Vodka Lemonade sweater pattern by Thea Colman, aka Baby Cocktails.

After some summer top knitting, I needed to have wool in my hands again. I chose a new pattern and some new-to-me yarn and got knitting on the Blueberry Vodka Lemonade sweater (pattern link below).
I made a stupid mistake when beginning the first rows after the neck ribbing, and had to rip it all out and begin again. Believing I would be able to do those yarn-overs just fine, I began to screw things up again – because, no I did not do yarnovers correctly. This time I kept knitting and took a refresher in doing yarn-overs.

Once I had all that down, the knitting went smoothly and the yoke became fun to knit.

The Yarn

I am knitting with Sandnes Garn Tynn Line Peer Gynt wool yarn (link goes to Wool & Co.). I’ve never knit with it before, but it’s soft and beautiful. There are some thick to thin areas, but I don’t mind that and I think it’s typical.

Although I bought two types and colors of yarn as possible choices for this project, the Tynn Peer Gynt worked out better for the needle size. I’ve ended up knitting with the black yarn.

  • Sandnes Garn Tynn Peer Gynt fingering wool yarn
  • skeins of wool yarn
  • Knitting swatches drying
  • Harrisville Designs shetland wool

Let’s Try This Thing On!

Using fingering weight yarn to knit a sweater means lots of little stitches and many rounds of knitting. Surprisingly, to me, I was done knitting on this fun project in just a little over a months time.

Finally I have split the body at the hem which means I can get this thing tried on! Yay…!

I am very pleased. That neckline seems perfect. A bit wide, but not too wide, just as the designer promised. I did knit for one more inch on the body, stopping at around ten inches and not nine. Two more inches of hem will be added, but first I plan to knit the sleeves.

We cannot run out of yarn on the sleeves, so I want to knit them without worry. IF I run low on yarn for the body ribbing, I can order another skein and not worry if it’s not a perfect match. *No problem here. I ended up with plenty of yarn even with adding a couple of extra inches to the body length.

Blueberry vodka lemonade raglan sweater knitting pattern
Hem split done, time to try it on

I began knitting this sweater on July 20th and today is August 15th, so it has taken almost a month to get this much done on the BVL sweater. *Then I finished on August 29th.

A few days later, I had one sleeve knit. They are 3/4 sleeves which stay wide until just before the short cuff. I ended up liking them a lot.

Decreasing for the Cuff

The knitting round where the many decreases are made, just before the cuff, gave me pause. Then I realized that the first set of knit stitches – in the parenthesis () – is done ONE TIME ONLY to begin the round. The next set of stitches – in the brackets [] is the number of stiches to knit along with the k2tog – and this is repeated in the round. The last set of stitches is what is left at the end of the round, and they will be knit – unless there are no stitches left and you knit zero.

For example: For my size, on this decrease round, I had to knit 2, then knit 4 + k2tog for the repeat, until I had only 2 stitches left at the end of the round, which were simply knit.

knitting sleeve cuff
Sleeve cuff
knitting sweater sleeve
Sleeve 1 done

Buy the Blueberry Vodka Lemonade Pattern

Finished and Happy

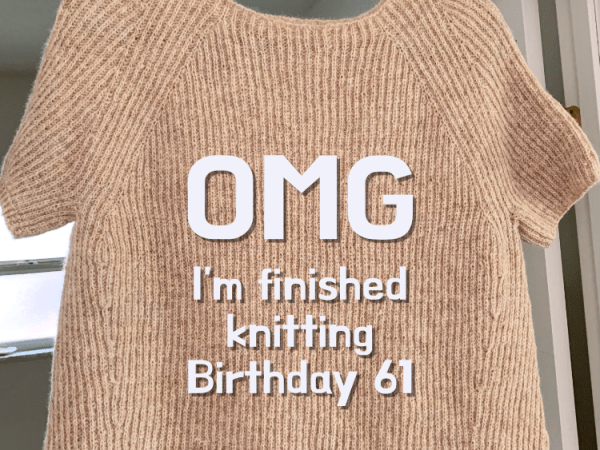
It took me about a month to finish knitting the Blueberry Vodka Lemonade sweater. I enjoyed knitting it because there was always something going on while knitting. The yarn-overs at the raglan sleeves, the texture down each side, and the bottom split rib, all added to the enjoyment.

Blueberry Vodka Lemonade sweater

The sweater was dry after a day and I did a quick photo shoot. We were getting the outer bands from Hurricane Idalia, with wind and rain, so I couldn’t go outside.

I also love this yarn. It is wool, but very soft. I would compare it to Rauma, but it may actually be softer. The finished project is absolutely fabulous! I’m always amazed at much more lovely a hand-knit becomes when washed. I’m very happy with my new sweater!

I don’t often say this, because once I knit a pattern, I move on to something new, but this is a pattern I would absolutely use again.
  • Blueberry Vodka Lemonade sweater

Please keep reading the blog…