

After knitting my first pullover sweater Umpqua by Caitlin Hunter, I decided to try a cardigan. I chose Fine Sand, by Heidi Kirrmaier because I could knit it in a light weight yarn suitable for my Florida climate. At least, that is my hope. Also it is knit top-down, so that is something new for me to try.
Part 1 (of 2)
This post has photos and comments about beginning the sweater and knitting to the short rows. I’ll finish up on the sleeves and bind-off on another post (Part 2).
Miss Babs was having a sale on the Tarte fingering weight yarn, which is made up of washable merino wool, nylon and tercel. Sounds sturdy and washable, which should make a nice sweater. (Yes, I love this yarn, and the color is wonderful!) The pattern called for DK or Sport yarn, so I knit up a swatch using a needle two sizes larger and I got close to the gauge. I’m hoping the sweater will be a bit large in the end. I don’t wear tight clothing.

This is the Franklin blue, and it’s very close in these photos to the actual color. And I have never been disappointed with any Miss Babs yarn. I knit a Mystery KAL Shawl with Miss Babs “Woodbury” yarn, which was soft and pretty.
Dark yarn is not as fun to knit due to difficulty in seeing stitches (my eyesight is not great), but I love this dark blue. Also the pattern is fairly simple, with no crazy lace stitches, so it shouldn’t be a problem. I can only knit dark colors during the daylight when stitches are easy to see.

What I’ve Learned From This Pattern
First of all this pattern is written very differently than any other I’ve followed (ya, that ONE other… hahaha). Charts are substituted for complete written directions. These are not knitting charts, like in colorwork, but charts with letters which are used to take the place of changing repeats / number of stitches for each row.
I always read through a pattern and highlight the parts I will need to pay attention to, such as repeats in a row, or info for my chosen size. I’ll admit that when I saw the first page of instructions, I had to spend a few minutes figuring it out.
Right off the bat I had to learn how to do the RLI (right lifted increase) and LLI (left lifted increase). Specific instructions for how to do those are included in the pattern and links to video help are included too. The LLI gave me a bit of trouble at first and I lost count on one row, but every row contains stitch counts (thank you!) so I was able to easily add those stitches back in.
Separating The Body and Sleeves, How To
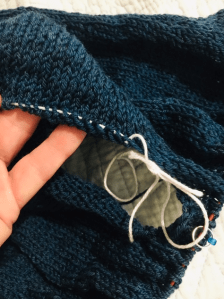
To separate the sleeves a bunch of stitches must be moved to waste yarn. That was easy enough to do using a darning needle and white yarn to be a contrast to the dark blue. The pattern called for a cast on of stitches and that threw me for a bit. Here’s what I did:
Turn the work to the wrong side. Yarn will be coming from the L needle. Use the R needle to begin a knit stitch but when it comes off the needle pick it up with the L needle (from the bottom) and let it stay there. Do this for the number of stitches called for in the pattern. For this sweater in my size I had to cast on 6, place marker, and cast on 6 more.
The video below is the one I followed. Begin it around 2 minutes for this type of knitted cast on. As he points out in his video, this is how to make a buttonhole!

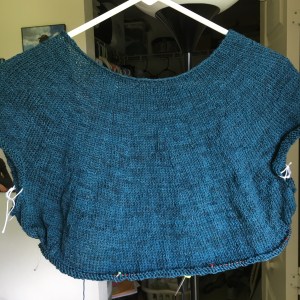
As of the beginning of July, 2019 here is where I am on my Fine Sand (photo below). I’ve passed the tricky armhole area and now the knitting will be pretty straightforward for a while. Next I will have to reacquaint myself with short rows. I love the yarn. I would definitely buy Tarte from Miss Babs again.
Along with this project I am also working on the Quince Wrap and Moon Sisters Shawl.
My first sweater was a bottom-up project and this is a top-down. With my cool new needle tips – those things that keep the knitting on the needles – I can try on my sweater as I go.

Adding a Contrast Color at The Bottom
When I reached the last few rounds (rows 1-6) toward the bottom, I began adding the moss green color. Although it looks more gold in my photo, it really is green. The blue is also more teal.
Now that I am finishing up the repeats the short rows come next to create a longer back section. I think I am going to change that and do a longer squared off back leaving slits between the front sections and back of the sweater bottom. I can picture it in my head but not sure I should try it. I may chicken out and follow the pattern. (Yup, I chickened out!)

Once the sweater bottom edge is done, I will go back and finish the sleeves. The other day I began to knit one of the sleeves with the blue color I was using for the bottom. This pattern calls for 3/4 sleeves which I like. In the photo below one sleeve is still on the white place-holder yarn and the other is in the knitting stage.
By the way, I love those stitch stoppers! Mine are by Cocoknits and I bought them at Webs (that is where the link goes). I can easily try on this sweater as I go without worry about losing my stitches.

Finishing the Sweater With Edging
The Fine Sand pattern gives directions for finishing the sweater with a knit edging. The edge is curling so it does need something. As I looked through the finished Fine Sand sweaters at Ravelry, I have found a couple that had really pretty edging. I’ll be there soon, so I need to decide.


3 thoughts on “Knitting the Fine Sand Sweater Pattern”