Understanding the Turtle Dove Sweater Pattern Increases

Twice I’ve bought sweater patterns and lots of yarn to knit them, and both times I’ve not been able to accomplish the patterns. Since I have all this yarn to use up, I’ve kept an eye out for a simple sweater to knit.

The Turtle Dove sweater pattern has raglan sleeves and also droopy underarms. What is that called? Bat wing? Anyway the armpit area is long. It’s not my favorite type of sweater, but the finished projects, knit by others, look quite nice. You can see them at Ravelry. It also looks comfortable. And, oh ya, it is a FREE pattern..!! Yes, that drew me in.

I’m not an experienced sweater knitter, and after my last two tries at knitting were flops – the Oxbow disaster really turned me off – I swore I wouldn’t knit a sweater this year. But all that yarn, stacked up in my spare bedroom, kept stressing me out. I needed to use it for something.

Beginning Sweater – #1

My first attempt at knitting the Turtle Dove sweater, which I had to frog.

I used Arranmore yarn for my first attempt. This was frogged because I did the short row shaping in the wrong place. I didn’t understand the marker placement.

I ripped out the yellow knitting and began again with Brooklyn Tweed’s Quarry. (My photos on this page are of the same yarn, but the color “Geode” photographs very differently.)

First, I researched “how to knit a raglan sleeve sweater”. I discovered that raglan sweaters are supposedly the easiest type to knit. You mark out your sleeves and make increases. The pattern began to make sense when I realized this.

I’m writing this page because I couldn’t find answers to my questions about this pattern. And, I’m not the only one who had questions.

Sketching Out the Pattern Increases

The marker set up row is separating out the sleeves, and marking the front of the sweater and the back. The markers DO NOT show the center of these areas, which was my mistake. The pattern does say that the markers denote the “divisions” between the areas. For some reason this did not click with me. Duh.

I had to draw out the directions. When I sketched out the marker placements and where the increases would be, I first thought that the right and left sleeves were mixed up. Then, it occurred to me that I am knitting the sweater upside-down, so the R and L labels were correct, of course.

sketch of how to knit the Turtle Dove sweater
Knitting the Turtle Dove

On the “marker setup row” first you knit the smaller amount of stitches, and place the marker – those stitches are the sleeve stitches, also called raglan stitches in this pattern.

Knitting around and placing four markers gives you both sleeve placements – the sleeves are within that smaller number of stitches. Knowing this, gives you a feel for the back and front areas of the sweater, which you need to know for placement of the German short rows at the back of the neck.

German Short Rows and Video Help

To begin the short row shaping, the pattern directions say to “knit across the right sleeve, front, and left sleeve, and then begin short rows. The short rows will go between that last sleeve marker and the BOR / back stitch marker. This area is the back of the sweater.

Neck and short rows done
Neck knitting will become a fold-over turtleneck, and those are my short rows.

I’ve never knit German Short Rows before, but after watching the Purl Soho video I did them just fine. The pattern suggests watching Very Pink Knits video, and it may be the one I list here, but I preferred the Purl Soho video.

These links go to YouTube: Very Pink Knits and Purl Soho. Very Pink Knits also has a slow motion video.

Raglan Increases

Now that I can “see” the pattern, when I get to the section where I will “Begin raglan increases” the rounds make sense. On Round 1 increases will be made before and after every marker. In the pattern they are called “raglan markers”. On Round 3 the increases are made at the front and back sections only – next to the markers.

Turtle Dove sweater knitting
Sweater front

Needles and Sizes I Used

This is my info, and you will use the needle sizes to get gauge for your project – it will depend on the yarn and how you knit. Gauge is listed in the pattern.

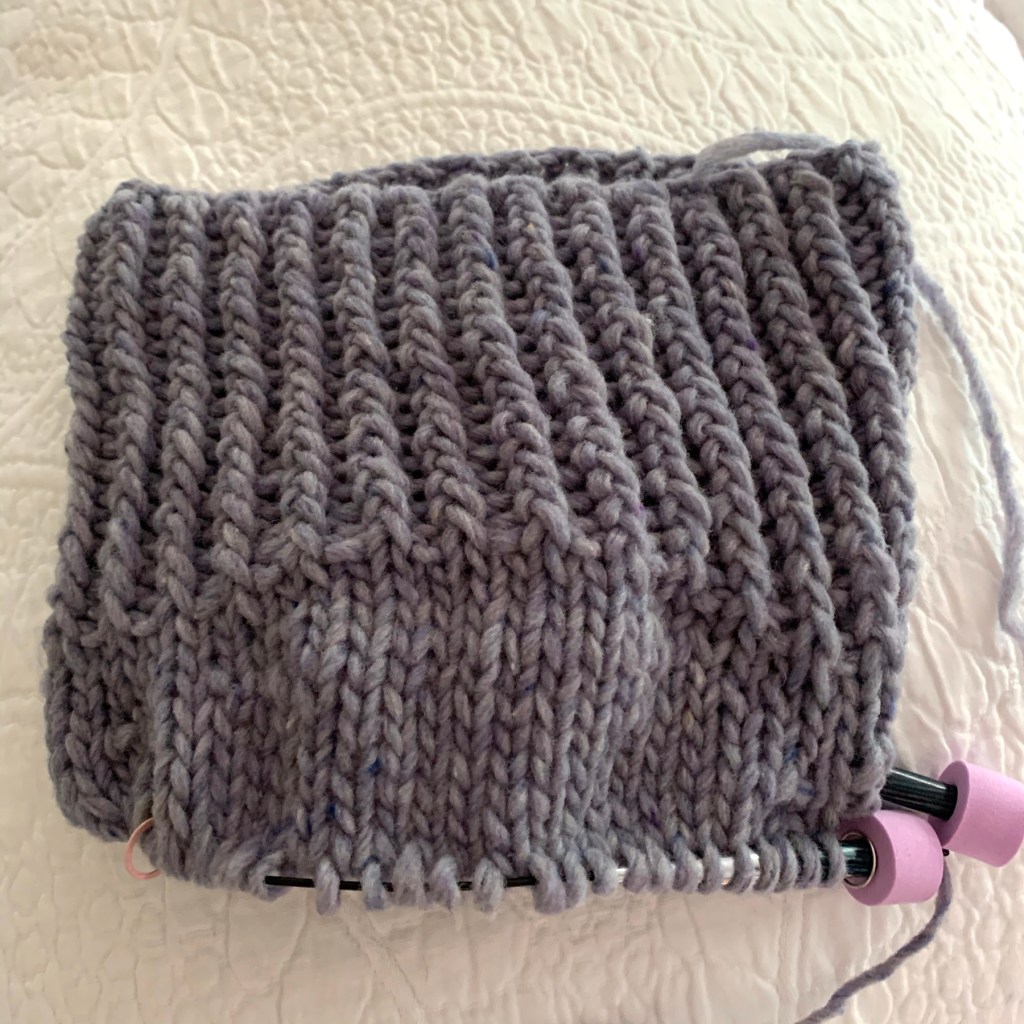
The pattern suggests using a smaller needle size for the ribbing to begin, but I used a size 11, which I am also using for the sweater. I tend to be a tight knitter and I did not want a tight rib around my neck. I knit the rib for 5 inches, to have a good roll down. I decided that I didn’t want the neck to stick up. I’ve tried it on and the neck is fine.

I cast-onto a 16 inch needle, following the directions for a size Medium, using the Old Norwegian cast-on – or something like it. (By the way, if you do change needle sizes after the neck, continue to use a 16 inch length needle – once the stitches get crowded, switch to a 32 inch length.)

When my stitches became crowded again, I bought a longer (40 inch) circular needle. I am knitting with yarn that is quite bulky.

Turtle Dove hand-knit sweater in Quarry yarn
The front

See photos of my finished Turtle Dove Sweater.

Discovery!

This is a pattern by Espace Tricot, which offers all their patterns for free! What? That is what their Ravelry page says. Based in Canada, they have a YouTube Podcast, website (for their yarn store), Ravelry page and forum, and a blog. Yay, a new designer to follow! I will be looking into all this further because I see that they offer some really nice FREE patterns!

More Free Sweater Patterns by Espace Tricot

  • Gingerbread Sweater – new raglan pattern that uses two yarns held together, or use a heavier single yarn for knitting.
  • Bright Side – also a classic raglan pattern knit with fingering weight yarn.
  • Calliope – Raglan with expanding rib at neck and long rib on sleeves. I have knit this sweater and you can see the Calliope page here.

Read More on My Blog

Do I Dare to Knit a Sweater?

Since I began to knit again, only a few months ago, I’ve saved sweater patterns. They are saved to my “favorites” section at Ravelry, and pinned to my knitting board at Pinterest. I even bought a book of children’s sweaters called Baby Botanicals (image link below) mistakenly thinking that a small sweater might be easier. Ha! Guess I did not learn my lesson from trying to knit booties. Small knitting projects can be just as complicated, or worse, than big ones!!!

As I perused the loooong patterns within this baby sweater book, I gave up on the idea of sweater knitting. Or at least, I had to find something super simple to begin with. Were any types of sweaters simple to knit?

I can’t answer this question yet, but I have decided on one to try. If I don’t jump in and give it a go, I will never know if I have what it takes to create a wearable item of clothing. After much searching, I chose the Umpqua Sweater by Caitlin Hunter. I’ve looked at a lot of sweater patterns and this one tugged at me right away. The sample is knit in a tweed yarn and has a wide yoke with an arrow-like design. Of course you can choose your own favorite yarn to use, which I did. Here’s how that happened.

Finding the Right Sweater Yarn

This is what has held me back from beginning a sweater:

Besides finding a pattern I could follow easily, sweater-knitting requires lots of yarn. Sweater knitting requires many needle sizes as well because the sleeves require DPN’s and sometimes other areas need smaller or larger needles. This all mean expenses beyond what is required to knit a hat or scarf. It costs (lots of) money to buy all the required notions.

Sweaters can be knit top-down or bottom-up and I had no idea which would be easier, or if there was a difference. Pullover or cardigan? Interesting cables and colors or plain and simple? After I began my sweater I found this Top-Down vs Bottom-Up Sweater Construction article which has good points to consider.

Also, I live in Florida. I am never going to wear a sweater – well, rarely. I don’t have that to look forward to. But I do travel to New Hampshire occasionally, where I would be able to show off my knitwear. The fact that I can’t enjoy wearing my finished sweater is a bummer.

The Umpqua Sweater is My Number One!

The Umpqua pattern is knit in worsted weight yarn, and I liked that. The Brooklyn Tweed “Shelter” yarn, used by the designer, was a bit pricey and was hand-wash only, so I looked around for something else. There are a lot of pretty worsted weight yarns to choose from. I needed something soft, warm and easy to care for.

It turned out that I got an e-mail the same day from a local yarn shop advertising the re-stocking of Malabrigo Rios yarn, so I checked out the description and colors offered. I’ve never used ‘Rios’ yarn, but do love Malabrigo yarn in general. And the colors were very nicely variegated which I thought would work well for this sweater. Also it claims to be “soft, warm and washable”. Perfect! (So far I can vouch for the “soft” part of that statement).

Finding the Right Color Yarn For My Sweater

Once I decided to use Rios, I looked on the Malabrigo site. This Rios yarn page shows the beautiful colors and has little “closer look” and ” sweater” icons in the top corner of each color. The “sweater” link goes to Pinterest where you can see each particular yarn knit up into items. This is a wonderful thing!

Often it is difficult to imagine a skein of yarn turned into a project, but here you have links to some things already knit up. The Rios yarn page is where I found my perfect sweater colors.

I decided that I loved the “Whole Grain” color for the main sweater color (my gauge swatch is the image for this post). Then I chose two others for the yoke pattern. “Aguas” is beautiful, but my second choice, “English Rose” is debatable. It’s very pretty, but I may want something different to sit alongside the blue-green color once I get to the colorwork part of the sweater. IF I ever get that far!

L-R, English Rose, Aquas, and Whole Grain – Malabrigo “Rios” worsted yarn.

“Wool and Company” Had All My Color Choices

I really wanted to support my local yarn stores (they are not close, but I could order from them), but neither one had these colors in their shop. I think one of them had the English Rose, but most yarn stores offer “free shipping” over a certain amount. I didn’t want to split my order and have to pay shipping fees. (For the most part I refuse to pay for shipping.)

Somehow, I stumbled across “Wool and Company” and ta da… they had every color I was interested in! AND they offer Free US Shipping – no matter the size of the order! What? On top of all that, they will wind yarn for no extra charge! Double what..???? Yes, they offer complimentary ball winding. All I had to do was ask at checkout in the comments section (see my comment below). So I asked for the 6 balls of my Main Color to be wound. That is what you see in the photo above (3 of the 6 they wound for me, for free!). I don’t have a winder, so I have to create balls of yarn from skeins and wind them from draping the yarn over my knees. To have all those skeins ready to go was immensely helpful. Wool and Company is my new favorite place to shop for basic yarn online.  

I do love Miss Babs, and other hand-spun / hand-dyed shops for their unique offerings, but Wool and Company had the name brand yarn I wanted when I could not find it elsewhere.

Pink pen is their writing…. Awesome!

Wool and Company’s shipping was quite fast. They are in Illinois and I am in Florida. I got the yarn – 8 skeins, 6 wound by them – in 6 days. Not bad.

Now all I have to do is create a nice sweater from this lovely yarn. Fingers crossed… here I go. I’m currently figuring the guage.

See how the Umpqua Sweater knitting is coming along.