Milet Mittens Colorwork Knitting Project and Mods

The Milet mitten pattern is my first real colorwork, small-needle knitting project. I’ve learned how to hold the yarn for the Main Color (MC) and Contrast Color (CC), and I’ve learned how to carry floats from both hands. So, I figured I was ready to attempt something new.

I did a trial knit of this pattern to try and figure out what size needles to use. The first attempt at this mitten came out very large (also my needle sizes were off – see Flexi Flip size discrepancies). I had gone up a needle size because usually I have to do that. But this time the mitten was way too big.

When I began my knit-along mitten project, although I had another mitten pattern in mind (Helianthus), I stuck with the Milet pattern because I could understand it (especially the thumb). I did go down to needle sizes 1.5 and 2 (pattern calls for 1.5 and 2.5). It meant I had to order some new DPN’s to finish off the top and thumb.

Honestly, I think this mitten should be knit in size 1 and 1.5, with added length for cuff and hand.

Knitting Milet mittens - cast on day
Accomplished the floral cuff the first day of knitting

The colorwork cuff is knit first then a ribbed lining is worked. Once the ribbing is finished the work is turned inside out to begin the hand. (See mug photo below.) I like this idea of making a double layer cuff.

knitting the mitten cuff and lining

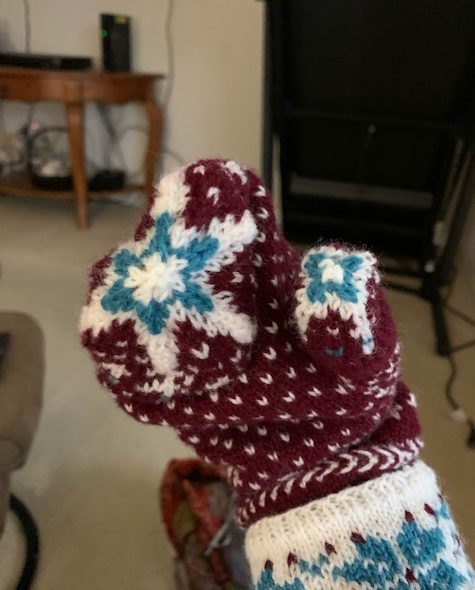
Because I like a longer cuff on my mittens, I added extra rows of maroon to the bottom of the hand / wrist area, then did a Latvian Braid (just for fun) with a couple more rows of maroon. I wouldn’t do it this way again because that wrist area is too loose. I like the braid, but overall the mitten is simply too wide and loose.

Colorwork mitten knitting
I added a Latvian braid and extra rows to lengthen the cuff

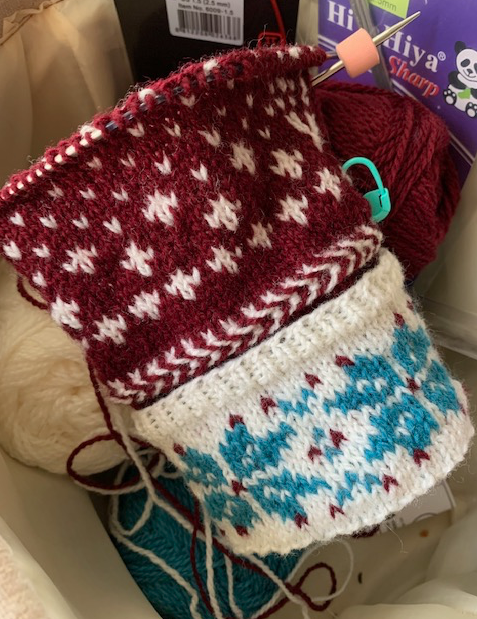
The pattern is easy to follow, but it did take me some time to figure out the thumb knitting. I’m not experienced with picking up stitches and very small circumference knitting, so the thumb was annoying. Because of this, I decided to knit it solid maroon until I got near the top.

knitting colorwork Milet mitten pattern

It took me twelve days to finish this one mitten, but I did not work on it every day. I had to wait for my Hiya Sharp #2 DPN’s to arrive.

Learned this: Very sharp, metal, DPNs are super helpful when knitting tiny stitches.

Colorwork mitten knitting
Made some changes to lengthen the mitten

Review of Milet Mitten Pattern

Overall I like the looks of this mitten. Loads of people have also knit it, so it is popular. Many knitters have mentioned having to add length to the hand, which I also had to do. The nice thing about mittens is that they can be tried on. It’s easy to adjust length of hand and thumb by adding / subtracting rows.

The thumb chart has been fitted in with the hand, so it’s very easy to follow – but you must know how to read a chart to knit mittens. It’s not difficult, but when designers put the thumb chart separate from the rest of the work, I don’t know how to incorporate that into my knitting. It’s something I will have to figure out because I have other mitten patterns I would love to knit.

Buy the Milet Pattern, by Ysolda Teague, Here

I added three extra rows of the white dot pattern, but once I got to the top “star” pattern I realized I needed more length. So I added a couple more rows there.

The mitten is also very wide. I believe a thin pair of gloves could be worn inside for extra warmth.

The left-hand mitten will not be knit exactly the same way as I will make better adjustments. I’ll use the same needle sizes so the pair will match, but next time (if I ever knit this pattern again) I will use smaller needles overall.

Changes, Mods, to Pattern For Next Time

  • Needle size 1 and 1.5 for a tighter cuff and smaller mitten circumference overall
  • Lengthen the cuff by adding more colorwork or plain color knitting, then more rows of ribbing to match length.
  • Add as many rows as needed of dotted colorwork to the hand length.
star pattern at top of Milet mitten pattern
The stars at the top add beauty to this pattern

Finding a KAL Mitten Pattern

The Woolly Thistle mitten knit-along begins on February 13th so I need to settle on a pattern to knit. I had thought I would knit the Helianthus mittens, and downloaded the pattern to browse. The thumb is difficult because the thumb chart is not with the mitten hand chart. Am I supposed to overlap it? And how? Seems difficult to follow a chart when one part is in one place and the rest in another. (This is why I decided to NOT knit the Helianthus, and stick with the Milet pattern.)

The Helianthus pattern does give me the opportunity to do a Latvian Braid, which I tried. I love the look of it! I was using a 9-inch circular needle and the knitting was slow going, but the end product is pretty sweet! The pattern has clear directions for making the braid.

Latvian braid knitting
Fontana and my first Latvian Braid!

I’m using Rauma Finul PT2 yarn in colors Dark Petrol Heather (blue #4123) and Very Light Green (#4106) in the image above. If I decide to continue with this mitten pattern, I will probably begin over with a prettier color match up. It’s a floral design, so it really should be “flower” colors. The pattern designer knit it in orange and yellow.

The Latvian braid is created by simply knitting and purling rows but carrying the yarn certain ways. It’s very easy, just tricky when working with such small needles and tight stitches. To knit 2-color mittens like these, one needs to know the correct way to do colorwork.

Adding More Rauma to My Stash

Now that my new Rauma yarn has arrive, (The Woolly Thistle has super speedy shipping!), I will choose three new colors and cast on a new Milet.

I’ve seen way too many mitten patterns that I would love to knit – or attempt to knit. My first choice was the Milet Mitten pattern which I began and is turning out large (see my trial mitten). The pattern is easy enough to follow that I think I could have a good end result AND get the pair finished by the end of the knit-along – which is March 26th.

More Mitten Patterns Using Rauma Wool

Here are more mittens (and a couple fingerless mitts) I’ve had my eye on which use Rauma yarn, or similar. If my first pair of colorwork mittens come out okay I may go for it and knit all of these. If it ever snows in Florida, I will be ready…!

  • Snovotter, by Skeindeer Knits (snowflakes) Fingering
  • Winterland / Vinterland by Wenche Roald (winter scene) Fingering
  • Marit, by Skeindeer Knits (big flowers) – DK yarn
  • Shine, by Sofia Kammeborn (not sure about yarn for this one)
  • Arthur Mitts, by Kristin Drysdale (fingerless)
  • Sionnach Mitts (Fox Face) by Nina Pommerenke – these are cute!! Fingering

If you want to join the knit-along, sign into Ravelry and find The Woolly Thistle group. The rules and such are listed in the forum. There will be prizes, and pattern discounts, but the fun is seeing what everyone makes, and trying to keep up with your knitting! Cast on days are February 13th and 14th.

Thoughts About This Mitten KAL

As time has passed, and I’ve browsed tons of mitten patterns, and read lots of forum posts, I began to doubt if I would participate in the KAL. Forums can be cliquey and in this case, I feel that there are loads of participants – so many that getting lost in the crowd is very possible.

However, knowing that many people, from all over the world, are casting on, and knitting mittens specifically, while I am too… is encouraging.

So Cast-on day was February 13th… see how it went. I amusing the maroon and blue, with white, for my mittens.

Rauma skeins
New wool yarn to add to my stash

I know that KAL’s are advertising disguised as camaraderie. Shops and yarn and patterns are mentioned in forums and on Instagram as hashtags abound. It’s all about sales in the end, but for a few weeks we can believe we are simply buddies, in the knitting trenches together, working to create a yarn keepsake.

In the end (fingers crossed) I will have a wearable pair of mittens.