Review of Knitting the Eva Cardigan

Cardigan knitting requires a little extra effort, but worth the effort for the Eva Cardigan by Petite Knit.

The Eva Cardigan is knit in a DK yarn and is a low v-neck with four buttons. It is a design by PetiteKnit (link to pattern below). I began to knit this – cast on – around the middle of September and finished the end of October. I found it to be a good pattern and love the sweater. Also, I learned some new things along the way.

I used a new yarn too. Sandnes Garn Peer Gynt, which is a DK, but really seems more like a worsted to me.

Although I have knit a few cardigans, none have had a shoulder construction like this one. I also had to watch a video to complete the buttonholes.

The Pattern and Yarn

The yarn is nice and I was very happy knitting with it. I bought mine at Wool & Company. It is made of Norwegian wool and the Peer Gynt is DK weight, but seems heavier. Wool and Company offers many colors, including heathers and tweed.

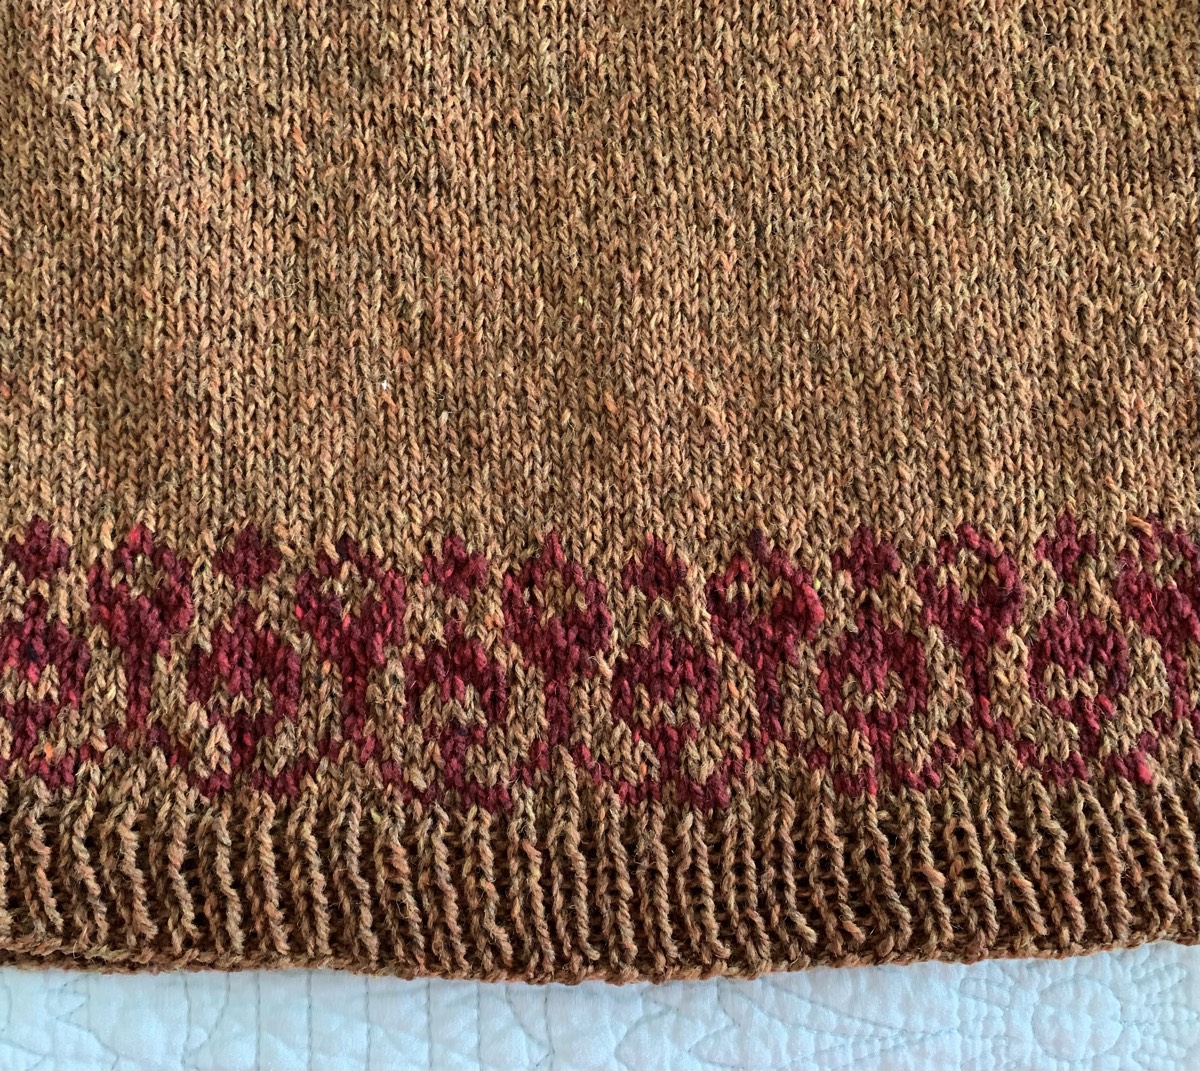
I bought 12 skeins of Sandnes Garn Peer Gynt yarn in color “Eucalyptus” green – per my daughter’s color request. I ended up with nearly two skeins leftover. But, better too much than not enough!

Peer Gynt yarn skeins leftover
Eva Cardigan leftover yarn

I knit a swatch with size 6US needles and it was a bit large. I don’t have many needles in size 5 (and then go down 2 sizes for the ribbing), so I chose to use the sixes (with size 4 for rib) and knit the extra-small size sweater. (Lots of various length needles are needed for this sweater in both the 4 and 6 sizes.)

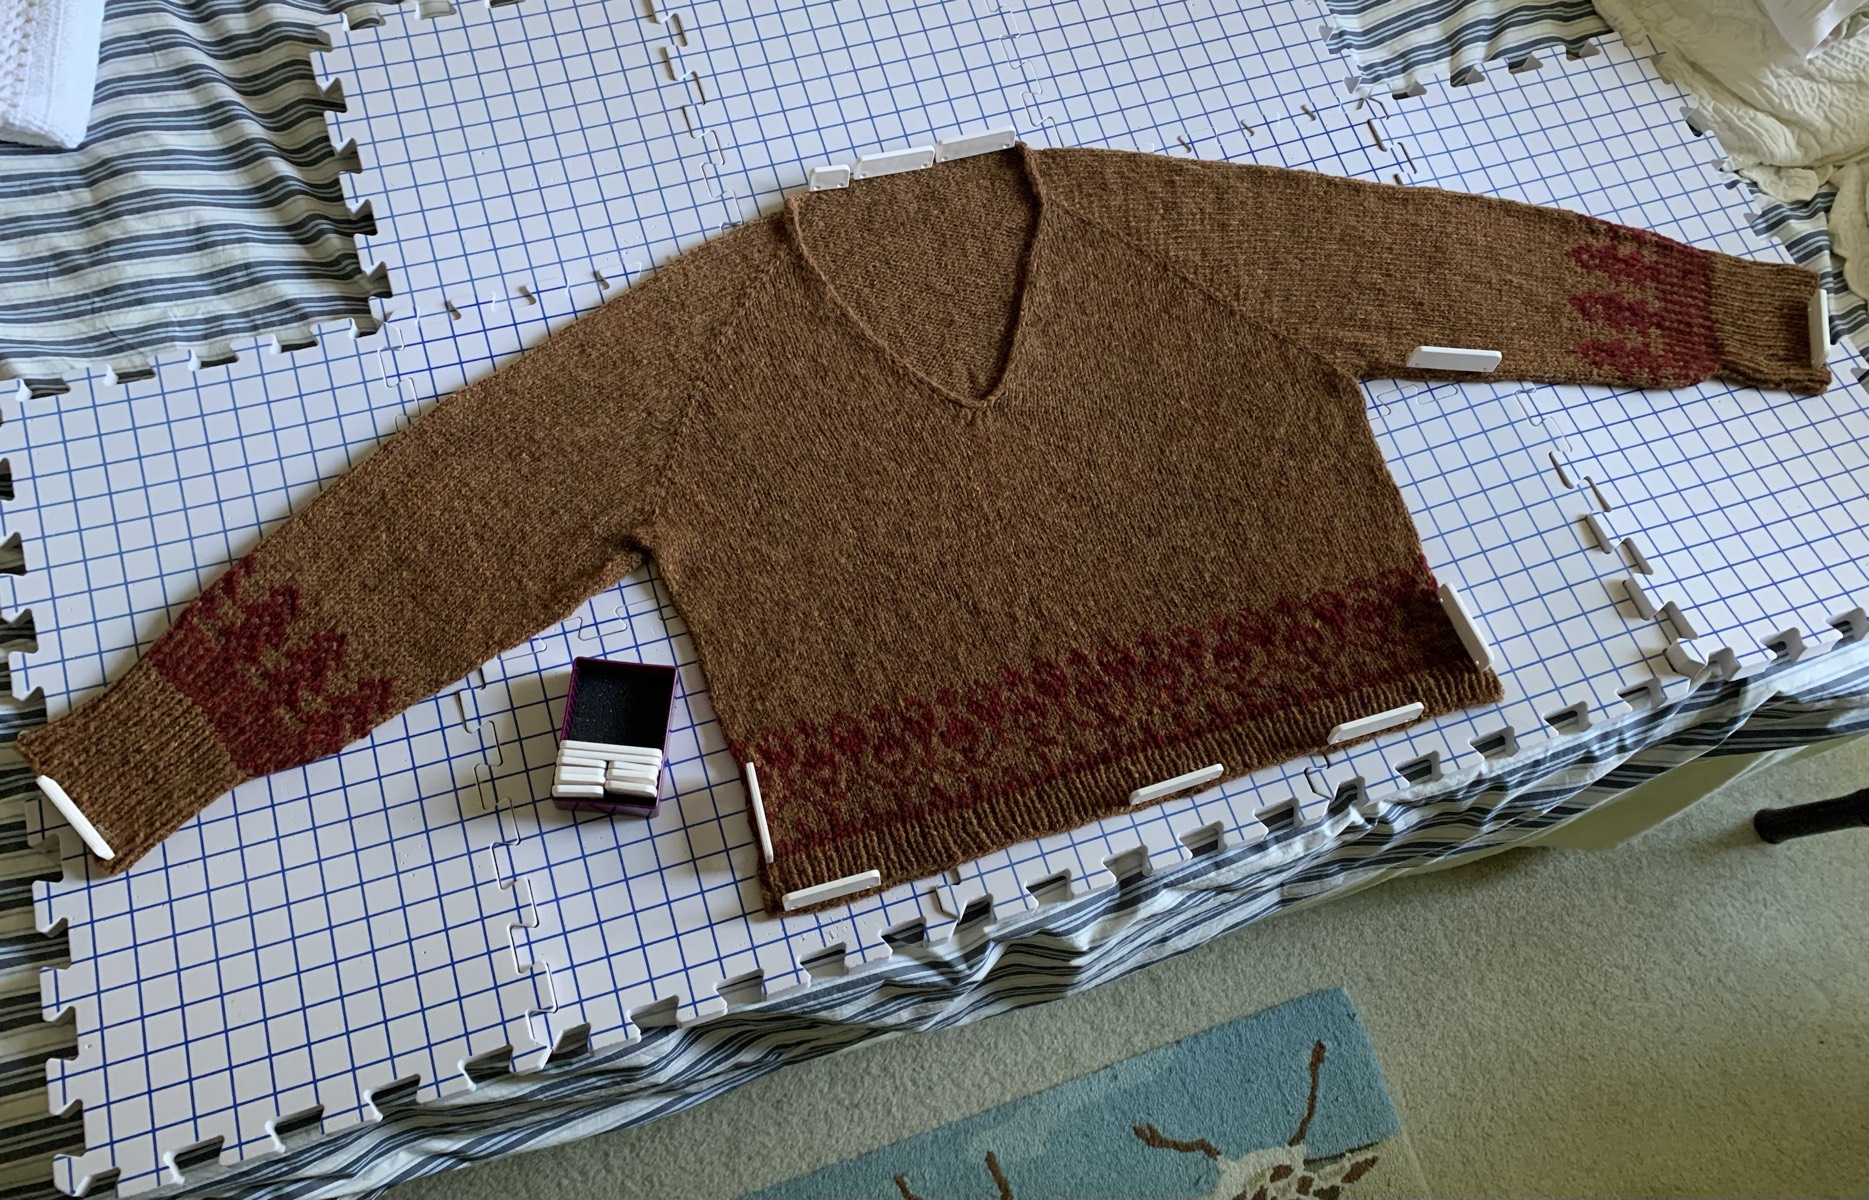
However, this cardigan is being knit for my daughter, who is tall and thin, and likes longish sleeves. I’ll be adding length to the body (end measurement is 23 inches) and especially the sleeves (18.5 inches).

Wool and Company notified me that only 10 skeins were matching dye lot numbers, so two would be off, but very similar. I took them anyway, and have used one of the odd dye lots to knit the body ribbed hem. I was saving the other for the button band – but never had to use it.

Hurdles During Knitting

After the initial neck knitting, stitches have to be picked up at each of the shoulders. I really didn’t know how to do this, so I used another needle to pick them up and then added those stitches to the main needle.

I think this may be called a “saddle shoulder”, but I’m not sure. The design idea is to keep the sweater from sliding off the shoulders – I think.

  • Eva cardigan sweater knitting
  • shoulder construction Eva Cardigan knitting pattern
  • knitting a sweater

Picking Up Stitches for Button Band

Picking up stitches for the button band is not at all my favorite thing to do when knitting! This always takes me hours. I love cardigans, but it’s one of the things I dislike about knitting them.

For this wide button band, which goes up one side, around the neck, and down the other, the total number of stitches picked up needed to be divisible by four in order to make the 2×2 ribbing. Also, while you’re at it, make sure both front sides have the same number of stitches.

At least the designer said to pick up 3 for every 4 stitches. I guess most knitters know this, but I appreciate the instructions. (This is something another designer didn’t bother to mention and my Carbeth cardigan is totally messed up because of it.)

I watched a helpful video by Cocoknits which advised to only do the picking up of stitches, and not “pick up and knit”. YES! Do this! Then, when your counts are off (be prepared to count and count and count), it is easy to remove the picked up stitches and fix the count, which I did… over and over. FINALLY.. I got everything worked out correctly.

How to Make the Buttonholes

The buttonhole directions in the pattern are a little confusing when it comes to doing the “double backward loop”. Many thanks to another knitter, who referenced the video below which shows how it’s done. I am not sure my purl 2 together through the back loop was done right, as it looked a little too loopy.

This YouTube video by Kimmie Mulkholm shows the buttonhole construction for the Eva Cardigan. It is not in English, but can be understood easily using CC or not.

In the End

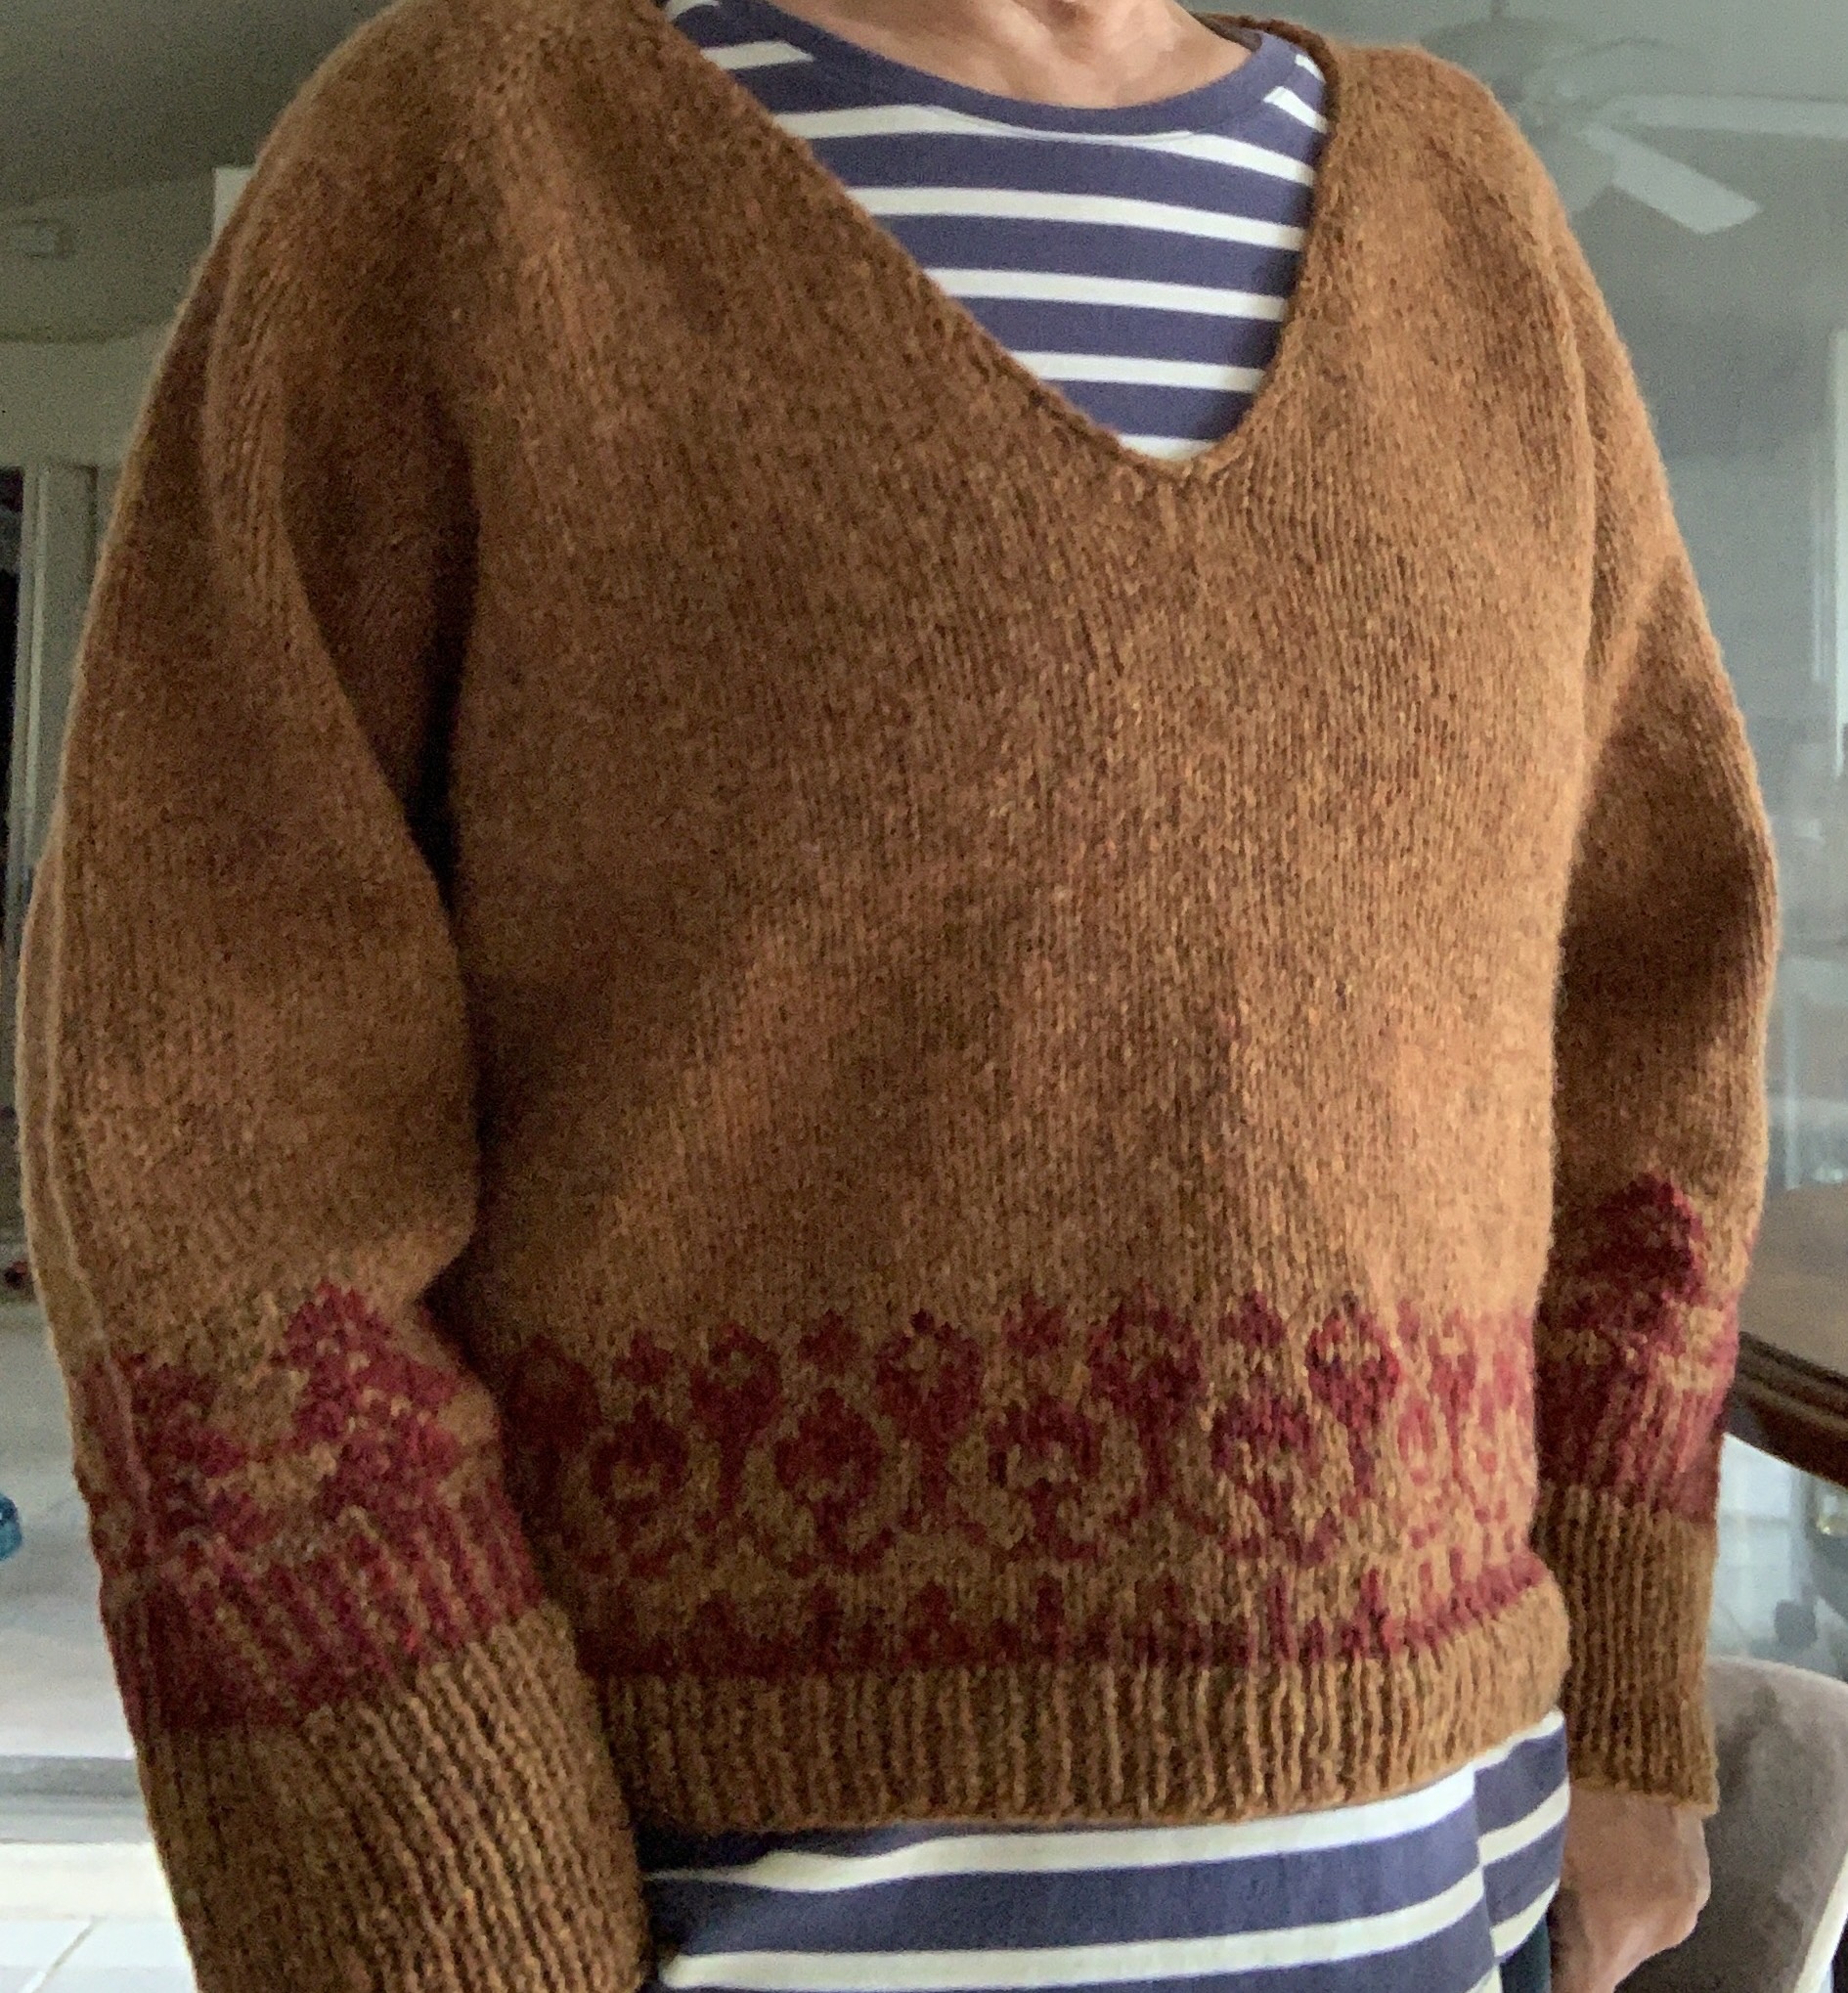
I have a pretty nice sweater now, which is a gift for my daughter. Since she lives in New England, it will get used a lot. It is currently being dried, on mats in a room with the dehumidifier running (necessary here in Florida), and then the buttons will be added.

This sweater seems quite big. Then again, my gauge was off. The shoulders and sleeves fit me just fine and I knit the XS size. I would like a wider body for myself so I’m not sure which size I’d choose to knit for myself.

  • hand knit cardigan
  • Eva Cardigan hand-knit sweater
  • Back of Eva Cardigan

As is usually true of hand knits, especially wool knits, the fabric smooths out and ends up looking incredibly good. I’m so pleased with the end product. I would knit it again – next time it will be for me!

Here is a little post about how I sewed on the buttons.

More Knitting Fun

Cumulus Blouse, My First V-Neck Sweater Knit

The reason I chose the Cumulus Blouse was the v-neck construction. I thought I would use a heavy yarn instead of the designer’s choice, but the pattern really wasn’t written for wool. I ended up with something a little different.

I’ve been dealing with being sick from Covid for about a month now (July 2022). Simple knitting is about all I’ve done while sitting in front of the television. Most days I couldn’t get off the couch and took a few naps off and on. I’ve been pretty miserable. I finished the Honey Cowl #3 and did a lot of round and round knitting on my orange watchcap. I even sat outside one morning and did a little knitting on the striped sweater which I eventually finished.

stranded knitting with red yarn
Knitting Cumulus

Now I am ready to begin a new sweater and I want a v-neck. My choice, in the end, was the Cumulus Blouse by PetiteKnit. I’ve been eyeing her sweaters on Instagram for a while now. They are very cute but she likes to knit holding two yarns together, and the Cumulus is no exception. It calls for two strands of Mohair type yarn held together and knit with a size 7 needle. I don’t plan to do that, so I have named my version the Cumulus Sweater.

Any time you must use two strands of yarn together in a sweater the cost of knitting that sweater doubles. Also, I am not a huge fan of Mohair fuzzies. I plan to use some Harrisville Highland wool I’ve had for a bit. Her little sweater is not something that would look good on my body either!

Cast-On Day

Today (July 6th) I did my cast-on and set up the raglan increases. The cast-on row ends up being the back of the neck area and then the increases are made to expand the shoulders and make the v-neck front. I’m not crazy about “make ones” and there are a lot of them in this pattern. Also, every other row is a purl row – so there’s that. That will change once the body is joined in the round.

Cumulus sweater in wool

I am also knitting from a cone for the first time. Cones generally save money because you get a lot of yarn for much less than a normal few skeins of yarn. I honestly can’t remember where I bought these cones, but I have two in this color as well as an extra normal skein. (I ended up using nearly all of both cones. Without using that red contrast color, I would have needed more than the cones to finish this sweater.)

I made a mistake right off the bat when the pattern said to set up the markers. I knit across the row to add ring markers when really I should have simply added attachable markers along the needles. So I had to purl back across and THEN begin the four row increases. Because of this, I have two extra rows of knitting.

Cumulus sweater beginning the knit

I’ve looked through the entire Cumulus Blouse pattern and the designer calls for an i-cord bind-off with decreases. And then the neckline is done in an i-cord, but without the decreases. This was confusing. She directs knitters to her website with a Petite Knit videos page and after searching, found the i-cord bind off under the section “Tips and Tricks”. Once I watched the video (which is not in English) I realized that the decrease part of the bind-off is the k3 together part, so that will be left out when doing the bind-off around the neck. Great, I’m all set! (Actually, I did this differently with fewer stitches because my yarn was heavy.)

I do not plan on doing an i-cord bind-off for my body and sleeve cuffs as my yarn is not mohair. A normal ribbing will work fine – going down a needle size to a 6.

I am ready to continue on with my new sweater knitting project.

Now that I have done most of the V part, I am re-checking my gauge. My gauge is good. Onward!

Cumulus v-neck sweater knitting
Knitting the body after separating the sleeves

I finished off the neckline before I finished knitting the sweater. Because my yarn is stiffer, I only did a cast-on of 2 for the i-cord bind off, and knit from there with a k1, k2togtbl. Now I could try the sweater on to see the v-neck, and it is low. For this type of sweater, it doesn’t matter as I would have a shirt on underneath.

I’m not real happy about my neckline. It is puckering a bit and there is a tiny hole that I had to close up in the end. That is all on me and my lack of skills.

Colorwork in red yarn (Brooklyn Tweed Shelter – color “Long Johns”) was added along the bottom of the body. I went up to a size 8 needle for that. Then, I did the ribbing in size 7, but I wish I had used a 6. I may go back and redo that ribbing. (I did.)

One sleeve is done. I only did a total of 7 decreases down the sleeve. Used a size 8 to work the trees, then decreased for five rows doing k1, k2tog (BOR) and SSK, k1 at end of round, while knitting one brown and one red around.

Both the flowers and trees patterns came from Fair Isle books I have.

With 60 stitches I began the ribbing using size 6 DPNs and made the cuff long enough to roll up.

Re-doing the body ribbing

I have finished knitting the Cumulus sweater but have decided to rip out the body ribbing. It will be done over using a size 6 needle (originally it was knit in a size 7). I ended up adding a bit more red before the ribbing.

So the Cumulus sweater was officially done on September 8th. It took me almost exactly 2 months to knit – between knitting on other projects along the way. It has been washed and is drying in the spare bedroom. Then I will get a photo of me wearing it.

The pattern was very easy to follow and straight forward to knit, but I did not do the bind-offs the same as the pattern directions. I also did not hold two light weight yarns together.

My sweater is quite roomy and comfy. If I ever did knit this pattern using the type of yarn suggested, I would knit the Medium size – one size smaller. My gauge was correct, and I checked it twice.

You can buy the Cumulus Blouse pattern from PetiteKnit on her Ravelry page. It is very pretty when knit in light weight yarn, and if you have the body for it – go for it!

V-neck sweater with colorwork in worsted wool
Done knitting, before the wash

January Photos


More Pattern Reviews and Stories From the Blog